![]()
When it came time to really define the face of Chevy Hardcore, our digital magazine that celebrates the classic era of Chevy musclecars, rebuilding an iconic nameplate for road racing was an obvious choice. When it comes to Chevrolet road racing in the 60s and 70s, nothing stands out more than the pony car designed to conquer the Trans Am series, the Chevrolet Camaro.
Blank Slate Tech Article Archive
![]() Not only are we providing a pretty comprehensive build diary for Blank Slate here, but we dive into tech details with full-length articles. Check them out below:
Not only are we providing a pretty comprehensive build diary for Blank Slate here, but we dive into tech details with full-length articles. Check them out below:
Chevy HardCore Project Garage: What’s Cookin’?
Blank Slate Project Update: How To Create an Autocross CamaroProject
Blank Slate Update: Mulling Over Paint Scheme Ideas
Project Blank Slate Update: Autocrossing Events We Should Attend
ATI’s New Super Damper in Action
How They’re Made: Forgeline Motorsports Wheels
LME’s 502ci 700+ hp LS Build Part 1: The Short Block
Project Blank Slate: Our ’69 Camaro Gets Chassisworks/Wilwood Brakes
Engine Build Part 2: Wrapping Up The RHS-Backed, 720HP LSX 502
Chris Alston Chassisworks Front Suspension Upgrade
Chris Alston Chassisworks 4-Bar Coil Over Rear Suspension Upgrade
Flaming River Steering Column InstallationOur Camaro’s Flowmaster and Vibrant Exhaust
Dwelling On Keeping Things Cool
Ordering A Custom Driveshaft Is Strange-ly Easy
Designing and Building a Street Performance Fuel System
Installing a Dry Sump Oil System
Project Blank Slate: Making Shocking Connections
Stop Rattling The Doors Off With OER Moldings
Blank Slate’s New Additions Include Harnesses, EZ-EFI And A Dyno Day
Project Blank Slate: LS EZ-EFI 2.0 Self-Learning EFI For LS Engines
On The Street And At The Track With Falken Azenis RT615K Tires
Video: Project Car Update For A Newly-Road-Tested Blank Slate
The Camaro Z28 package was purpose-built for the SCCA Trans Am road racing series, complete with a specially designed performance package. Finding a Gen 1 Camaro with the Z28 package that is affordable to our blue collar crew is nearly impossible. Car collectors cherish these particular examples of American performance machines.
Like many would-be project car builders, we broadened our search to include any late 60s Camaro.
Because the Camaro nameplate gained popularity so quickly within the first three years, 1969 became a record year in sales for Chevrolet’s value oriented sports car. It stood to reason that our best chances of finding a decent project car would fall into the 1969 model year.
Success came in the form of a basket-case project. Finding a bare bones Camaro SS that the owner was in process of converting into a Z28 clone before calling it quits in the beginning stages, our crew picked up the sad hulk for a decent price.
While the primer gray/faded white on Hugger orange clad beast wasn’t a true Z28, our crew felt obligated to complete the outside restoration as the previous owner had planned.
Our plans to make the exterior a Z28 clone was limited strictly to being skin-deep while hiding a few modern performance secrets under the sheet metal.
Drawing inspiration from the golden era of SCCA Trans-Am series road racing, we planned on some serious street machine upgrades for hardcore road racing and an occasional trip to the local burger stand looking for some Mustangs to eat.
Where do we begin? The car was a hulk when it arrived at the Power Automedia garage but we dove right in and began reworking the car into our vision of what we wanted.
This transformation began with a brain storming session on what direction we want to go in. Then we identified key elements that we needed to help us get there. We couldn’t help but daydream about what events we wanted to take the car to. Eventually we got down to the nuts and bolts of the project and discussed engine building and drivetrain.
We’re documenting everything that we do to the car in detail so you can follow along. While we will be delivering complete tech articles on each aspect of this build, we want to keep you up to date on some of the important milestones we’re passing every month. Bookmark this page – we’ll be updating as we go along, and putting in links to all the detailed stories.

Our project was a bare hulk, but we saw beauty in it. The plan was to pay tribute to the SCCA Trans Am Camaros on the outside, but beef up the suspension and drivetrain with modern technology.
Project Build Diary:
March 28, 2016: Video: Project Car Update For A Newly-Road-Tested Blank Slate
Building a performance car is all about the final results. Why would you build a car with some of the best parts available, and then not use those parts? For that reason, we took project Blank Slate to the Willow Springs road course to see how well all of the parts we chose for the build actually work together. It was good to get the car on an actual road course, and really stretch it’s legs. The day was a success, but you’ll need to watch the video to watch the car go around the track, and get the responses of the guys that pushed to it to its limits.


August 24, 2015: On The Street And At The Track With Falken Azenis RT615K Tires

When we heard that Hotchkis was hosting an autocross event at Auto Club Dragway in Fontana, California, as part of the NMCA West event series, we figured that was a great time to test our project car, and the new Falken tires we planned to run. As you’re likely aware, Hotchkis specializes in designing suspension components for both vintage and modern musclecars that transform straight-line street machines into genuine corner carvers, so the event’s musclecar-focused theme seemed like the perfect venue to put the car and the tires through their paces.
The tesing went well, and you can read all about it by checking out: On The Street And At The Track With Falken Azenis RT615K Tires
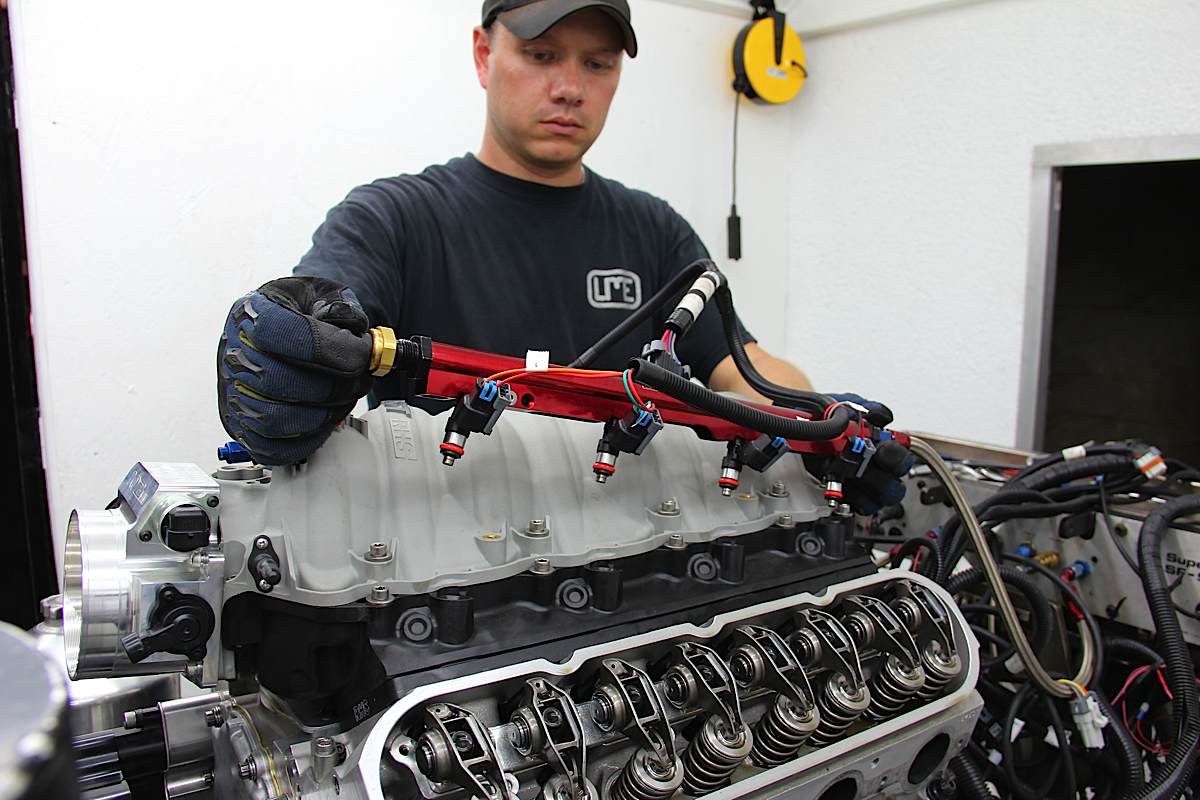
August 13, 2015: LS EZ-EFI 2.0 Self-Learning EFI For LS Engines

Our first-generation 1969 Camaro had a high-end engine built that was suitable for sustaining the abuse we plan to throw at it. Our friends at Late Model Engines (LME) from Houston, Texas, helped us by building a Texas-sized LS engine that promised big horsepower for the track. We covered that engine build in a two-part series of articles, LME’s 502ci 700+ hp LS Build Part 1: The Short-Block and Engine Build Part 2: Wrapping Up The RHS-Backed, 720 hp LSX 502.
At the time, we noted that LME used Fuel Air Spark Technology‘s (FAST) XFI 2.0 engine control system for tuning because it allows users to process, analyze, and adjust parameters more quickly. The results were about what we expected as the mill came off the dyno making a very potent 720.3 horsepower at 6,400 rpm and 669.6 lb-ft of torque at 5,300 rpm

LME pulled their FAST XFI system off of the engine and shipped the engine to our facility where we pondered what to do for a substantial fuel delivery system. The timing was perfect, as FAST was in the process of releasing their LS EZ-EFI 2.0 multi-port fuel injection kits that allow anyone to install a multi-port injection setup on small and big-block Chevy engines. Couple this with FAST’s LS Self Tuning Engine Control System (PN 30405-KIT) and you have a true install-and-forget system.
Read the full article at Project Blank Slate: LS EZ-EFI 2.0 Self-Learning EFI For LS Engines
May 15, 2015: New Additions Include Harnesses, EZ-EFI, And A Dyno Day
With our project in full swing, we sat down with shop manager Sean Goude to discuss the 1969 Chevy Camaro’s recent developments. According to Goude, a lot of progress has been made mechanically, and it shows through the dyno runs Blank Slate made in recent weeks.
Looking back, our last addition to Blank Slate was the OER door moldings, which keep Blank Slate sealed and free of any drag or resistance. The install was simple and straightforward, which gives us confidence leading up to the our next order of business: seat harnesses, a FAST EZ-EFI system, and a day on dyno for Blank Slate.
If you want to rad about how our dyno day went, you can check out the full article, Blank Slate’s New Additions Include Harnesses, EZ-EFI And A Dyno Day
February 4, 2015: Stop Rattling The Doors Off With OER Molding

By this time, we have Blank Slate far enough along in the build that it’s time to crank the engine over, break-in the drivetrain, and get some chassis dyno numbers. But, to make our project car roadworthy, we needed the rubber moldings all the way around to keep out water and the elements. We knew that OER had the original quality products that get the job done.
We’re lucky enough to have our own in-house Dynojet chassis dynomometer, but what we were not lucky enough to have was door and window molding and mounting clips. Putting the car on the dyno with no vibration-suppressing door molding would have caused the doors to vibrate and generate a racket that would have cleared the garage. No bueno.
Fortunately, we knew where to go to solve the issue. Classic Industries offers a full line of OER products that are manufactured to exact factory specifications and will fit and function just like the original part. The beauty of OER manufactured parts is that many of the products are officially licensed by the OE manufacturers. We decided to get a few of the molding and accessory items we needed to get the Camaro on the dyno, then on to the streets.
We ordered the F-Body weatherstrip kit (PN R5101), which includes the door frame weatherstrip for both doors, roof rail weatherstrip for both sides, trunk weatherstrip, all side window weatherstripping and felts, along with the vent glass vertical weatherstripping. This kit truly covers all of your cabin weatherstrip needs.
Read about the install at: Stop Rattling The Doors Off With OER Moldings
January 23, 2015: Procar Evolution Seat install
Seats are an essential component to any car. They keep the driver secure while driving, and of course provide safety. When it came time to install a pair of seats, we chose SCAT Enterprises’ PROCAR Evolution seats to install into our project car Blank Slate, a 1969 Chevrolet Camaro.
Not only are the seats comfortable and stylish, but they are a quality seat sold at an affordable price. All of PROCAR’S seats are designed for hot rods, Volkswagen, muscle cars, sport compacts and off-road vehicles.
The Evolution seats we purchased are priced at $401 per seat. Moreover, the ’69 Camaro seat adapters cost $72 each. The seats have a sporty design with defined lines. Each seat is TIG-welded to ensure heavy-duty strength and durability.

We chose the black vinyl finish for the Camaro. With suspension straps for support and comfort, the Evolution seats accommodate a 5-point harness and are also fully reclinable, forward and back.
In addition, the Evolution seats feature a carbon fiber inlay backing body design to endure the harshest road conditions.
You can read about the install by checking out the article: Procar Evolution Seat Install
January 13. 2015: Making Shocking Connections
In this installment, we made some shocking connections with Ron Francis Wiring, Classic Industries and Moroso. The full story on the electrical systems can be read here: Project Blank Slate: Making Shocking Connections.

Wires and connectors that can handle the amp load are essential in a good wiring job.
We had no wiring in the car and needed to step it up so we could actually start the car and make it run. Being the do-it-yourself type crew, we decided to give Classic Industries a call to seek their knowledge about wiring options and to see what they had available. From there we gave Ron Francis Wiring a call to get more information on a trunk-mounted battery cable kit. Lastly, we needed a battery box so we contacted Moroso.
Classic Industries has a very complete line of electrical harnesses that are direct replacement harnesses for Camaro builds. These harnesses are manufactured to exact specifications of original GM harnesses, so there’s no hassle trying to figure out which wire goes where. These stock-like wiring harnesses are the correct length, with correct connectors on them. A universal one would require us to use broken, worn-out connectors and have to cut all the wires to the correct length, eating up valuable time. Classic Industries gets two thumbs up for making this an easy choice.
Well thought out wiring harnesses have good color coding, cut-to-length and quality connectors that work with OE-style plugs.
December 15, 2014: Installing a Dry Sump Oil System, Coil Relocation Harness, and Wiring Harnesses For Shocking Connections
Aviaid’s dry sump oil system includes an aluminum external oil sump that can be located practically anywhere in the chassis.
Prepping a vintage Camaro for autocrossing means the relocation of components and shifting weight around where you need it. We decided to get a little tricky and put the engine weight a little lower in the engine bay, but not sacrifice our supply of oil in the sump. After all, we have a nice engine and don’t want to see it get hurt.
The solution? An Aviaid dry sump oil system! Aviaid’s low profile oil pan will help with getting the engine lower in the chassis while the Aviaid oil sump will provide plenty of life supporting oil to the engine. Lowering the engine and chassis has the overt advantage of a lower vehicle center of gravity, but there can also be a major advantage in aerodynamics as well, and we plan on taking full advantage of that.
For many enthusiasts, the thought of adding extra components, like a dry sump oil system, means increased weight and complexity to the oil system. We show that the Aviaid system is a simple install, no complex plumbing or increased weight to worry about. Despite those concerns, the cost and installation expertise is a small price to pay for the huge benefits of a dry sump oil system.
Aviaid’s low profile LS oil pan allowed us to lower the engine in the project car’s engine bay.
We opted for Aviaid’s 7.5-inch X 19-inch diameter dry sump tank kit (Part #110-57530) that comes with a 3-gallon capacity aluminum dry sump tank with brackets, fitting and an extra baffle. Then we added Aviad’s LS-D oil pump system (Part #001-14122-10) which is designed for all-out competition. We capped it off with Aviaid’s LS, 5-port, billet, dry sump oil pan (Part #152-52505) that gave us low profile and some options for future upgrades.
When it came to the hoses and fittings, we selected Earl’s. Armed with 12-feet of Earl’s Pro-Lite 350 AN-12 hose (part #352012ERL), 20-feet of Earl’s Pro-Lite 350 AN-10 hose (part #352010ERL) and several Earl’s AN-10 and AN-12 fittings, we plumbed our system. For a final touch to the oil system, we added Derale Performance‘s dry sump oil cooler kit (part #15451) to keep things cool.
We opted to install a Darale oil cooler to help protect the engine.
You can read about the full installation of the Aviaid dry sump oil system here: Installing-an-aviaid-dry-sump-oil-system-in-a-first-gen-camaro
September 18, 2014: Designing and Building a Street Performance Fuel System
A stainless steel tank with internal baffles and electrical sending unit from Rick’s Tanks was our starting point.
When it comes to fuel systems, you don’t need the biggest pump, or the most expensive components. If you take the time to do some homework and figure out what your fuel system requirements are and buy proven quality components, you will be eliminating future problems. Nothing says professional like consistent and reliable performance!
Most fuel system failures are a result of poor system design or installation by installer and not the result of poor manufacturing. Understanding that pressure and volume are not the same thing is critical when designing your system and the components must work together or one of them might make the other components fail prematurely.
We also selected a twin fuel pump from Holley, along with a pre-filter and post filter.
Because we’ve added a beefier engine under the hood of our classic Camaro, we needed to make some major changes in our fuel system. We got with Hector Guerrero at Rick’s Tanks in El Paso, Texas. Hector gave us a first class education on fuel tanks then guided us in picking out the right fuel tank for our needs.
We connected all of the fuel system component with lines and fittings from Earl’s Performance Plumbing.
We selected Rick’s stainless steel tank designed for 1969 GM F-Body Camaros (part #SSF69SU), with 0-90 Ohms sending unit. This is a well built tank that will fit and work like an OE tank in our project Camaro, while preventing any interruption in the flow of fuel. Along with a tank and pickup from Rick’s Stainless Tanks, we’ve decided to use an electric fuel pump and plumbing from Holley and Earl’s Performance Plumbing.
To get the whole story on our fuel system upgrade, click here. Stay tuned as we continue to upgrade our Project Blank Slate Camaro with a performance EFI system and other goodies in the next few weeks.
August 29, 2014: Ordering a Driveshaft For Our Car
While there is a lot to a simple driveshaft, ordering a custom made driveshaft is not that difficult.
With the majority of the driveline complete, from wheels to motor and transmission and rearend, all we needed was a driveshaft to hook it all together. Now that it was time to actually get power to the ground, we evaluated our driveshaft needs.
Our clip had been replaced and we made a few component changes from the stock engine and transmission, which means we would need a custom driveshaft for a perfect fit. Fearing ordering the wrong size driveshaft, we enlisted the help of Strange Engineering to help us determine what type and length of driveshaft we actually required.
It’s actually not as complicated as it may seem initially. The crew at Strange Engineering have made this process strange-ly easy.
After talking to the folks at Strange, they sent us a driveshaft order form, which covers all the required dimensions. These dimensions are easy to measure with a basic tape measure. To start we made sure the car was sitting on the ground with weight on the tires. Then we measured from the transmission output shaft seal to the middle of the yoke on the rearend. A few other measurements, such as the yoke size on the rearend and we were done. But wait! There was more.
The Strange crew had a few more questions: “How heavy is the car? How much horsepower? How much RPM will the motor spin?” All these are factors needed, along with the measurements, in order to get the right shaft for the job.
With your measurements and car specifications, Strange will build the correct driveshaft for your application. We asked what goes into a driveshaft and the Strange crew explained the most important factor is what’s called “critical speed.” This is when a driveshaft starts to lose its shape and ultimately fails. That seemed pretty important to us.
We got exactly what we needed the first shot. A true bolt on part if there ever was one!
To read about the process of ordering a custom Strange Engineering driveshaft, click here.
June 6, 2014: AFCO Radiator, Aluminum Shroud and Electric Fan Combo.
We called our “cool” friends at AFCO Racing Products to help us design a great cooling system for our project car.
Deciding not to become another roadside victim to engine overheating in the desert of Southern California, we called the “cool” experts at AFCO Racing Products.
Our eduction began with understanding what causes heat which lead to designing a cooling system that could handle all the mechanical power that our combustion process would be making.
In layman’s terms, removing waste heat and keeping the engine cool.
After talking with AFCO Racing, we found out what was needed to maintaining a good temperature and not spill coolant all over the ground. First, all engines need cooling to operate. An over-heating engine is one that has a compromised power output and a short life.
Second, a well designed engine cooling system will remove heat quickly to keep temperatures low enough to make the engine survive. This means that you have to understand that there is a specific number of cooling fins per square inch that each application requires for maximum efficiency.
Not all electric fans are created equal. AFCO Racing has one specifically built to their specifications.
Designing an efficient radiator is more than just cramming in as much radiator core that is physically possible in the space; maintaining high airflow within that core capacity is a key to superior cooling.
The folks at AFCO got us hooked up with AFCO’s aluminum radiator (Part #84251-S-DS-N) combined with the accompanying aluminum shroud with dual electric fans (Part #84251-F-DS-N) which make for a very efficient cooling system that stands up to the many demands of modern combustion techniques.
You can read about the components, other considerations and the full cooling system installation here.
Not only does it work well, it looks great and fits like a glove.
May 28, 2014: Exhaust Performance Using Flowmaster and Vibrant Performance
Things started to get interesting when we began to realize how little space we had under the car, not to mention, how much noise our 502 ci LS engine makes. Not that we are opposed to starting car alarms when we drive by, but the five-O in SoCal seem to look for reasons to pull classic muscle cars over. Using Chris Alston Chassisworks’ front and rear suspension to lower our center of gravity and roll center were great for road racing, and that suited our purposes perfectly. However, fitting an exhaust system under the beast was going to be a chore, and an aftermarket off-the-shelf kit was not going to cut it.
After kicking over some stones we found the perfect solution. Flowmaster and Vibrant Performance make products that are designed specifically for low profile, high performance vehicles. Flowmaster’s low profile muffler designed for Nationwide Series racecars fit our space requirements pleasantly. To make matters even more attractive, Vibrant Performance makes low profile 16-gauge oval tubing that helps with ground clearance. They also offer a round tubing to oval tubing connector. That solves our clearance issues.
We TIG welded two of the mufflers together at the end seam to make our exhaust note a little more “street-friendly.”
Race mufflers are designed for performance, not sound reduction, which doesn’t make NASCAR race mufflers very street-friendly, yet we managed to solve the issue by welding two of the race mufflers together. We used the Vibrant Performance tubing to route the exhaust to the rocker panel where it exits the Camaro, just like the traditional SCCA Camaros in the Trans-Am racing days.
We ended up with a very modern custom exhaust system that has a SCCA retro look and traditional appeal it.
To see how we built our exhaust system for our project car Blank Slate, click here.
May 2, 2014: Getting Direction with Flaming River Steering
The recent upgrades from Chris Alston Chasssisworks’ suspension and a beefy 502 ci LS-based engine made us want to get a better grip on our handling. The stock steering column simply was not going to be good enough.
Flaming River’s tilt steering column kit for 67-69 Camaros.
In addition to needing a steering column that we could hang onto during hard cornering, we wanted a brand new column that didn’t have worn out bearings and slop in the steering wheel.
After we talked to our friends at Flaming River Industries, we found out that we could have all that and a steering column that could bolt in as well as connect to the factory dash and dash wiring harness.
Old versus new.
Flaming River’s John Jennings got us steered in the right direction for a, “straight forward, easy, requiring-no-fabrication installation.” We ordered up a brand new tilt column from Flaming River along with a Double-D shaft and U-joints. Because we used an aftermarket rack and pinion, we had to use the U-joints and Double-D shaft to make the connection. We did have to cut the shaft to get the perfect fit.
We feel a lot more confident with a new steering column from Flaming River Industries than the worn out stock unit.
The entire installation took less than an afternoon, which included removing the old steering column, harness, and cover plate. Installing the new steering column was simply a matter of reversing the procedure. For a precision upgrade, nothing could be simpler. We didn’t have to connect the wire harness because our plans include wiring the entire car in the near future.
We are awaiting the steering wheel, but we tested the Flaming River column–the tilt mechanism and turn signal switches worked flawlessly.
To see the full installation, you can view it here.
September 13, 2013: Upgrading to a Four-Bar Coil Over Rear Suspension
We desperately needed to balance out our suspension after upgrading the Camaro’s front end with Chris Alston Chassisworks’ Bolt-on g-Machine front clip kit. We enlisted the old Pro-Touring professional to help us with a great suspension that we could assemble quickly and get top notch results with throughout the life of the car.

Chassisworks’ 4-Bar coil over conversion.
Alston assured us that the Chassisworks’ g-Link canted 4-Bar coil over rear suspension conversion kit (part #5804-F10) was just the thing for do-it-yourselfers like us.
The parts were all manufactured by Chassisworks in the facility, and were easy to use because they are all manufactured to exact specification, with much tighter tolerances than GM factory limits. Every part was a true bolt-on piece with nothing to clearance or “make fit.”
Add some mini tubs to The 4-Bar suspension for a little extra tire width and now you have a real Pro Touring, road hugging suspension.
Knowing that we wanted to run with some bigger tires, we opted to add the mini-tub kit (Part #5913-F10) as part of our upgrade. It was a no-brainer to combine the adjustability of the four-link kit with wider tires.
Some simple prep to the frame rails and we were off and running. While the kit can be assembled with the car on jackstands, we used our two-post lift and recommend this back-saving method to anyone considering this upgrade.
There was some welding required, but the rest of the installation was performed using common hand tools.
The rearend was completed with Chassisworks’ direct fit FAB9 rearend housing with Strange Engineering internals (Part #84F10-801)
The adjustability of a 4-Bar suspension in an early model Camaro!
Upgrading from the old stock Camaro rear suspension meant that we didn’t have any trade-offs in durability or ride quality. Not only did we improve the quality and durability, but we managed to save a pile of weight in the upgrade.
You can read about the entire upgrade here.
September 3, 2013: Fabricating New Engine Mounts
Things don’t always line up exactly the way you expect them to, especially when you try to shoe horn as much good stuff as possible under the hood. That’s what happened when we got a little aggressive with our ’69 Camaro project car. Our 502 ci LS engine is a work of art and designed specifically for our road racing plans – complete with a dry sump oil system.
After talking with John Schwarz, owner of Avaid, their one-piece, we opted to get their Billet Aviaid dry sump oil pan. It’s good to note, since we’re running a 4.600-inch stroker crank, it was also necessary to run a 3/8-inch spacer between the block and oil pan to give us the clearance needed. Speaking of clearance, Aviaid’s four stage externally mounted dry sump pump requires some additional space when used with this engine combination.
We found that our engine mounts would only mount on the opposite side because of our external oil pump clearance and the off-set of the mounts. This caused problems with header clearance and engine position.


We fabricated our own engine mounts to solve the problem. The key to getting it correct is making templates that represent the final product. We started with a standard bushing kit and cut the rest of our mount out of 3/16-inch steel plate.
So, what do you do when you have a fully functional fabrication shop and need a custom engine mount? You make it, of course.


Using our Lincoln Electric Plasma Cutter to cut the parts out of the steel plate, our shop hands smoothed the rough edges and prepped for welding.
Our shop dogs used 3/16″ plate steel, a plasma cutter and our Lincoln Electric TIG welder to create our own engine mount. The key to getting it right lies in making an accurate template of the pieces you need to fabricate the mount. We took advantage of the custom fabrication to make a beefier engine mount that incorporated the three mounting bosses on the side of the engine block instead of the forward two that the previous engine mount relied on for mounting.


Once the pieces were sanded smooth, we test fit the parts and worked each curve until it was a snug fit. We tack welded the mounts to the bushing and tack welded the assembly together.
Once the templates were made and the parts were cut out of the plate steel, our shop dogs TIG welded the pieces together, giving plenty of space to the bushing mounts so that the rubber bushings were not rubbing on the weld and deteriorating with each vibration.
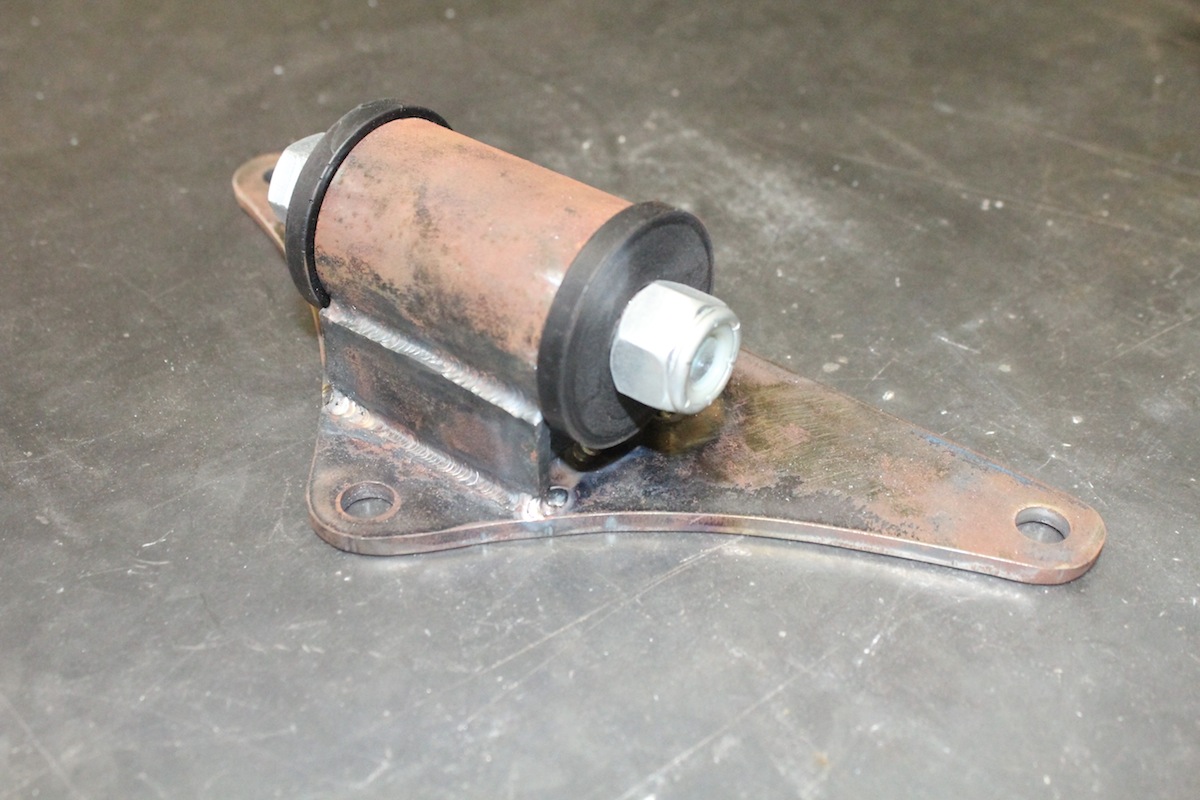
The finished product is ready for a little corrosion prevention treatment, a coating then installation. Problem solved!
We will be reinstalling our 720 hp engine, along with the newly fabricated engine mounts, once they get a little corrosion treatment and prevention work done.
July 1, 2013: Chris Alston Chassisworks Front Suspension Upgrade
We knew that a chassis upgrade was going to be required to keep our 44 year old unibody frame from flexing too much. Chassis expert Chris Alston was there to help us figure out what we needed. Alston’s Chassisworks offers several different packages for the classic muscle cars that were designed with bolt-on front clips. Our goal with this task was to add a new clip and front suspension to our vintage vehicle while taking advantage of modern technology for performance on the street.
We ended up overhauling the complete front end with Chris Alston Chassisworks Bolt-on g-Machine front clip kit for 1967-1969 Camaros and Firebirds. A fully loaded kit with many different options, we ended up changing everything on the front clip of our project car. The kit includes the g-Machine bolt-on subframe (Part #7701), Camaro body bushings (available in billet or urethane), subframe g-Connectors (Part #5601-20), g-Connector center support (Part #5601-32), a driveshaft safety loop (Part #TCP-DSL-01), side motor mounts (available in LS, SB, BB or V6 style), a transmission crossmember (Part #7951-5916F10002), g-Machine headers (available for SB or BB), rack & pinion steering (available in manual or power), steering column components (for manual or power), tie-rods (optional bumpsteer tie-rods available) and the choice of Street Machine A-arms or g-Machine A-arms.
Also rounding out the kit are billet balljoint covers with screw-in balljoints, a hearty anti-roll bar (Part #916155), g-Machine sculpted spindles (Part #916186), and VariShock coil-over shocks with VariSprings.
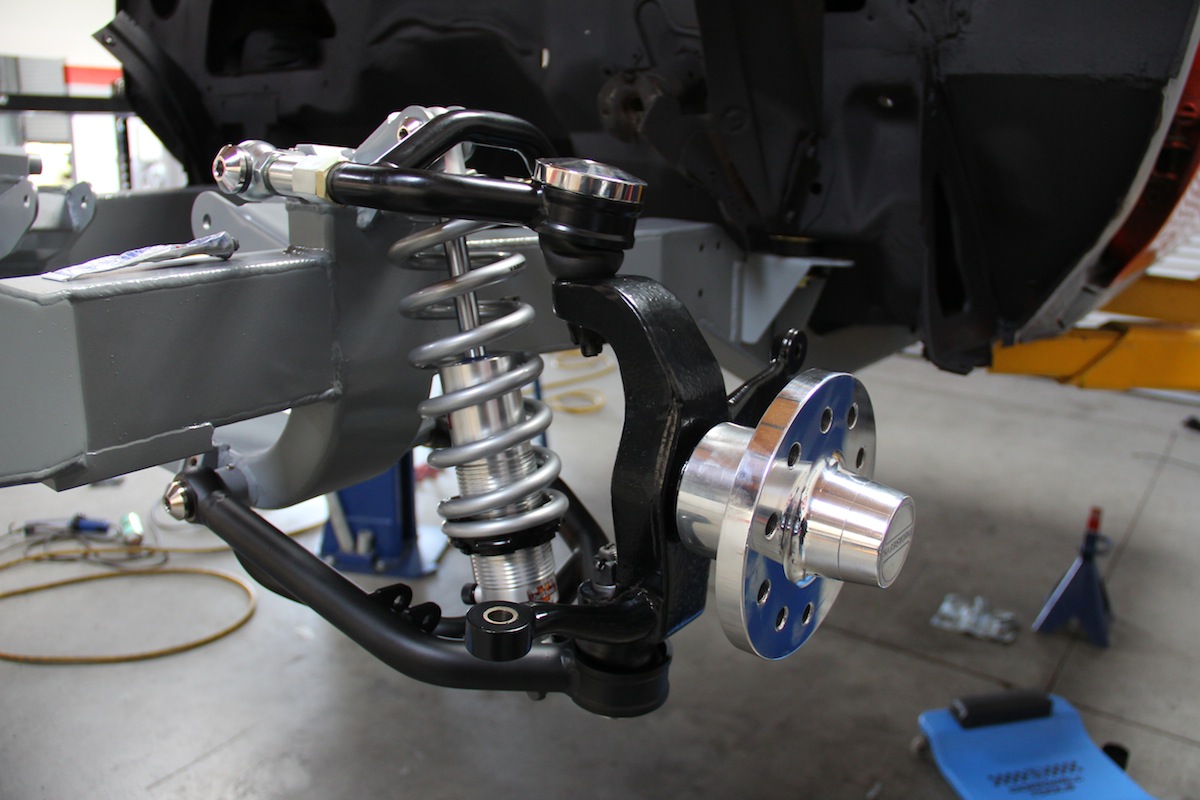
We documented the complete upgrade in the article titled: Blank Slate: Chris Alston Chassisworks Front Suspension Upgrade. With our new parts all bolted up, our editorial crew really can’t wait to get out there and put this modern classic to the test – stay tuned.
June 7, 2013: Wrapping up The RHS-Backed, 720HP LSX 502
We wrapped up our LME stroker mill in grand style by adding a bullet-proof top end to the short-block. The 502 cubic-inch foundation has a great history of reliability on the track and on the dyno, so it was an obvious choice. Picking the top end to mate with the proven performance block was a tad more difficult. There are so many great choices, even within RHS family lines. Because we were building this engine for the street, drivability was a key factor in all of our choices.
The 502 CID LSX engine build exemplifies the design criteria that was RHS set out for in their new LS block.
RHS aluminum LS7 cylinder heads are popular for their flow capabilities. RHS CNC-machined and equipped them for a hydraulic roller camshaft. Oversized Ferrea valves were also a part of the deal. The heavy breathing cylinder heads made it easy to mate up fast flowing intake manifold. We selected FAST’s 102mm LSXR manifold because of the low to mid torque range while carrying horsepower all the way through the upper powerband.
To see all the goodies and why we chose the components we did, check out the article titled: Engine Build Part 2: Wrapping Up The RHS-Backed, 720HP LSX 502.
March 21, 2013: Blank State Gets Stopping Power
The inspiration for our classic Camaro comes from SCCA Trans-Am racing of the late ’60s. Because we wanted to copy that level of road racing, it’s a given that you need top quality brakes to effectively scrub off speed to enter the corners later and exit faster.
To put the racer’s heart into our driveline, we selected Chassisworks/Wilwood brake set for our front and rear brakes. Chassisworks produces a kit specially designed and fabricated for the 1969 Camaro. The brake components are specifically selected to offer significant braking performance for cars that have significant power – just what we were looking for.
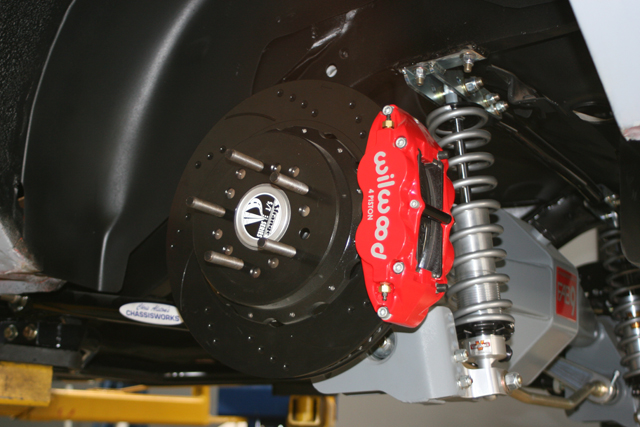
The expertise of Chassisworks paired with the quality of Wilwood make the the ultimate braking combo on our soon-to-be corner carver.
On the front we installed Chassisworks’ g-Street 14 Kit (Part # 8323) complete with 14-inch directional-vaned, slotted rotors, billet hats and hubs, caliper adapters,and optional red powdercoated six-piston calipers.
For the rear we chose a kit built for the weight transfer of road racing. The rear 12.19 Kit (Part # 140-7140-D) offers 12.19-inch vented rotors with parking brake, billet aluminum park brake/caliper bracket and optional red powdercoated four-piston caliper.
You can catch the full story on our brake install here: Project Blank Slate: Our ’69 Camaro Gets Chassisworks/Wilwood Brakes.
March 21, 2013: ACTing up with Advanced Clutch Technology’s Twin Disc Kit

Higher horsepower engines require higher horsepower drivetrains. A stronger clutch assembly is more than just adding a stronger pressure plate to the mix. Advanced Clutch Technology (ACT) defines the torque capacity of a clutch as depending on three parameters. Clamp load, surface area and the coefficient of friction all play a role in the strength of a clutch. Knowing that a traditional single disc clutch can hold up to 500 lb/ft reliably, a twin disc can double that amount and hold up to 850 lb-ft without a problem.
Switching to a twin disc clutch can mean tradeoffs in smoothness or pedal effort. ACT’s twin disc kits beef up the torque capacity without the tradeoffs of traditional twin disc upgrades. Looking for a stock-like pedal feel with smooth engagement, we wanted to upgrade to a clutch kit that would be satisfactory in street use but have SFI certification, surface area and clamping power suitable for road racing. After all, we planned on putting our Camaro out on the track.


Looking for a stock-like pedal feel with smooth engagement, we wanted to upgrade to a clutch kit that would be satisfactory in street use but have SFI certification. The ACT twin disc clutch kit filled that bill.
Our kit featured the 26 spline discs to mate with our T-56 TREMEC transmission. A robust 10.5-inch disc diameter provides the surface area needed for a higher torque engine and all the hardware needed to install the clutch kit. This was exactly what we were looking for to transfer power into motion!
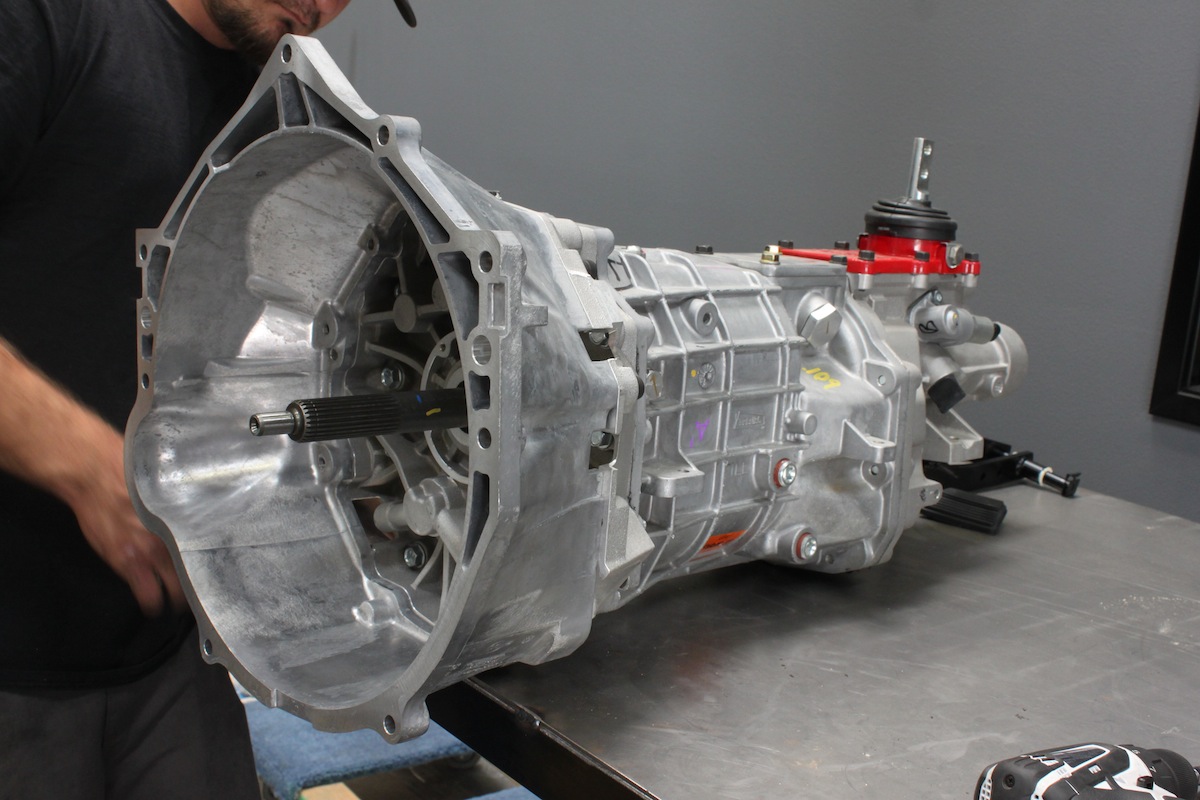 March 20, 2013: Adding a Tremec Trans to the Driveline
Our gearbox selection was based on the intended purpose of the project car. In Southern California, a slushbox automatic tranny is great for the traffic crowed freeways. For road racing and autocrossing however, a manual trans is the only way to fly.
We selected the TREMEC T56 6-speed manual to bolt behind our big inch LSX. The nice thing is, American Powertrain has worked out all of the specifics with an install package specifically designed for our swap.
The TREMEC T-56 The transmission uses a hydraulic clutch and the entire case, including the bell housing, is made of aluminum. Equipped with a synchromesh made up of brass synchros for GM and Ford applications, the transmission also features internal stops which render stopbolts on the shifter mechanism unnecessary.


TREMEC's T-56 required very little setup in preparation for the install.
What’s not to like about a lightweight gearbox that is rugged enough to handle the rapid gear slamming on a road course and still deliver highway speeds with six gears? Read the full article here: Project Blank Slate: Our ’69 Camaro Gets A Tranny And Clutch.
March 19, 2013: Bolting in the Muscle
Bryan Neelen and his crew at LME put together a mill that would work well in a street car but could also car up some corners in a road race capacity. A broad power curve with the ability to spin 6,500 rpm was our goal.
Highlighting our LME LSX engine is an RHS Aluminum LSX block, Lunati Crankshaft and Connecting Rods with Wiseco custom pistons and Total Seal piston rings. COMP Cams joined the party with a custom grind camshaft and LME topped it off by including an ARP 12 point engine bolt kit for LSX engines.


Our Shop dawgs got to work bolting the new mill into the engine bay.
For extra street cred and big power, LME added set of heavy-breathing RHS aluminum LS7 cylinder heads with oversized, Ferrera valves (2.20/1.61-inch intake/exhaust valves) and 69cc chambers. Matched it with a FAST 102mm LSXR manifold to maximize low- and mid-range torque and we were thinking about setting some records.


While the LME big inch LSX can be a plug and play unit, it would be some time before we would be able to play with it.
Our shop dawgs couldn’t wait to bolt the new muscle into the engine bay so we let them plug it in but it would be some time before we actually got to play with it.
February 26, 2013: Brute LSX Muscle and 502 Cubic Inches. The Short Block Build

The foundation of our engine build. RHS’s tall deck LSX engine block.
The first basic question that any project build has to deal with is: Show or GO? Where do you put your resources first? If you want something nice to look at and want to risk scratching a nice paint job, you work on the exterior first. If you want a project car that looks like hell but sounds like a jet fighter, you do what we did and order a 502 LSX engine from Late Model Engines.

Our beast on the dyno at LME.
Planning an engine build is one of the most detail-oriented projects in the entire build. With a market that has performance parts for everything under the sun, getting the right combination of engine parts can be challenging. We rounded up the ultimate “think-tank” and worked with LME to plan out a package that was guaranteed to smoke some rubber.
The foundation of our short block build centered around RHS‘s 9.75-inch tall-deck aluminum block. RHS’s tall deck block with outside priority main oiling allows us the rod clearance for a 4.6-inch stroke and cut down the windage effects in the bottom end.
We have some other performance tricks in store for our big cube beast. A dry sump lubrication system, Lunati stroker crank and 6.3″ lightweight connecting rods topped off with Wiseco 11.5:1-compression pistons.
To gain an upper hand in the rev department, we went with a COMP Cams custom grind, hydraulic roller ‘stick with 254/266 degrees duration and 0.660/0.660-inch lift at 0.050 on a 114 LSA.
We’ve also gone with a set of COMP Cams short travel hydraulic race lifters that are purpose built for higher engine speeds.
ARP, Clevite, and Total Seal also feature prominent roles in our build. For engine management, we opted for the F.A.S.T. XFI unit. This combo promises an eye-popping 720 horses and 669 foot-pounds of torque at 5300 RPM.
READ THE FULL ARTICLE ON OUR SHORT BLOCK ENGINE BUILD HERE.
February 21, 2013: We Finally Get Rolling
 After months of making plans, discussing powerplant options, talking transmissions and chassis cures, we finally were rewarded with our first actual component installation. There’s nothing like a new part to energize a project build, and we hit the jackpot with a set of Forgeline wheels.
Traction is a touchy subject. Any racer can tell you that there’s only so much traction available at any given time, and when it runs out… it’s gone. Getting a grip on traction management goes a lot deeper than tires, shocks and chassis. Wheels also play a significant role in helping manage the traction available.
We worked with the technical team at Forgeline to determine the best combination for an autocrossing, road racing, Gen 1 Camaro. Serious thought was given to the braking options and chassis upgrades. It was almost as if we were reverse engineering the build from the wheels back to the engine.
We ended up with 18 x 12 inches wheels for the rear and 18 x 9.5 inches for the front. Looking for style as much as effectiveness, we selected the SC3C Concave style wheels for the muscular look to match the performance level of Forgeline’s custom made-to-order three-piece wheels.
Finally, we were rolling again. This time we were rolling along with quality.
READ THE FULL ARTICLE ON OUR FORGELINE WHEELS HERE.

The Forgeline custom made-to-order three-piece wheels re-energized our project and got us rolling again.

Our ATI damper and 6-inch dry sump pulley arrangement.
October 12, 2012: Getting Balanced with ATI’s Super Damper
A last minute upgrade to our monster LSX engine build called for ATI Performance Products‘ Super Damper. We wanted a damper that had the SFI 18.1 rating while reducing and eliminating torsional crankshaft vibrations. Putting our road racing Camaro on the autocross course was going to subject the engine to rapid acceleration and deceleration. The Super Damper is exactly what we needed in a high horsepower engine running at high RPMs to take corners at higher speeds.
The complete development of the engine package, along with the selection of ATI’s Super Damper will be presented in a future article at a later date. If you want to read about our inclusion of ATI’s Super Damper, READ THE FULL ARTICLE HERE.
June 28, 2011: Event Planning
Our Black Slate project car was still waiting for shop time so we did the next best thing… bench racing. We covered the bench racing session in our project car update: Autocrossing Events We Should Attend.
Dreaming of tackling the course at the Del Mar Nationals Goodguys Custom Car Show was double trouble for us. The event is held in the Spring and returns to Del Mar in the fall for the Fall Del Mar Nationals. At both of these events, three classes of vehicles are timed as they go through the autocross course. Because our Camaro is newer than 1955, we would participate in the Street Machine class. Certainly we could get our project car done in time to meet the fall deadline?

June, 2011: Finding Our Look
In June we found ourselves thinking about paint schemes for the Blank Slate project car. After all, we are working with a blank slate. Project update “Mulling Over Paint Scheme Ideas,” took us into the realm of race Camaros and professional autocross cars’ exterior looks.


While we waited on the shop crew to start on our project car, daydreams of paint schemes filled our thoughts.
It occurred to us that many of the well known Camaros used variations of the factory colors in a new original exterior paint scheme, while a few of the very best sported a single color where they would fit in with other plainly painted cars in the pits. The plain look deception was quickly dispelled when these cars took their turns dominating the autocross course.
In the end, we decided to wait before committing to a single paint scheme. We still didn’t know if sporting a “sleeper” type average exterior look or something a bit wilder would suit our Blank Slate, vintage Gen 1 Camaro.

May, 2011: Planning
Our build team was elbows deep in other project vehicle builds which allowed us to spend our time doing a little research on building a road race/autocross Camaro. Our project car update, “How To Create an Autocross Camaro,” examined the subject by interviewing the Pros like Steve Rupp and Mary Pozzi. We found out what makes Rupp’s “Bad Penny” ’67 Camaro and Optima’s “One Lap Camaro” the top performers in their field.

October 12, 2010: Taking Delivery and Deciphering What We Have
Our bare hulk project car rolled into the garage with little more than the previous owner’s story. We decided to take a closer look at the information available, which boiled down to the VIN tag and Cowl tag, to figure out what we could about this once proud Camaro.


Our hulk came stripped with tons of extra parts stuffed in the driver's compartment. Taking inventory of what we had to work with was step one.
Understanding where the car started would give us some ideas on where we wanted to go with this build.
Decoding the Vehicle Identification Number (VIN) was not a difficult task. Chevrolet kept pretty decent records in their Southern California assembly plants.

The Vehicle Identification Number (VIN) gave us some idea of the Camaro’s origin.
The first two digits in the VIN identified the chassis as being a Chevrolet Camaro (1= Chevrolet, 2= Camaro). The third digit lets us know that the original car came with an 8 cylinder engine. The 37 that is next in line tells us the body was a coupe and not the convertible with the number 9 signifying the chassis as a 1969 model. The letter L identifies the chassis as being assembled in the Los Angeles assembly plant with the final 6 digits representing the vehicle serial number.

Our project Blank Slate was pretty bare when it rolled into the shop. It gave us a good chance to see exactly what condition the unibody chassis was in.
The Camaro serial numbers in 1969 started at 500001 and continued sequentially. Our project car represented the 25,193 Camaro ordered and built in 1969. Considering that a total of 243,085 Camaros were assembled in 1969, we had a good feeling about getting one of the early ones.

Blank Slate’s cowl tag provided a few more hints about the car’s origins.
The Cowl Tag
More information was available from the cowl tag, which is located on the firewall in the engine compartment, on the driver’s side. We were able to identify that our project car began assembly on the 3rd week of February in 1969. The cowl tag also clued us in on the Ivory/Black interior with Hugger Orange exterior color codes. Sadly, we found out that our project car was a standard car with no extra options. It began life as a plain blank slate Camaro.


