
Hardcore Chevy fans recognize the first generation Bel Air series as the transition car, with an awkward look about it, that eventually led to the iconic second generation Bel Airs. Along with the oddball looks, the first gen Bel Airs were evolving mechanically, from pre-war technology toward modern parts. Gone were the torque-tubes and babbitt bearing engines–in their place was a more powerful drivetrain.

Currie started making these polished aluminum rearends in 1984 and they’ve made so many that it’s a signature piece for the street rod market. – Brian ShephardEven after the passage of several decades, these first-gen Bel Airs are still being used as platforms for increased power and modern technology. Such is the case with our project car, “Sucker Punch,” a ’54 Bel Air that we plan on bringing some boom to with a fully updated drivetrain.
Already equipped with a built 383ci mill, our future upgrades will include a transmission, clutch, and supercharger power adder. To handle all this power, we decided to rehabilitate the rearend and suspension by adding a custom Currie rearend with a Motive Gear ring and pinion set mounted to an Eaton Truetrac unit all supported to the chassis by Total Cost Involved’s new parabolic leaf spring rear suspension.
The Parts
California’s longtime rearend manufacturer Currie Enterprises has been producing a polished aluminum rearend that has become a staple with the street rod crowd. Currie’s Brian Shephard explains why this rearend is so popular, “Currie started making it in 1984 and they’ve made it so many years that it’s a classic now. It’s a signature piece for the street rod market.”
Currie Custom Rearend Package

- Currie aluminum housing (#CE-2011S)
- 9-Plus sportsman case (#CE-4026C)
- 9-Plus big bearing pinion support (#CE-4031)
- Pinion support set-up kit (#CE-8021LB)
- 1350 Series yoke (#CE-4044ND)
- 11-inch rear drum brake kit (#CE-6005A)
- Currie performance axle package (#CE-0012)
- GM style weld-on spring pads (#CE-0102)
- Third member assembly (#CE-0111)
- Polish housing upgrade (#CE-0111P)
- Rearend Assembled (#CE-0118)
He patriotically added, “People like that they can still buy it new and don’t have to go find one at a swap meet and restore it. They can still buy it brand new with all new parts totally made in the USA–which still means something to people.”
We opted for the custom polished aluminum rearend housing, selected a few options that are available on Currie’s online store webpage, and ended up with a very cost-effective performance rearend. “It’s a show rearend,” said Shephard. “It’s polished aluminum, it’s trick, it retains the strength of a 9-inch rearend while being a show quality part. I mean…it’s an affordable, bitchin’ rearend!”
Eaton, Motive Gear, And TCI Engineering Join In
Eaton’s Detroit Truetrac limited-slip differential has become well known for its ability to improve stability and handling. The units are smooth and quiet with no wearable parts, no routine maintenance, and an acknowledged cost effective unit overall. The Truetrac differential allows one wheel to spin faster or slower, as necessary, under normal operation. When a wheel loses traction, the differential transfers torque to the high-traction wheel until the opposite wheel exits the low traction situation. The differential then resumes normal operation as an open unit.
When it came to the Ring and Pinion gear set, Motive Gear was a solid choice for our combination. We have a pretty stout engine and plans to bolt a Hughes Performance T-400 slush box behind it. With the 27-inch tall tires and highway speeds of 70 mph (like we obey the speed limit), pushing a chassis that’s nearly 4,400 pounds, we were looking at 3.00:1 gears. Motive Gear’s #F890300 were the perfect fit for our street rod.
Looking to keep the rearend planted and eating up the traction pie, we decided that it would be smart to beef up our rear suspension at the same time. Total Cost Involved Engineering, manufacturers of a wide array of products for street rods, hot rods, and musclecars, recently released a new parabolic leaf spring suspension kit specifically for 1949 to 1954 Chevy cars (part#424-4610-00).
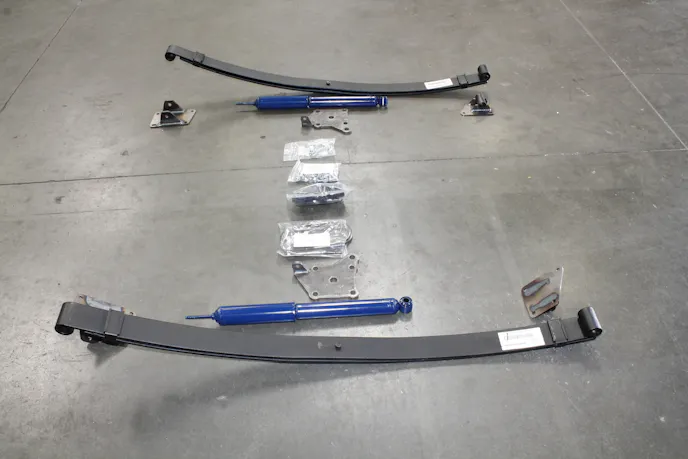
TCI Engineering’s Ben Bryce sold us on the rear suspension by saying, “This kit will provide your Bel Air with strength, 28-percent weight savings, better fuel mileage with less vehicle weight, and it won’t rob your street rod of performance.” We liked the idea of gaining performance and reducing 28-percent weight on our pig-heavy car. TCI Engineering’s leaf design in this kit is characterized by fewer leafs whose thickness varies from center to ends following a parabolic curve. In this leaf design, inter-leaf friction is unwanted, and therefore there is only contact between the springs at the ends and at the center where the axle is connected.
The Making Of A Currie Rearend
Hands down, the best part of the entire project was being invited to Currie Enterprises to watch the custom polished aluminum rearend being assembled. Taking advantage of the offer, we grabbed our camera and met Brian Shephard at the front door of Currie’s manufacturing facility in Corona, California as he unlocked the building. After a cup of coffee and a safety brief, we hit the factory floor to watch the process from start to finish.
When asked why street rodders would perform this upgrade, Shephard responded, “It’s a showpiece that still handles plenty of horsepower.” We asked what he meant by affordable showpiece. “A lot of guys are putting quick changes in, and a quick change is three times as much money. If a guy is just interested in having a shiny, bitchin’, and affordable rearend to put under his car with all the strength and benefits of having a 9-inch, then this is a reasonably compact package that still fits where a 9-inch housing normally will and where a quick change might not.”
We agree that about 85 percent of the guys that have quick changes in their cars aren’t using the quick change, they just want a polished aluminum piece under their car for the look. This rearend is geared to that market.
Housing Finish

- Housing Style: Currie polished
- End Type: 9+Torino large bearing
- Brackets: GM leaf spring
- Placement: 42.75-inch @ 3 degrees
- Housing Width: 55.05-inch
- Driver Tube: 17.612-inch
- Passenger Tube: 19.364-inch
- 11-inch drum brakes
- Tapered 31-spline axles
- 5 on 4.75-inch bolt pattern
- 7/16-inch studs
- 27.2740-inch Driver axle
- 31.6610-inch Passenger axle
Axle Tubes
The first stop we made was an area where the center section of the housing was being prepped for assembly. Shephard explained the polished aluminum housing’s popularity, “A lot of guys are shopping for a steel housing and see that this polished aluminum piece is only a few dollars more and they think that if it’s only that much more, it’s kinda cool, you know?”
We watched as expert hands cleaned the housing, measured three-inch diameter with .188-inch wall tubing, and custom cut the axle tubes for our assembly. “We use three-inch tubes because they are industry standard as far as bracketing is concerned. The entire street rod industry, as a whole, uses three-inch tubes and bracketry so that it’s adaptable for the street rod market,” said Shephard.
The crew took the freshly cut axle tubes to a metal lathe for the next stage. “The tubes are machined true on the ends so that they fit into the aluminum case. The case is etrued on a CNC machine and we machine the tube ends on a lathe so that they seal perfectly to each other.”
While the tubes are being machined on the metal lathe, the polished aluminum center section is placed into an oven and heated. Shephard explains this part of the process, “The aluminum casing is heated to 450-degrees in the oven to expand it. The axle tubes are RTVd and stuck in the casing. When the aluminum casing cools, the two perfectly machined surfaces are bound together so tight that it creates the perfect sealing surface.”
Welding
We followed the housing to the tack welding station where the technician inserted a bar through the axle tubes to line up the tube ends correctly. The bar centered perfectly through the axle tubes and a third member case jig for precise orientation. The bar also acted as a jig to line up the tube ends at the proper angle before tack welding in four spots to securely anchor the ends in place.
The assembly passed on to the welding station where the tack welded parts along with the leaf spring pads were completely MIG welded. We watched the process as Shephard pointed out key areas of the assembly. “You will notice that there is one thing that they are very critical about here. Cleaning,” he said. “Basically, there are two things that happen at every station. First, everyone is responsible for measuring the assembly. Then, everyone is responsible for cleaning it. Whatever you are doing to it, you measure it and you clean it. Then it goes to the next station where the next guy measures it and cleans it. This represents many, many, checkpoints of quality control.”
Currie’s welder finished the job of joining the tube ends on the tubes with flawless welds, then placed the leaf spring plates on the rearend housing at exactly 42.75-inches center to center at three degrees to create a perfect mounting place for the leaf springs. Once the welding was completed, the housing was moved to a steam cleaning machine where all the machining oils and other potential contaminates were removed.
Third Member
While the housing moved to the steam cleaner, simultaneous work began on the rearend’s third member. Currie’s longtime third member assembly pro, Ruben, had the parts laid out and ready to go. Ruben is a veteran of project builds for magazines with just about every current magazine that has done a Currie 9-inch rearend featuring Ruben’s hands and work.
Starting at the hydraulic press, the bearings were pressed on to Eaton’s Detroit Truetrac carrier. Using precision, hand-made press sleeves, seating the heavy duty carrier bearings on each side of the carrier is performed precisely and quickly.
Our Eaton Detroit Truetrac (Part #CE-5034) is a 31 spline, worm-gear style, posi traction unit that works well for any application – including our tricked up street rod – by managing the rear tire’s traction through it’s helical gear design.
With the bearings in place, the ring gear is installed on the differential carrier. The folks at Motive Gear are pretty clear on assembly. Their instructions state; “Careful attention should be given to blueprinting your differential. Accurate clearance will lead to a longer life for your unit. The same care and detail as used in engine assembly should be exercised.” We echo that statement, “Treat the internals of your rearend like the internals of your engine!”
Each of the 10 bolts that retain the ring gear are treated with a helping of thread locker, as are the bolt receptacle threads, then torqued into place in the typical cross-torque fashion. Then it was back over to the floor press where the inner pinion bearing was pressed onto the pinion gear shaft, followed by the pinion support and the outer pinion bearing. With the stack up completed, the pinion support seal was pressed into place and the pinion support was ready for the pinion yoke.
We used Currie’s 9-plus nodular iron pinion support (part #CE-4033N) that are manufactured out of 65,000 p.s.i. nodular iron, along with Currie’s 1350 9-plus yoke (part #CE-4044ND). The Motive Gear set we selected for our street rod is the 3.00:1 ratio 9-inch ring and pinion set (part #F890300) with 39 teeth on the ring gear and 13 on the pinion gear.

Gear Patterns And Backlash
With the carrier assembled and the pinion gear completely assembled on the pinion support, it was time to put the third member together completely and check the backlash of the gears. The pinion support assembly was installed into Currie’s 9-plus Nodular Sportsman case (part #CE-4026C). Shephard reminded us that the Nodular Sportsman case was “One-hundred percent new material cast out of 65,000 psi nodular iron that supports over 600 horsepower, yet only weighs a tick over 27-pounds.
Keeping with the principal of blueprinting your differential, Currie uses brand new pinion support bolts (part #CE-94031B), that are the correct flange head style, and are 3/8″-16 coarse thread x 1.200″ long, grade-8 bolts finished in yellow zinc plating. These bolts accurately clamp the pinion support to the case without the worry of the bolts backing out or failing.
The case is then flipped over and supported in a jig that allows the carrier to be installed in the carrier supports, with the caps torqued and carrier bearing side load adjusters. The carrier bearing side load must be set correctly to prevent the backlash of the gears to be too little or too much. Inadequate carrier bearing preload allows the carrier to move under a load – like a hard launch – which will cause the backlash to open up. The initial backlash can be checked with a dial indicator mounted to the housing with the plunger set to the ring gear teeth. By holding the pinion yoke and rotating the ring gear back and forth, you can measure the backlash of the gears. To decrease the backlash, move the carrier closer to the pinion centerline. To increase the backlash, move the carrier away from the pinion centerline.
Motive Gear also makes note of the fact that all ring gears and pinions have been “lapped” in sets and should never be mixed with another ring gear or pinion. Check to see that serial numbers are the same on the ring gear and pinion.

Gear pattern can be checked by coating five to seven teeth with a coat of gear marking compound in a couple different places on the ring gear. Rotate the ring gear about three or four revolutions so that a pattern can be seen. The pinion depth can be identified by the gear pattern’s position on the ring gear teeth.
Backlash affects the pattern between the heel and toe of the ring gear teeth. The contact pattern on the face of the ring gear indicates whether the pinion gear is too far away, or too close, to the ring gear – and shims will need to be added or removed to locate the pinion gear at the correct distance.
Ruben had us spot on the first time, which is why he is considered a professional.

Axles (Part #: CE-0012)
With the housing getting a final cleaning, and the all important third member being assembled, the Currie crew was hard at work on axles for the beast. “For this type application we have two types of axles; cut-to-fit pre-made axles, or custom machined axles,” said Shephard. “For this build we will use the cut-to-fit axles. They come with either Chevy or Ford bolt patterns and fit most aftermarket brake kits for almost all of the brake manufacturers.”
Shephard explained that most of the industry adheres to ABCS, “which stands for Aftermarket Brake Configuration Standard,” he explained. “This allows for manufacturers to plan for standard spacing of parts.” Because of the ABCS standards, most manufacturers can keep a supply of nearly finished parts on the shelf, like Currie’s cut-to-fit axles.
“Our cut-to-fit axles are the same quality, strength, and fit as our performance axles,” said Shephard. “These were 31-spline with Chevy bolt pattern, which are very common and we use a lot, so we have them on the shelf. We just pull them off the shelf and trim the end off for a “cut to fit.”
Final Installation
As with every station that the rearend housing moved to, a good cleaning and measuring was top of the list at the final assembly station. The axles were test fit after an alignment jig was placed in the center section. Satisfied with the test fitment, our technician applied a bead of RTV around the center section flange, along with a gasket topped with another long bead of RTV sealant. The third member was dropped in and torqued while the axles were at another station having the wheel studs and bearings pressed on.
The axles came back, with wheel studs and bearings, and were quickly slid into the housing. After a test to ensure fit, the 11-inch by 2 1/4-inch drum brakes and bearing retainers were installed. Shephard reminded us again that all the components in the entire assembly were “all new content, and made by Currie, in the US” With that, the rearend received a final wipe down, and was boxed and escorted out of the door.
Back At Home

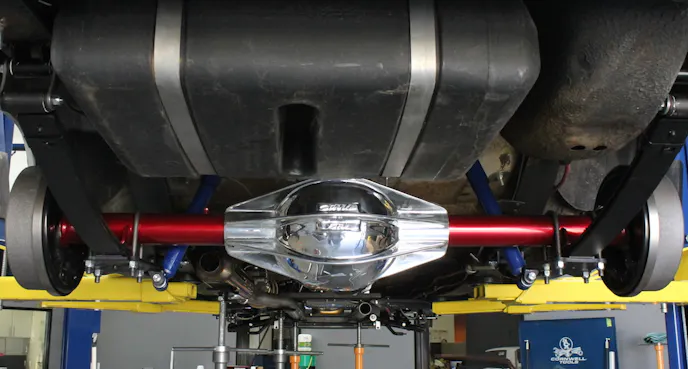
Arriving at our garage, the crew pounced on the new rearend, giving it a quick touch up paint job on the axle tubes. We have an idea of what the final paint color of the car will be, so we picked a complimentary color to highlight the rearend.
Our techs mounted the polished Currie rearend to the Bel Air’s chassis with Total Cost Involved Engineering’s new rear parabolic leaf spring suspension kit for 1949 – 1954 Chevy cars. The TCI Engineering crew tells us that their parabolic leaf spring design adds strength with 28-percent weight savings which directly translates into durability with better fuel milage with less vehicle weight. Add to this performance with Currie’s rearend performance and we’ve really beefed up our old classic.

“This leaf design is characterized by fewer leafs whose thickness varies from center to ends following a parabolic curve,” said TCI Engineering’s Jason Wilcox. “In this design, inter-leaf friction is unwanted, and therefore there is only contact between the springs at the ends and at the center where the axle is connected. The characteristic of the parabolic springs is a better ride quality and not being as stiff as conventional multi-leaf springs”.
Stay Tuned…
Our classic Chevy is slated to get some dramatic new additions and we will be covering them here. In addition to the TCI Engineering rear suspension, we will be adding a TCI Engineering front suspension for a full suspension upgrade and covering it in an article dedicated to those improvements. We will also be adding a Hughes Performance transmission and Edelbrock supercharger to the drivetrain. If it’s power you want to see… stay tuned for upcoming changes to this ultimate classic street rod.
You might also like
Classic Style, Modern Control: Art Morrison’s GT Sport Chassis For Early Chevys
Art Morrison's GT Sport chassis transforms the timeless 1949-54 Chevrolet into a serious restomod performer.

