
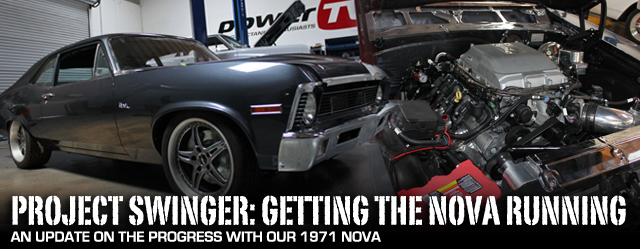
 Project Swinger is looking pretty darn good lately, and the Shop Dawgs have been plucking away at their ‘to do’ list when they aren’t busy busting knuckles on one of our other projects. The paint was applied last year by Z-Best Auto Body and Paint in Lake Elsinore, CA, and this ’71 Nova sure cleaned up nice – it’s hard to tell this is the same car we took in over five years ago!
With the body and paint completed, it was time for reassembly and that meant a host of goodies for Swinger to bring it back to life and to get it on the right track. Scanning through our check list, the reassembly is a long road that takes plenty of time and attention to detail to get this project looking better than it ever did. All the trim and interior needs to look just as great as the paint does, because you can’t just throw on polished-up 40-year-old trim. Nah, that’s not good enough for Swinger.


Classic Industries provides everything needed for the exterior and interior, and a Dakota Digital instrument cluster light's up the numbers when the key is turned.
We reached out to Classic Industries and they sent us a care package with all the exterior and interior trim to finish up the details, and a pair of Rally seats from Procar by Scat arrived as well. Dakota Digital gauges gave it a modern look in the instrumentation department, and what a clean installation that was. With a custom panel designed for the Nova, the Dakota Digital display is a nice touch to make Swinger stand out when gauges are lit up.
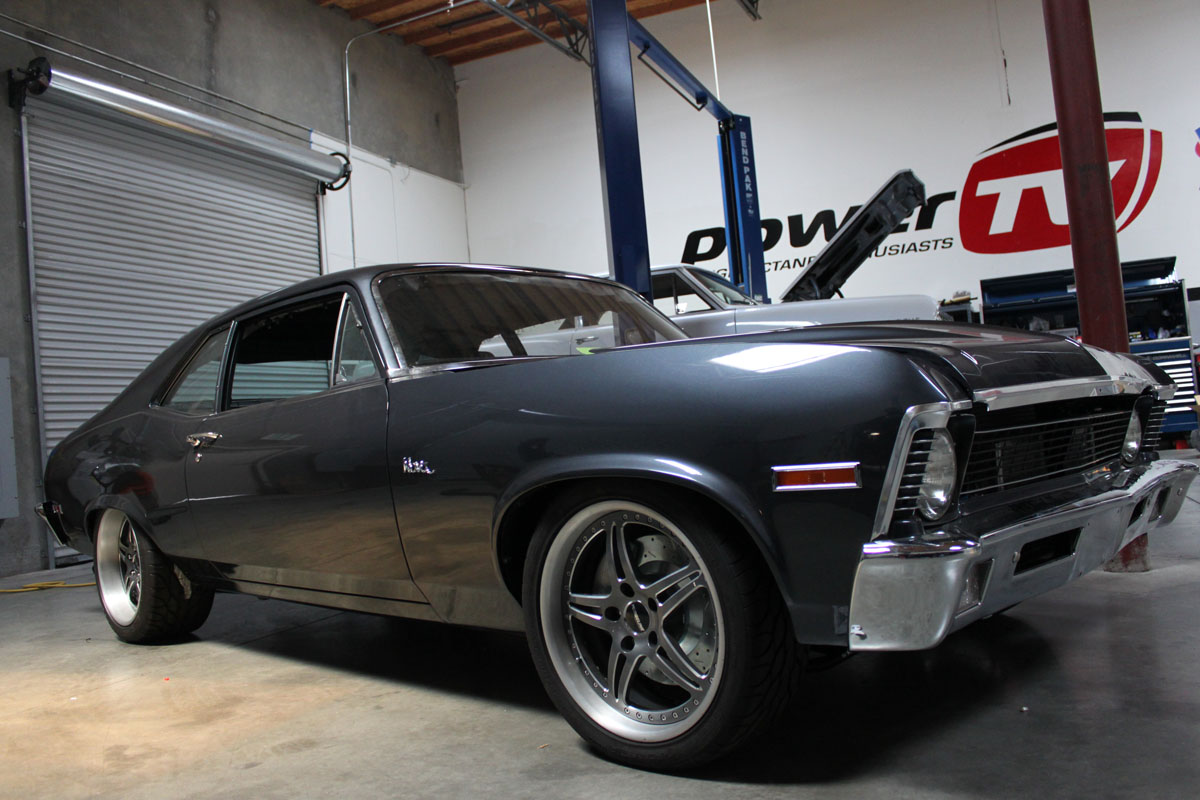
Our rolling stock consists of a nice set of Forgeline wheels and BF Goodrich tires, which meant we had to do some cutting and stretching of the sheet metal to get things fitting nicely before we sent it out for paint. Getting the stance just right meant a call to RideTech to get the ride height that we were aiming for.
Now we know that Swinger is going to ride nice, handle well, and look like a million bucks. But we can’t have all these cool products on a car that’s lacking under the hood. A worthy engine had to make it’s way between the frame rails and it had to stand out like the rest of the car, and for that we decided on a blown LSA engine. We were getting ready to fire it up, but we had just a few more things that needed to be done before turning the key for the first time.
Getting Swinger Fired Up
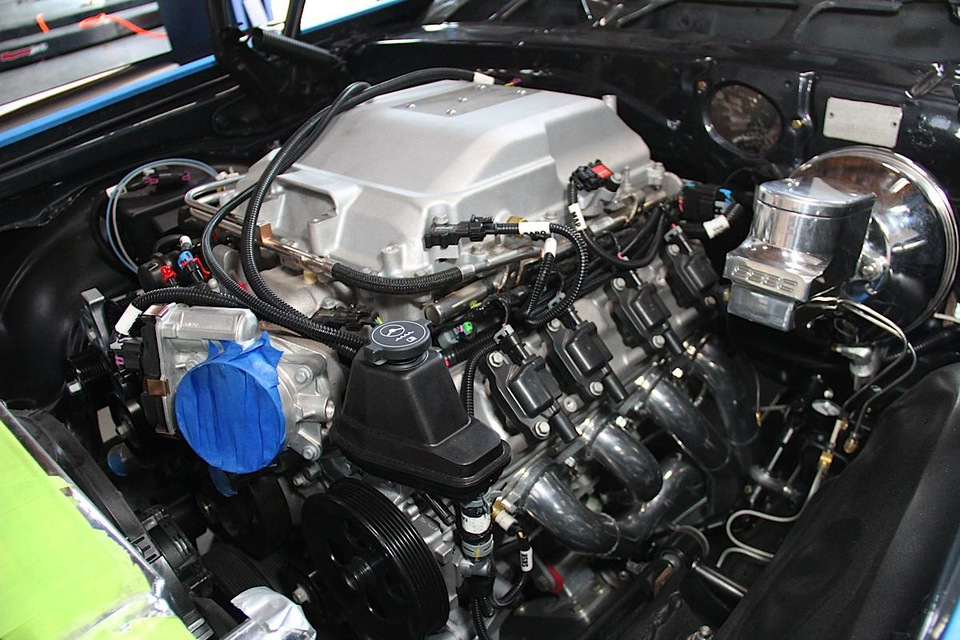
With very little coaxing needed, this LSA found it's way into it's new home with the help from BRP Hot Rods' LS Swap Kit.
We got the LSA and Keisler Engineering TKO 600 Swap Kit installed, the work to get this powertrain in the car called for some talent, and of course our own Sean Goude was up to the challenge. Whenever a modern power plant like our blown LSA is finding a home in a classic, it’s not completely plug-and-play, and that’s where crate motors, harnesses and engine mounts designed for these upgrades come in handy.
Lots of people have been doing LS swaps, and GM has really stepped up to the plate and made these swaps go in a lot easier, and making it more affordable. But as easy as it can get to mount a modern engine in a car, finding places to route wiring harnesses and electrical components calls for creativity and well thought out planning. This is where plug-and-play stops and the ingenuity begins.
It’s one thing to mount a harness and all associated wires to a fender apron that has clips and grommets already in place, but something else entirely to lay wires where they aren’t going to be affected by heat, the elements, and especially where they won’t come in contact with moving parts.
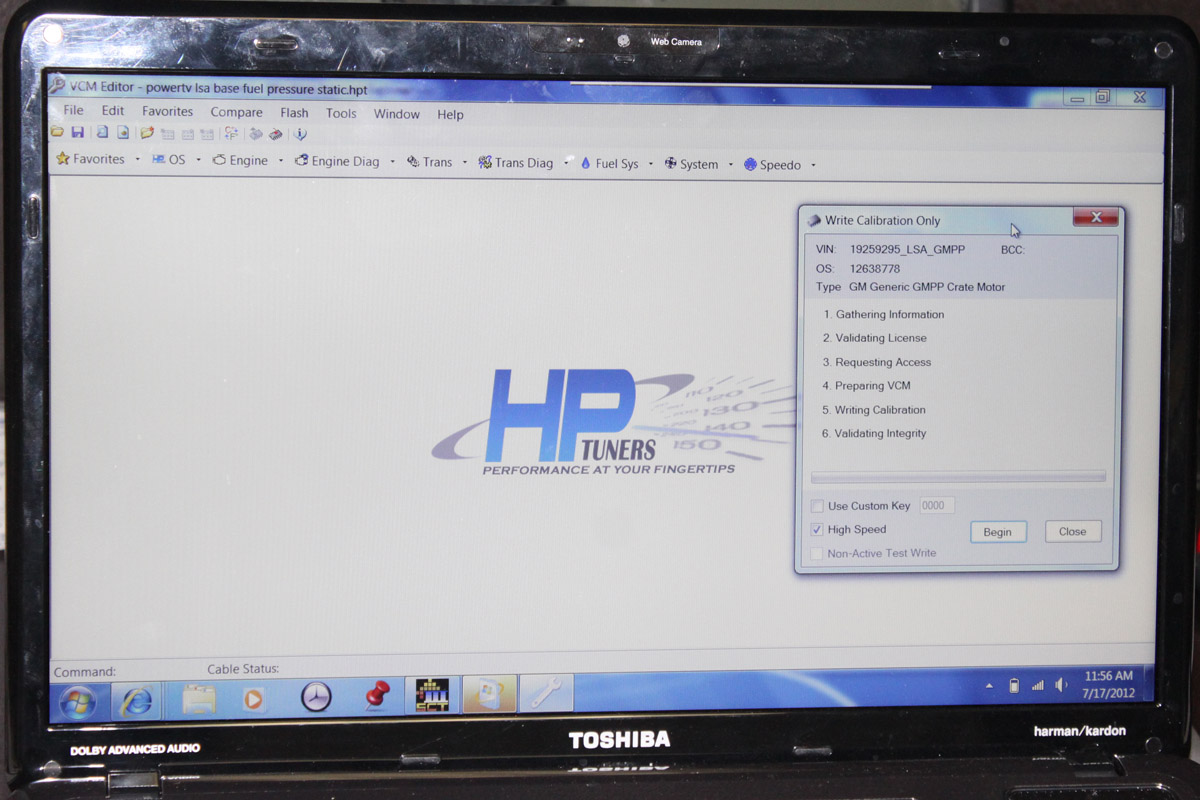
As with any ECM, flashing it for the proper tune on a custom install is paramount.
Looking down the list of what goes into installing an LSA into Swinger, there are things to be considered. The 6.2L LSA has a lot of wires that are crucial for the engine management system to run properly. We found a harness through GM Parts that would suit our needs, and the shop Dawgs got the fusebox and the ECM mounted up on the right fender apron.
We counted on Cunningham Motorsports and HP Tuners to get our ECM flashed properly, and that is part of the program when old bones like Swinger meet the workings of a modern tech powerplant.
The ECM got tucked away from all the heat and elements, behind the right side fender apron where it’s accessible, but out of the way. The mounting location for the ECM follows the simple rule of wherever it fits without being a problem is usually a pretty good location for it.
We installed Flowmaster’s U-Fit dual exhaust and while it was just what this Nova needed, it wasn’t exactly done, so we sent it out and had Jet-Hot give it their treatment. Flowmaster Super 44 mufflers were kept black, and the rest of the exhaust was hooked up and we finally got Swinger running under it’s own power to move it around in the shop.


We always keep our shelves stocked with Royal Purple's line of synthetic lubricants, we never want to run out of it because we use it in all of our custom builds.
To keep Project Swinger running and performing at its best, we treated the engine to a helping of 5w30 Royal Purple HPS synthetic motor oil. With all the regulations that the EPA has been putting on motor oils, many of them don’t contain the proper amounts of additives to properly protect your engine. The Royal Purple Synerlec additive technology is formulated for today’s street and performance engines, far outlasting leading synthetic and conventional oils on the market.
We also use Royal Purple Synchromax High Performance Manual Transmission Fluid to keep our gears quiet and lasting longer, and Purple Ice in the radiator. Purple Ice has a corrosion inhibitor and wetting agent that protects the cooling system year-round against corrosion. It also helps to keep cooling temperature a little lower, a must for these hot August nights here in Southern California.
Hose Candy

Hose Skins and Boa Clamps secure the radiator hose to the radiator for a tight, leak-proof seal.
When it comes to hoses and fittings under the hood, making them look good was always limited to what types of hoses you bought. Fittings were often bulky, especially with smaller vacuum hoses. Your options changed when Hose Candy entered the scene and introduced hose fittings and hose coverings that turned boring rubber hoses into show-worthy components.
We used our supply of Hose Skins and Boa Clamps for the radiator hoses, and the smaller hoses were treated to Hose Skins, Sidewinders and Black Super Shrink clamps. It’s a simple, yet effective way to clean up the engine compartment and give it a custom look without having bulky anodized fittings at each connection. Hose skins simply slip over the hose and are held in place with the Super Shrink clamps using a hair dryer or heat gun to shrink the tubing onto the hose and skins for a snug fit.
With straight, 90° and Tee-fittings, the coolest part of these fittings is that they lock together with a twisting motion and come apart the same way. If you need to remove a component, like our intake tube, we can disconnect the small fittings and not have to worry about damaging a fitting or destroying a hose.
Hose Candy makes all of our hoses and connections look as good as the rest of the car. These fittings and coverings handle a wide variety of applications.


Earl’s Hoses And Fittings
We used Earl’s hoses and fittings for the power steering system that we installed in Swinger. The hose was developed specifically to meet the demands of power steering systems, and is capable of up to 2250 psi. It’s a triple steel and fabric braid-reinforced high pressure hose, and we used Earl’s -6 JIC (Joint Industry Council) hose ends, which are designed specifically for Earl’s blue power steering hose.
Shop Dawg Sean assembled the hoses here in the shop and as you can see from the pictures the install is a snug fit that makes for limited working space. When doing an engine swap like this LSA with all the extra components, harnesses and sensors, you know you’re going to be working in tight quarters for some parts of the build. Despite the lack of room and some thick knuckles, the Dawgs were able to get up in there and get these hoses and fittings installed.


It's a tight fit, but you can see the Earl's power steering hose and fittings we used for the steering pump and rack. Capable of 2250 psi, these hoses are more than capable to keep the fluids in check.
Many people ask what kind of power steering fluid you can use when it comes to swaps like this, and with all the different brands and types out there, it makes you wonder what is best. But did you know that Royal Purple also has power steering fluid in their line up? We used Max EZ power steering fluid to keep our hydraulics in check. Max EZ fluid is compatible with conventional power steering fluids, and helps to keep the pump running cooler, quieter and longer.
Intake And Filter
We couldn’t just slap a factory style air filter box on this LSA, so we called on Spectre to get the parts needed to complete the air filter and intake tube. Since an LSA isn’t a common swap in a 72 Nova, you can imagine that some more customization was needed. But fear not, Shop Dawg Sean found a quick and simple solution and after a couple phone calls to Spectre he was back in business.
He used parts from a ’72 Nova kit designed for a carburetor, and used one of the L-shaped tubes and welded the adapter for the MAF sensor and added a fitting for the PCV filter. Just a little modification and it almost looks like it was made for the car with this engine. As with any custom intake, you have to be prepared to do some fabrication even if you think what you’re doing is a straight swap. With Swinger, we knew what we were getting ourselves into and it didn’t take long for us to get any little stumbling block cleared. That’s why we have Sean and Dean in the shop, because they’re both more than capable of finding solutions to fitment problems.


Problem solved: We got a tube for a Nova with a carburetor, and we converted it to a tube for a Nova with an LSA. Piece of cake.
TCI Auto LS Series Starter

TCI's LS Series Permanent Magent Starter designed to fit any existing GM Gen III(LS1/LS2/LS6) and Gen IV (LS3/LS7/LS8/LS9) vehicle applications.
When it came to getting the engine cranking over, we needed a starter that can handle a high performance engine, and one that could fit our odd combination of engine and trans. TCI Auto had just what we needed. The twelve adjustments that can be made to this high torque mini-starter allows for mounting in the tightest locations, allowing you the flexibility of clocking the starter body in any of several positions to clear other components. All that was needed was an allen wrench to remove three bolts, a slight rotation of the body, and replacing the bolts and tightening the starter to the mounting flange.
It’s always a good idea to loosely test fit your starter first to see where it might come in contact with other components before you make your adjustment. Once you determine that the body needs to be adjusted, make that adjustment and test fit again before securing the mounting bolts to the proper torque.


Adjusting the TCI starter is a simple process that takes a couple of minutes. Always test fit the starter before cranking down on the mounting bolts, and clock the starter body for clearance.
With our set up, we were careful not to tighten the starter on first test fit, as we quickly found out that the solenoid came in contact with one of the sensors on the side of the engine block. Putting some torque on the starter mounting bolts before checking clearances could have damaged or broken the sensor. With the limited vision behind the starter body, it could potentially become one of those issues that takes a while to figure out, and could cause problems. You know the drill: better to be safe, than sorry.
Optima Batteries
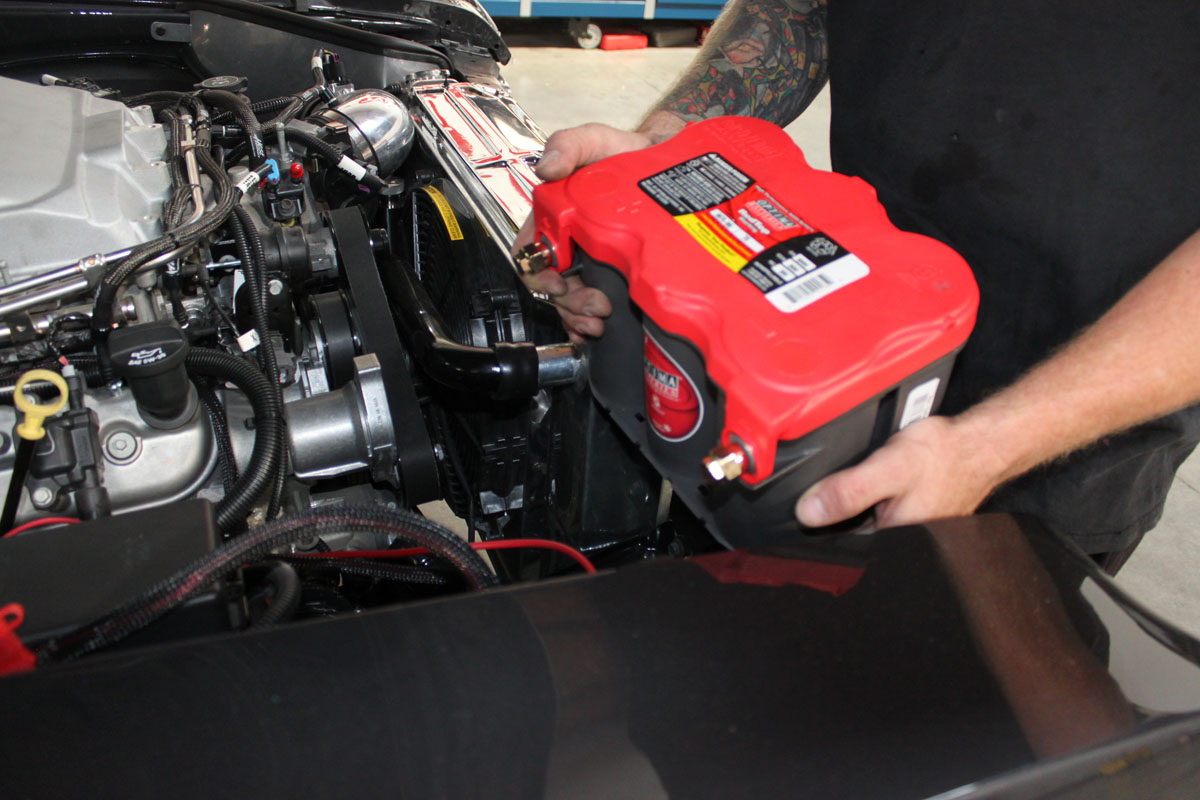
The layout of the battery cables required a Group 78 battery from Optima.
When it comes to batteries, Optima has been our brand of choice for nearly all of our project cars. They always come through with what we need, and putting one of these AGM (Absorbed Glass Mat) batteries under the hood or trunk of a classic or muscle cars these days is a common occurrence. Optima has dozens of battery groups and types to choose from, and for Swinger we needed side post battery cable mounts. A group 78 is readily available from Optima, and the order was placed.
This particular Optima Battery is a red-top with 800 cold cranking amps, plenty of juice to get our LSA turning over and fired up. Upon first start, it fired up without any problems whatsoever, which is the goal for any build or engine swap. As always, once the engine does get fired up, check immediately for any fuel leaks, coolant leaks or oil leaks.


Installation of the battery in the stock location, with side post terminals.
Any leak detection warrants and immediate shut down and inspection, and we’re glad to say that Swinger fired up nicely, ran smoothly and didn’t drop any fluids beneath. We kept it running for just a few seconds, though, as we hadn’t yet gotten all the fluids put in, namely the coolant for the heat exchanger and intercooler mounted beneath the blower.
Up And Running
So there you have it: a lot of details and checks and balances to get Swinger fired up, and she sounds sweet! It’s nice to see the Dawgs getting some seat time in Swinger finally so they can spend less time polishing out the hand prints on the trunk lid and quarter panels from moving it around in the shop.
We still have a little bit more to do, and we’ll have some updates posted for you soon covering the bright work and interior upgrades. You can already tell from the pictures that this old swinger has swapped it’s old life for a new one, and she’s a looker!
Now that Swinger looks great on the outside, and the LSA has it moving under it's own power, we have to finish up the interior. Stay tuned for further updates right here on streetmusclemag.com.


