
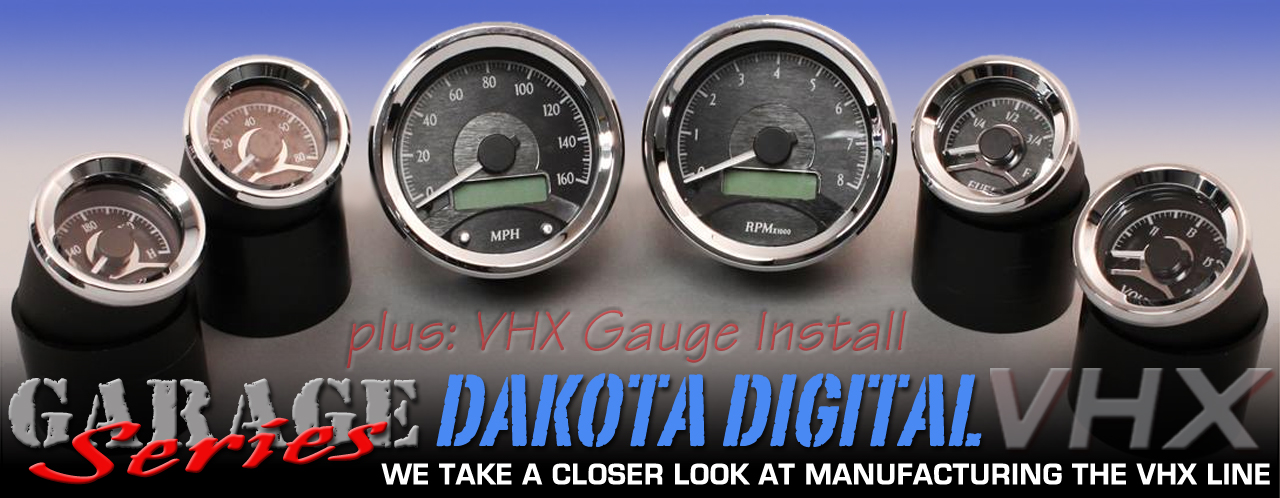
Some of the hottest looking gauges have been coming from Dakota Digital with their introduction of the VHX line of instrument clusters. These gauges have what they call a digital input with an analog output, looking very much like a typical gauge. However, it’s what’s underneath that makes them so unique.
Our own BluePrint Chevelle had a nice VHX cluster installed, an improvement over stock.
The VHX utilizes the same type of input as their VFD (vacuum fluorescent display) gauges, but instead of a digital readout, the visual is analog with a full sweeping needle that appears just like the traditional type of instrument.
For the first couple of years, the VHX line was designed for specific vehicles, with full replacement clusters. Dakota Digital soon found that their gauges were finding their way into custom builds, which meant that sometimes a ’40 Ford cluster was installed in something other than a ’40 Ford.
The gauges were catching on, and Dakota Digital responded by increasing coverage for other popular vehicles. The decision on which vehicle to cover was based on a few factors: demand being the largest one, but it was also based on what vehicles were being custom built, and which vehicles were more popular.
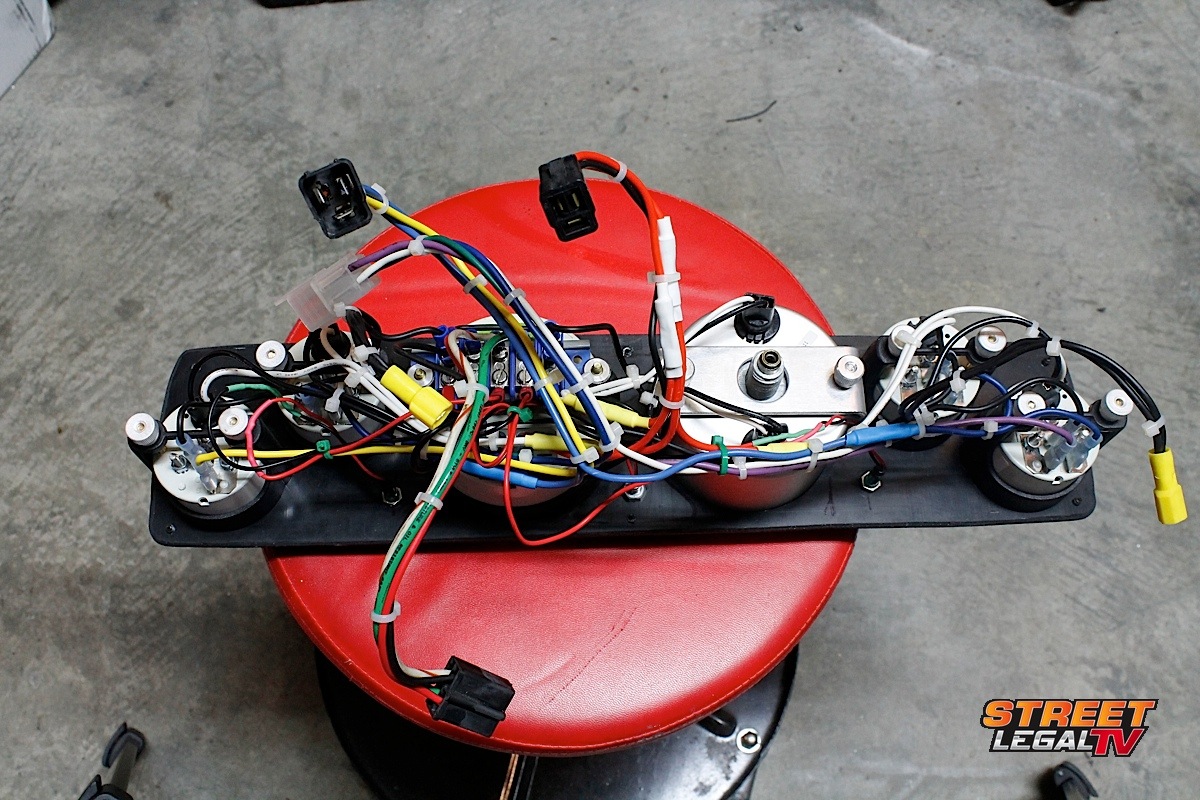
Traditional gauges require a lot of wires; it gets confusing if you don’t color-code.
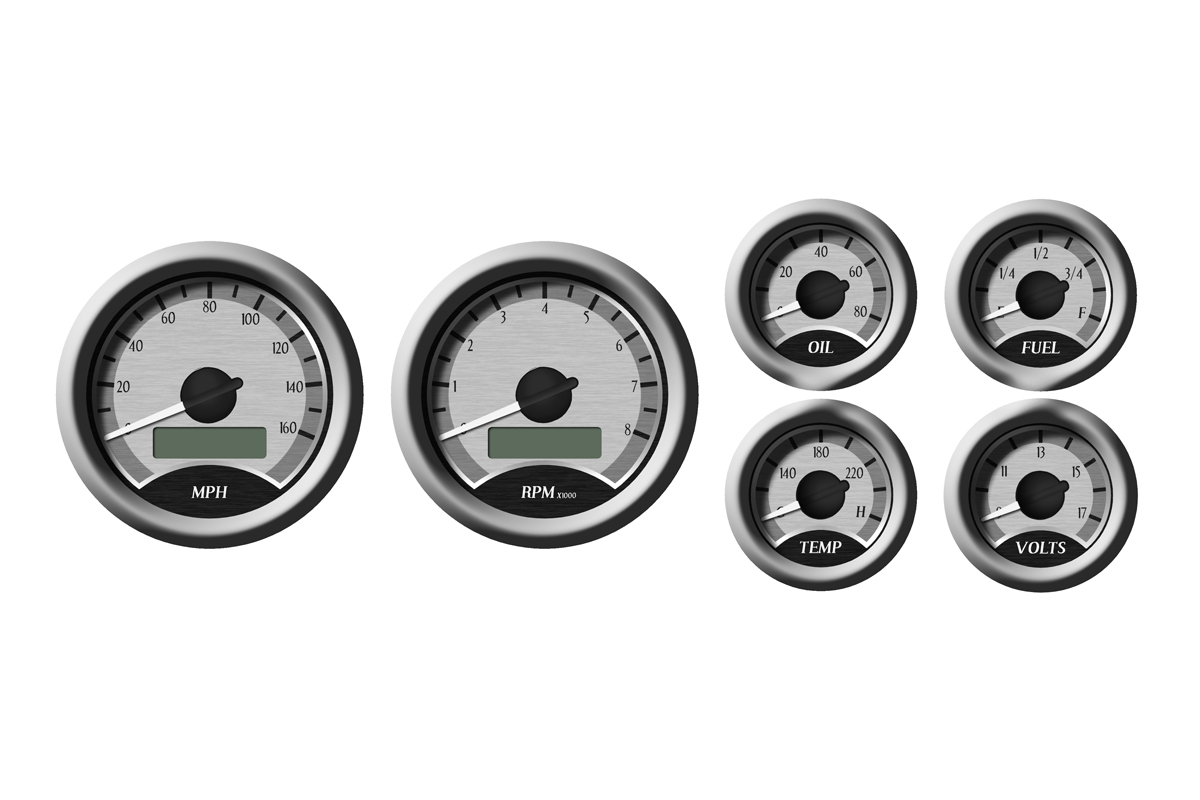
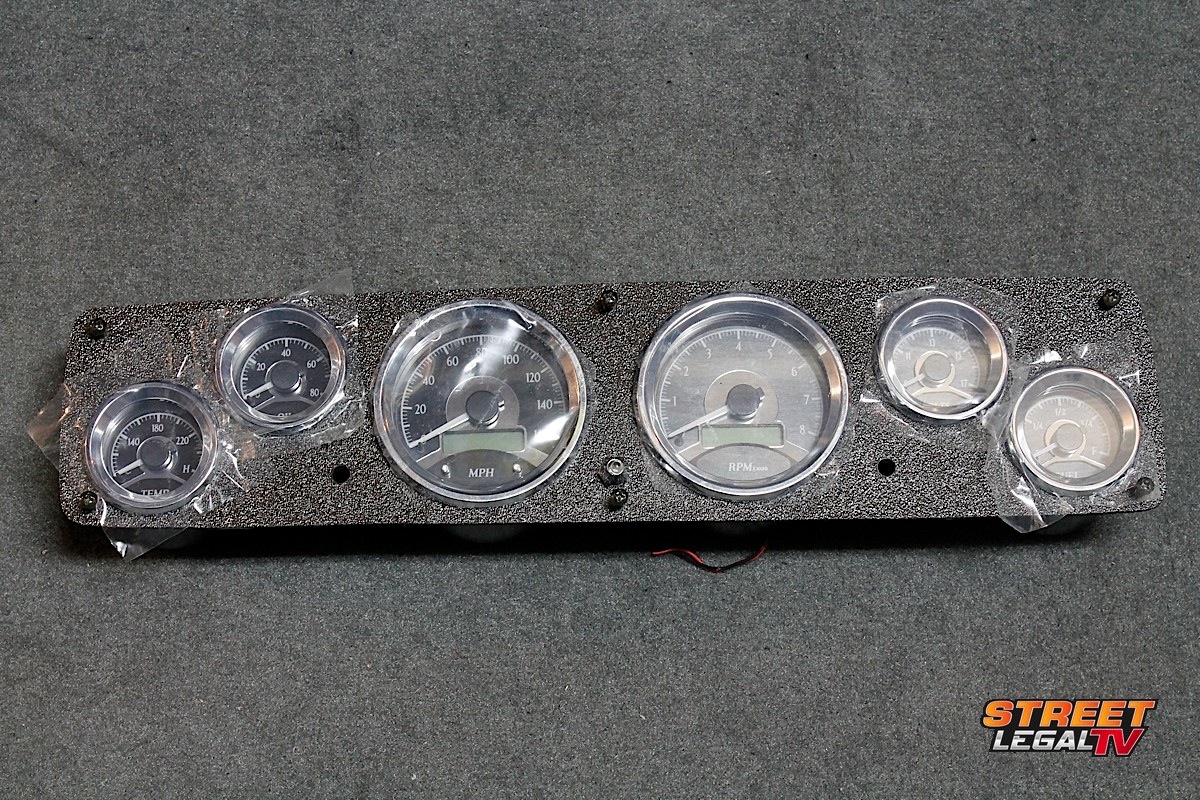
While these gauges look great in a custom build, there was one market that is still popular and yet was not covered by the VHX line – until now. Introduced at SEMA 2013 was the new VHX-1050 and VHX-1060, better known to musclecar owners as the popular 5- and 6-gauge set in the traditional sizes of 3-3/8 and 2-1/16-inch cutout sizes. These new gauges make it possible for anyone to run a VHX gauge system in their car, especially those cars that require individual gauges. It’s also a great fit for cars that are already set up for individual gauges, as these new sets will simply drop into place where the current aftermarket gauges reside.
As we mentioned, these are digital input gauges so they don’t require the same wiring that traditional 5- and 6-gauge sets require.

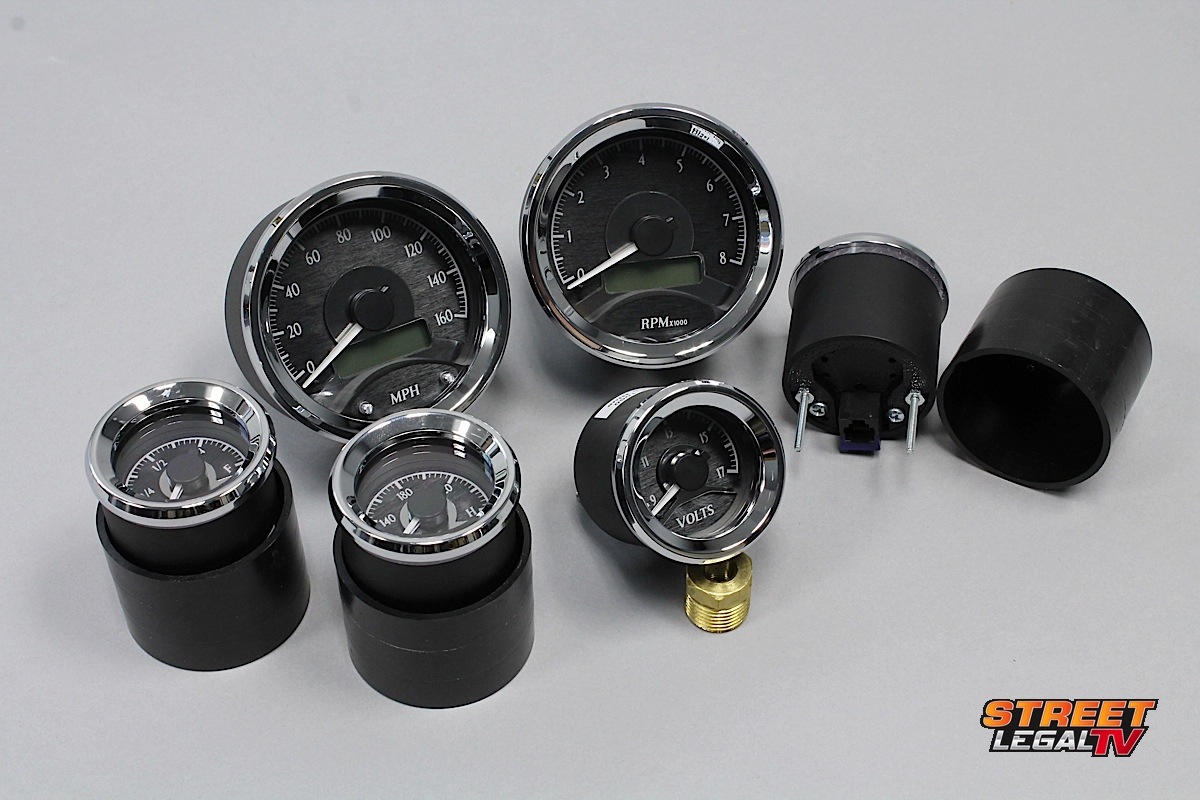
Dakota Digital VHX-1060
- 3-3/8-inch: Speedometer, Tachometer
- 2-1/16-inch: Fuel, Water, Oil, Volt
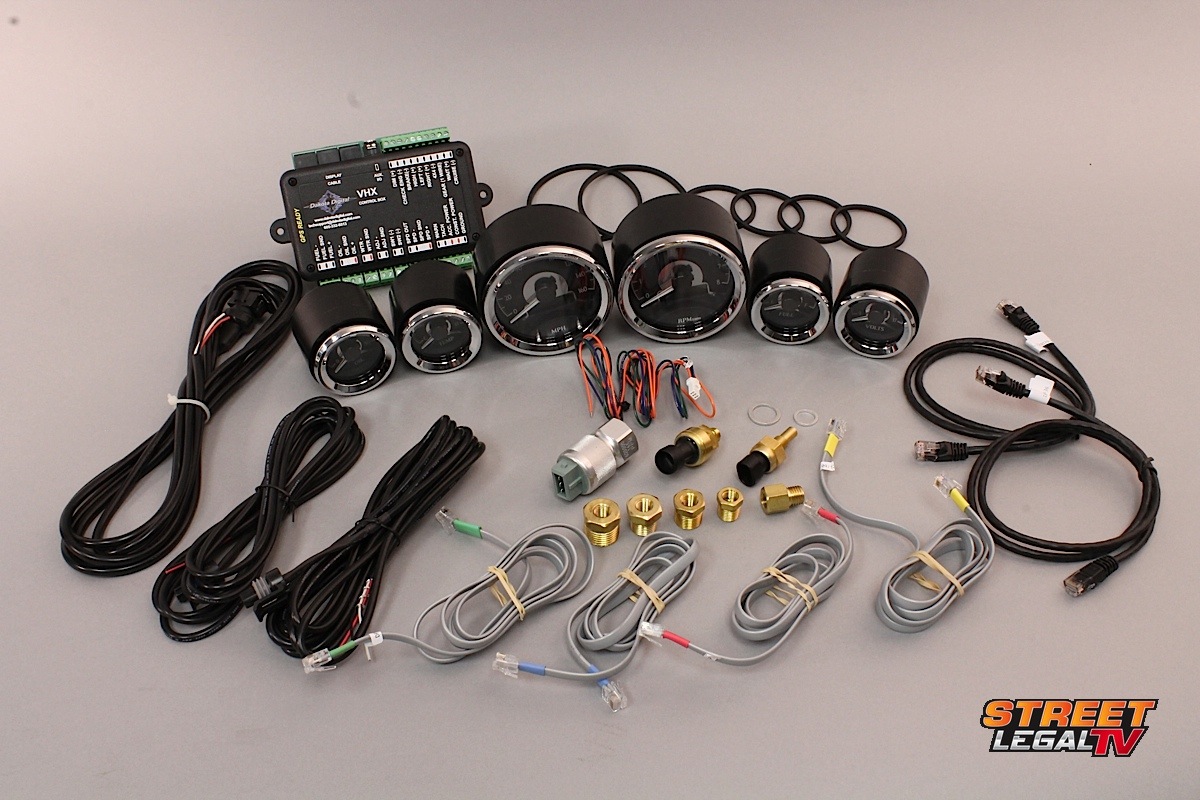
- Oil, water senders, adapters, cables
- 23K ppm speedometer pulse generator
- Two CAT6 cables, four 6-wire RJ45 cables
- Gauge mounting cups, gaskets
- Digital control module
- Two function switches
- Available in blue or red LED, black or silver face.
For those who have installed a 6-gauge set in a musclecar, you know that you have a lot of extra wiring for each individual gauge. For starters, each of those gauges needs hot and ground for the illumination; they typically need an input from the sender; and they need to get power with the ignition key on, as well as a ground wire.
If that’s not enough, it’s often recommended that each gauge receives it’s own power and ground wires so that the gauges will receive a full 12-volt signal from the battery. Otherwise, you might notice that your gauges fluctuate with engine speed, and show a different reading at idle than what is shown at cruising speed.
However, the VHX gauges utilize a single CAT6 cable from a remote module to the back of the speedometer. That’s one single cable to power five gauges, with patch cables that connect the four smaller satellite gauges to the speedometer. When adding a tachometer, an extra CAT6 cable is used and is also plugged into the module.
The module is mounted remotely, and all signal input wires connect to the module, as well as a constant power, ignition power, ground, and illumination wire. There is no need to run six pairs of power and ground wires to the gauges, the system only needs the single pair to power all six gauges because they’re digital.
Normally, each traditional gauge would have a few connectors for power, ground, signal input and for the lighting. The VHX series use a simple 6-wire patch cable to connect the gauges together.
How Do They Do That?
So how do they do this using something as simple as a networking cable to power all of the gauges? The simple answer is that the gauges don’t require high voltage to operate, because the power is connected to the module. And just like your computer receives its digital signal from a network cable, the gauges receive their signal the same way, and it’s a very low voltage signal.
Once a rendering is decided upon, the work begins to manufacture the new gauges.
Mounting the control box remotely allows you to easily make your connections and not have to add yards of additional wiring behind the cluster. This technology is so cool that we wanted to take a deeper look at how it’s done.
It’s one thing to hook up a few cables, but like the little kids we sometimes are with our car parts, we wanted to see what’s inside the gauges. We wanted to see how they work, so we called on our friend Greg Karpe, Product Specialist at Dakota Digital, to give us a behind the scenes look at how the VHX line is made, and how it’s put together.
One reason for the VHX-series to include individual, round instruments is to keep up with the changing trends in the automotive industry. This inclusion provides musclecar and street rod owners a way of getting the latest technology in a car that doesn’t have room for entire clusters – or a current application.


Once a design is agreed upon, the CAD engineers go to work designing the prototype gauges.
Karpe says, “Long before the first piece of aluminum is machined, before the overlay is printed or any circuit boards are soldered, the engineering team completes several digital renderings to get a feel for what the new application will look like.” After it’s discussed and finalized, the work begins on the new set of gauges, and that means CAD drawings have to be created.
The engineering team completes several digital renderings to get a feel for what the new application will look like. -Greg Karpe

The gauges need to be designed from all aspects, including the electrical circuitry and the software. This is done by the electronic engineers at Dakota Digital, and there’s a lot more than just adding a couple of bulbs or designing the faceplate.
Being digital means that the gauges need to have circuitry, and all of the circuitry needs to fit into an area that is only a few square inches. It’s a tight fit and creates plenty of challenges, so all of the designs are done in 3D CAD software before they can start machining parts and printing the faces.
One thing that saves lots of companies time these days is the modern technology of the 3D printer. Creating these parts in plastic will help save the company a lot of time and money, because the 3D printer can print a prototype without spending thousands of dollars on machining work and tooling to produce an aluminum prototype.
Machining an aluminum prototype exceeds the cost of what the 3D printer is capable of doing. These plastic pieces allow the engineers to test fit all components, and the process can be completed in minutes instead of hours.


With this kind of technology, 3D printers have saved companies thousands of dollars in tooling costs alone. These parts can be test fit prior to any tooling being done.
When the design is determined to be accurate and ready for production, some of the most sophisticated equipment is at their disposal. Dakota Digital starts with a chunk of aluminum and using the specifications from the CAD data, the CNC machine goes to work duplicating the digital file in a matter of minutes.

This might be a little scary if you’re at the dentist, but this equipment is necessary to create the VHX gauges.
Each part needs to be accurate to the exact specifications or the parts won’t fit together properly, and that’s where the 3D printer comes in handy as a process prior to machining parts. The CNC machine is supplied with numerous bits and drills for removing aluminum and creating the gauge from the specifications fed to the program.
For years, gauges had metal faces that were screen printed with numerals and markings, and the gauges were either front-lit, or they had a ring of light around the perimeter of the gauge. That left some gauges difficult to read at night, so plastic gauge faces were used and that allowed for light to pass through where it was needed, and to be blocked out where it wasn’t needed.
Modern Printing Technology
Many manufacturers cover bulbs with a colored sleeve that gives off a slight green or aqua hue, keeping the intensity of the light bulbs from creating hot spots and cold spots. If a bulb burned out, it was a chore to replace it, and usually required removing the entire cluster (and sometimes half the dash) to change a bulb. LED lighting lasts far longer, has better lighting properties, and doesn’t generate heat that an incandescent bulb generates.


The indicators on the speedometer are barely visible until the LED is activated. Layering the UV-safe ink is how they accomplish this.
Even with LED lighting, there needs to be translucent and opaque areas on the gauge face. Printing the gauge face requires ink that is able to withstand the ultraviolet rays from the sun, otherwise the gauge faces will fade, lighting will be compromised, and the detail lost.
Dakota Digital uses state-of-the-art UV ink technology, and instead of a single pass, there are several passes printed on the overlays. These layers of ink are ‘stacked’ in a specific order so that the light can be blocked in some areas, and pass through in others. The indicator lights are barely visible, but when the LED is lit, it’s hard to tell that there was black ink over that part of the gauge.
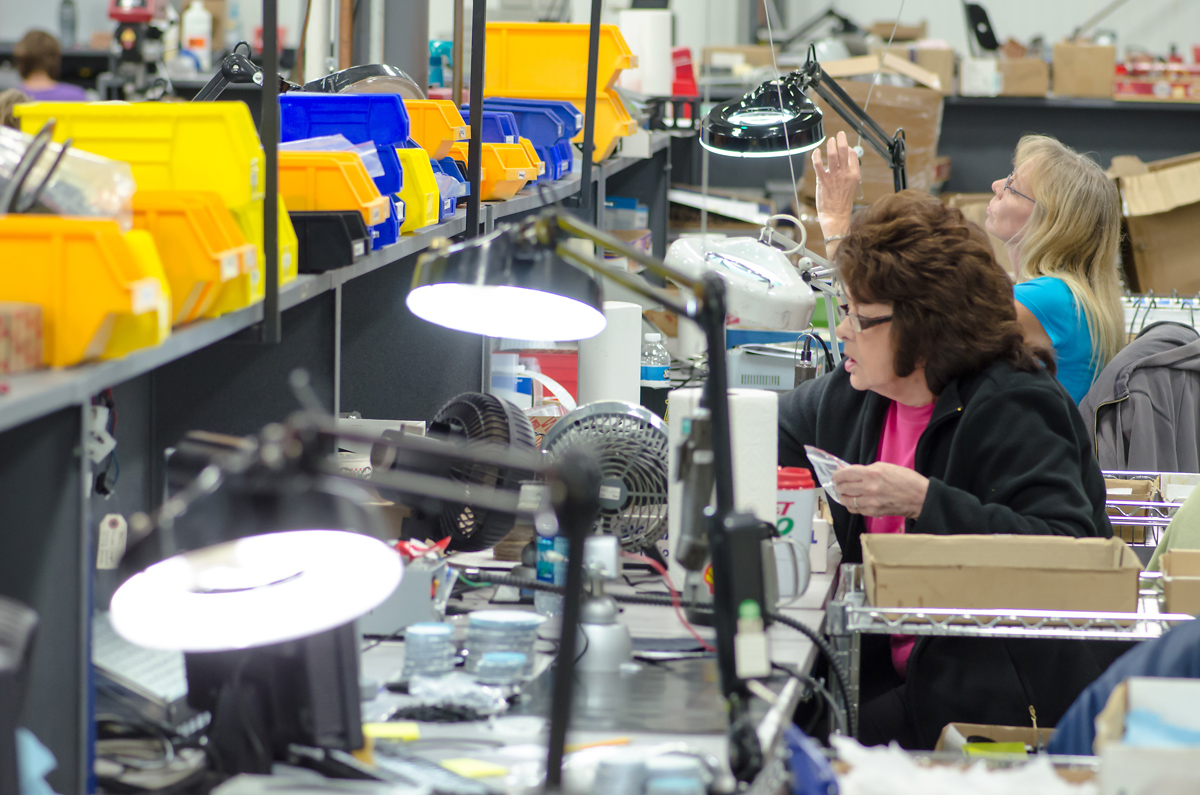
Work done the old-fashioned way: people assemble the gauges and perform the QA testing before any gauges shipped out.
These inks can be expensive because of their UV properties – far more than the inkjet printer on your computer desk. This process is more than just running a sheet through an inkjet printer, it’s calculated and is done in several passes to provide the intended look.
While computers and machines are responsible for the design, tooling and printing, it takes people to assemble and test every gauge in-house. This keeps quality control simple and effective, and allows the engineers to oversee production runs and to address any issues that may arise on the production floor.
When indicator lights are used on the gauges, the light for a left turn indicator needs to produce that light only on the arrow, and not any of the other indicators. To keep the light from bleeding into other areas, guides are used to keep the indicator light bright and only in that specific area. For the rest of the gauge, the LEDs are arranged so that the light is evenly distributed to the overlay and the needle. Without consideration in this area, the lighting could bleed over into other areas of the gauge.


There's not a lot of real estate on the circuit boards for all of this technology, but they make it all fit.
Each of the sub-assemblies are put together and then placed into the gauge housing, and the final assembly of buttons, lenses, and a needle are added last. But before that lens is sealed to the gauge, all of the instruments are cleaned out with compressed air. This process will get any dust or loose particles out of the gauge, and also remove the static before the gauge is sealed up.
Each of these gauges only needs a digital signal from the control box, which is the brains of the operation. The senders and sensors will provide the readings, and the control unit provides the signal to the gauges. While they look like a fancy analog gauge, there is quite a bit going on behind that gauge face, and a lot of data being transmitted from the CAT6 cable connected to the control unit.


Once all components have been machined, the gauges are assemble by hand.
While the smaller gauges simply provide the information provided by the sender, the speedometer and tachometer both have data centers that provide varying information. The speedometer also provides several indicator lights, such as the signals, high beam indicator, and optional check engine gear selection (when using an additional Buss Interface Module or BIM), and whether the vehicle is in four-wheel drive.
Cool Features You Will Like
The programming functions are handled by two momentary switches included with the kit, or you can use the push buttons on the face of the speedometer. This allows the user to set up the gauges and to program the gauges to work based on specific parameters.
You can also set up the lighting so that the intensity is not too much at night, and the gauges can be lit or off during the day.
The fuel gauge, for instance, can be programmed to use custom values by moving the level sender, or to use known values from popular senders. These are based on full and empty ohm readings.
The speedometer is also programmable, meaning that you can adjust it based on a known speed (such as from a GPS device) or you can simply mark out a measured mile. Since the mileage can be programmed, and there is a clock in the unit, you can imagine what that means for us performance junkies. If you guessed 0-60 and 1/4-mile times, you’re right! The data display will give you those readings.
Of course, if your measured distance is more or less than a mile, your times will not be exactly accurate, and you might not make a believer out of your friends. But it is good to know that you have these treats available to you so you can do a little bragging the next time someone tries to bench race you – you can spout some facts rather than guesstimates.
Connections are simple, everything is labeled, and the cable jacks are color coded as well.


Installing the VHX-1060
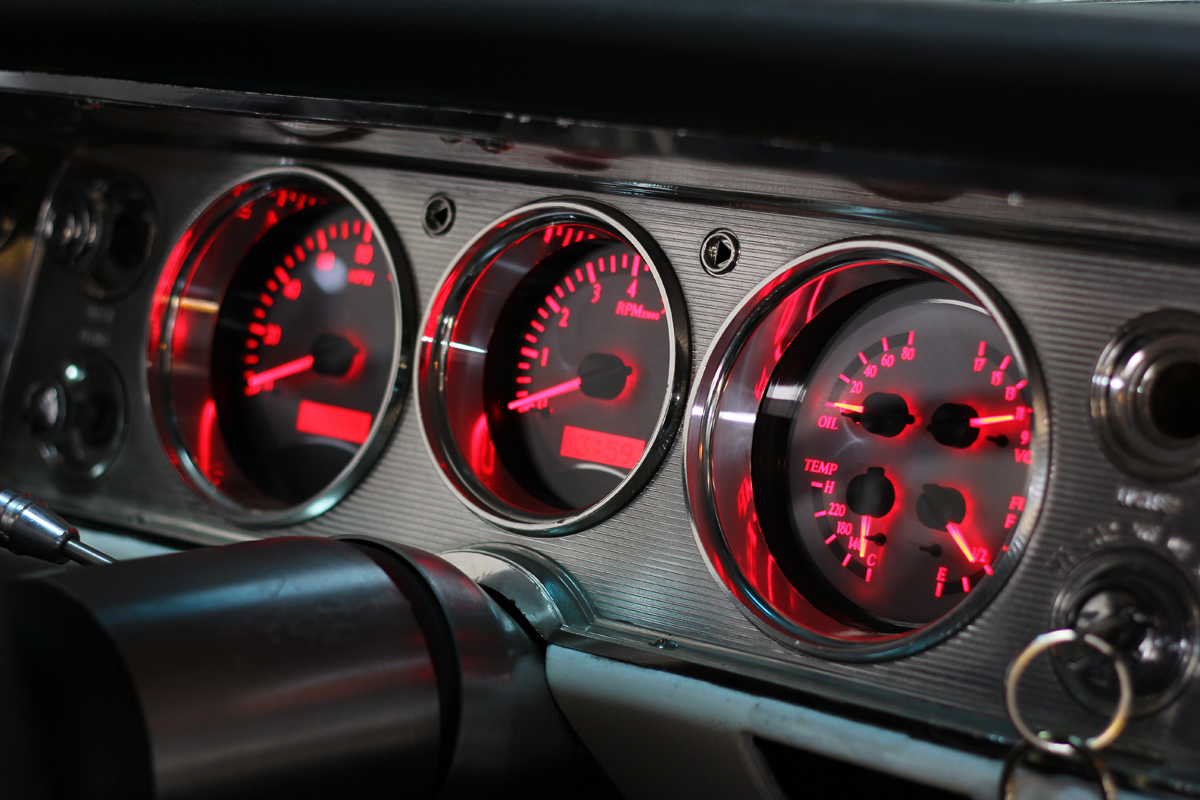
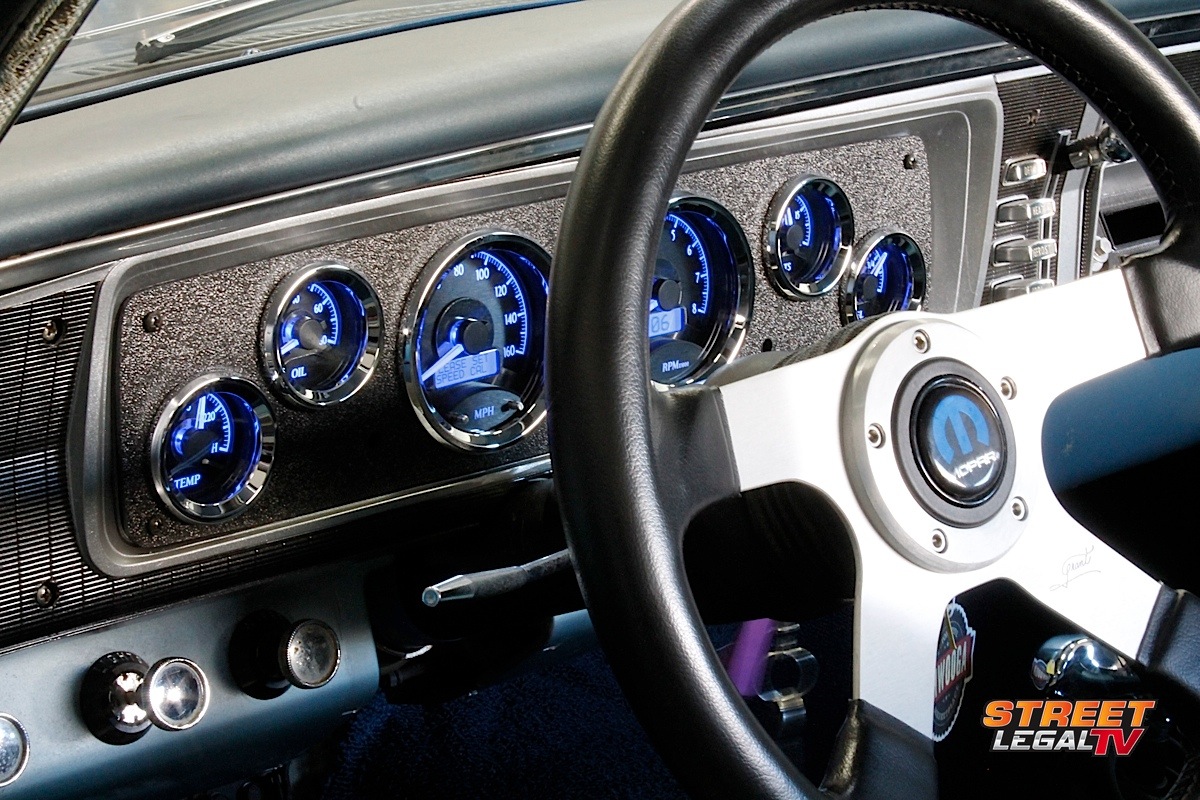
Now that we know how they are made, and how cool these gauges truly are, we couldn’t wait to get ours installed in our 1965 Plymouth Belvedere II. We already had a set of aftermarket gauges, but night-time driving made it difficult to read the perimeter-lit gauges.
Our previous gauge set was nice and performed well, but without daylight the needles were dark, the gauges were dark, and we were literally left in the dark when it came to coolant temp, oil pressure – even speed or engine rpm. The VHX is a well lit unit, and will provide full visibility, regardless of outside lighting conditions.


Since the Dakota Digital VHX-1050 and VHX-1060 are designed to the same sizes as typical 5- and 6-gauge sets, we already had half the battle won because we had already made a template from cardboard, and made a custom-cut ABS plastic gauge panel. The new gauges simply fit in place of the others, so very little work was needed to mount them.
We found a suitable mounting location for the control module and connected all of our wires. It’s clearly marked, and Dakota Digital does something nice for us here: no crimped terminals. Each wire connection is a simple screw terminal that holds the wires in place by tightening the screws.

Finding a good location under the dash of our Plymouth was the most difficult part of the installation.
Since we no longer need the speedometer cable, we decided to use the hole in the firewall where the speedometer cable was routed to run our new electrical wires. This also meant no new holes needed to be drilled for the wire harnesses included with the kit for the oil pressure, coolant temperature, and the speedometer.
With all wiring routed behind the dash, and the control module mounted, we inserted the gauges into the panel and connected all of the patch cables from the speedometer to the individual gauges. Dakota Digital will provide two different lengths: long and short.
For those who cluster all of the gauges together, the shorter will suffice. But if you want to mount the smaller gauges somewhere else in the dash panel, a longer cable is used.
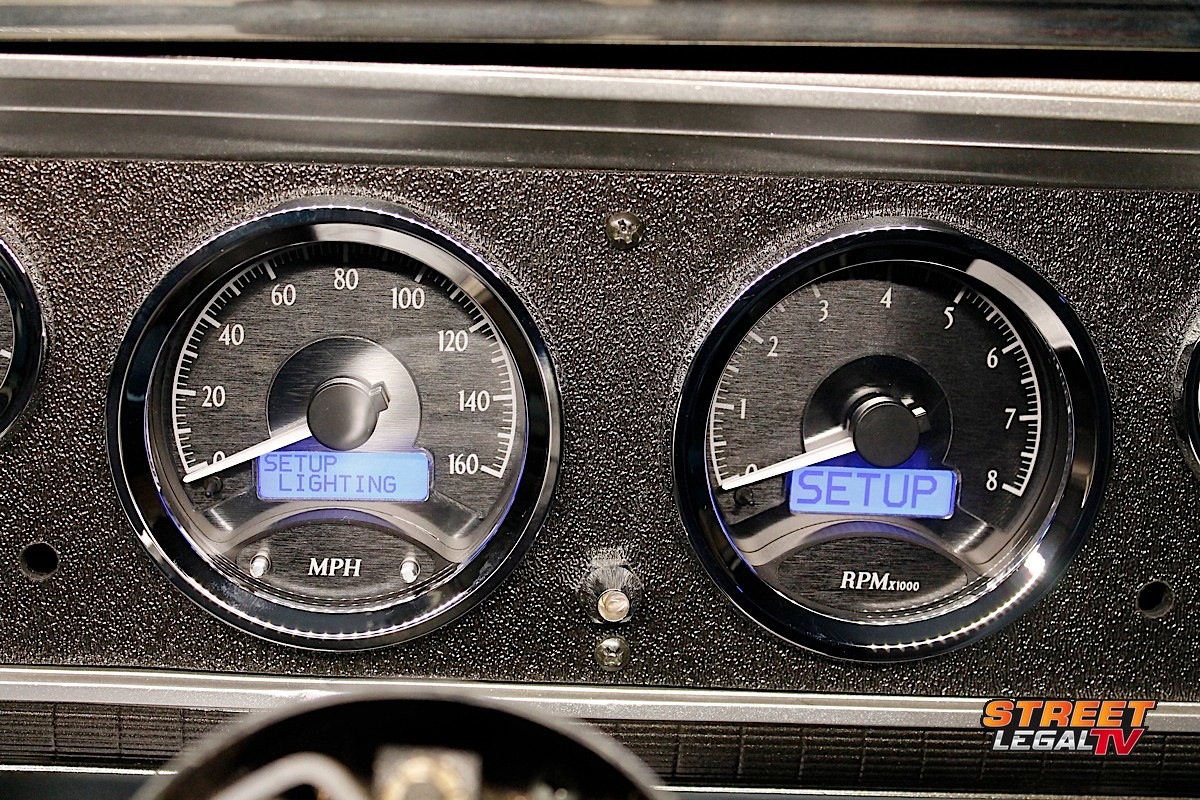
With all of the gauges connected together, the two CAT6 cables were plugged into the speedometer and the tachometer, and the other ends plugged into the module. The assembly was set in place and attached to the dash, and we began the setup process, which was much simpler than than you would think. The instructions are thorough, clear, and very precise.
The two buttons on the speedometer allow you to set up the gauges, and also to cycle through the info centers.
One thing we especially liked about the instructions was where they stated to push either switch 1 or switch 2. Most of the settings were switch 1, but when it came time to press switch 2, they reaffirmed it by stating, “Yes, you have to push SW2 for this setting.” That assured us it wasn’t a typo, and that a call to their tech line wasn’t going to be necessary.
The first setup process is the speedometer, but you can bypass that to set up the other gauges first. This is where following along and reading the instructions will make the task very simple to do. The fuel gauge offers several settings, and if you know the resistance values prior to setting up the fuel gauge you can zip through it in no time. The other gauges: volts, oil pressure, and water temp are simple, and you must use the included senders for oil and water. They also provide plenty of brass adapters in case you need them.
Top: The back of the gauges have a very clean and uncluttered look. Simple patch cables handle all the wiring needs. Bottom: The coolant, oil pressure, and speedometer senders installed.


The speedometer will give you an odometer that you can set to any number “one time,” unless you send it back to Dakota Digital to be reset. It includes a trip meter (both A and B) MPH or KPH, and incorporates turn signal indicators, high beam indicator, and several other indicators that you might want to use. The tachometer can be set up for 4-, 6-, or 8-cylinder, and can work from a coil or an ignition box. Both of these gauges include message displays.
 Through the message displays, you can track your 0-60 times, quarter-mile times, top speed, top rpm, and several other functions. You can even set up a shift light that will trigger at a set rpm using these displays. After setting up our gauges, we found a stretch of road that measures a mile in length, and set up the speedometer. The gauges look great in the car, and perform even better than they look. The only problem we have with the gauges is keeping our eyes on the road and not checking out the gauges too often because of how cool they look!
The VHX-1050 and 1060 are brand new from Dakota Digital, but they literally have dozens of specific applications that fit many popular vehicles. They’re available in different finishes, with red or blue LED lighting. Check out the Dakota Digital web site for more information about the VHX line to see what kits they have. You can still get the popular digital readouts, but the VHX line is putting analog back in our lives, without losing the form and function – and the accuracy – of digital gauges.


