
When you finish building an engine, do you call up everyone you know just so they can hear the sound of your freshly built small block? If you are a car guy, engine builds are most likely your favorite part of a project. There is also a good chance that your engine is worth more than your car, like mine is. What car you ask? A Nissan 240SX that’s going to receive a Dart SHP short block that is about to be assembled at Westech. The Dart SHP and Top End Kit packages can turn a weekend racer on a budget into an engine builder, giving you the ability to assemble budget friendly matched components while making great power. We also plan to put a little “squeeze” on the engine dyno.

An Overview of the 400 Cubic Inch Small Block Chevy Build
The idea behind this project was to build an engine that was affordable, yet still carried some premium parts that would be suitable for a street car. The engine is going into our “Riced Rat Rod” 1991 Nissan 240SX – yes, an import. It is designed to be a sleeper of sorts, minus the obvious healthy cam sound resonating out of the exhaust.
Because of their extensive experience, we decided to take all of our parts to Westech for a complete engine assembly by Steve Brule, to be followed by dyno testing. If you have ever read an engine dyno story, the dyno was most likely performed at Westech.
We headed off to Mira Loma, CA and began the two-day process of building and dyno’ing our 400 cubic inch small block Chevy.
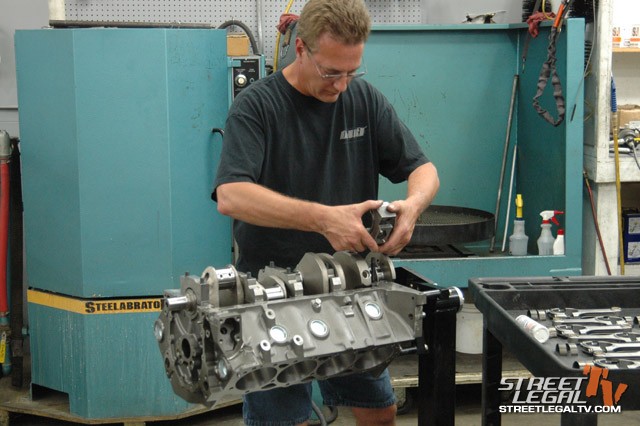
The foundation – The Dart SHP short block
This is where you can really lose your wallet. It’s a good idea to outline exactly how much horsepower you want out of your engine, and then tailor the package to meet your requirements. The block that made the most sense for us was the new Dart SHP.
The SHP is the new sportsman block from Dart that is designed for racers on a budget, dirt trackers, or people looking to upgrade from an OEM block. According to Jack McInnis of Dart, “Richard Maskin came up with the idea for the SHP block as a way to support the aftermarket manufacturers, and give local engine builders a way to be competitive with factory crate motors.”

Our SHP short block comes with the optional forged crank, H-beam rods and forged pistons.
The awesome part about the SHP block is that it utilizes a lot of the main features that come in Dart’s race block: priority main oiling, siamesed bores, blind bolts, and ductile iron main caps with splayed bolts, just to name a few. So the question becomes, what is the difference between the Little M Sportsman block and the SHP?
The Little M is a race block, and the SHP is a performance block. This means that the SHP block is not designed for dry-sump systems, larger cam cores, or any other racing features, which add cost. The SHP block is about forty pounds lighter than the Little M, as it is intended for engines up to about 600 horsepower, whereas the Little M is designed to support considerably more.
In addition, the SHP block is closer to a finished piece from the foundry, which in turn decreases the machining time of the block.
Dart assembling our 400 cubic inch small block Chevy at their facility in Troy, Michigan.
If you plan on keeping the engine relatively tame, the rotating assembly that is offered as an option for the SHP short blocks will do the trick. The engine is offered in both a 372 and 400 cubic inch assembly. We obviously chose the 400. The hypereutectic pistons and forged I-beam rods still make great power, but if you have the urge to use a power adder like we do, Dart does offer upgrades.
The ‘typical’ SHP short block with a final compression ratio of 10.7:1 and a street cam and carburetor setup manages 525 horsepower out of the box, very respectable for a complete engine in the $5000 range. We asked Jack why they got into the short block business and he said, “We wanted to give our customers (engine builders) a way to compete with factory crate motors. Most of them build higher-end motors, and could not economically compete in that area.”
With the addition of a moderate spray of nitrous, we opted for the forged piston and forged H-beam rod combination for our 400. The 400 comes standard with a Forged 4340 crank and balanced internals. The final size of the engine came in at 4.125” bore and 3.750” stroke.

Our forged piston and rod upgrades mounted together and ready for installation.

The forged crank and H-beam rods mounted to Dart’s 4-bolt mains.
Short Block Specs that come standard on the SHP 400 CI:
• 4.125″ Bore x 3.750″ Stroke
• Internally Balance
• Plate Honed
• Cast Steel
• Hypereutectic Flat Top Pistons with Floating Pin
• Forged 4340 I Beam Rods with 3/8″ Cap Screws
• Hastings Moly Rings
• Clevite Bearings
• Coated Cam Bearings
Our Upgrades Included:
• Forged 4340 Steel Crank
• Forged Flat Top Pistons
• Forged H-beam Rods
The Top End – Dart’s Pro 1 Top End Kit
Dart also offers a complete top end kit that accounts for all of those parts you probably forgot.
The top end kits are offered in both aluminum and iron. Because of the obvious weight savings, we chose the Aluminum Pro 1 kit.
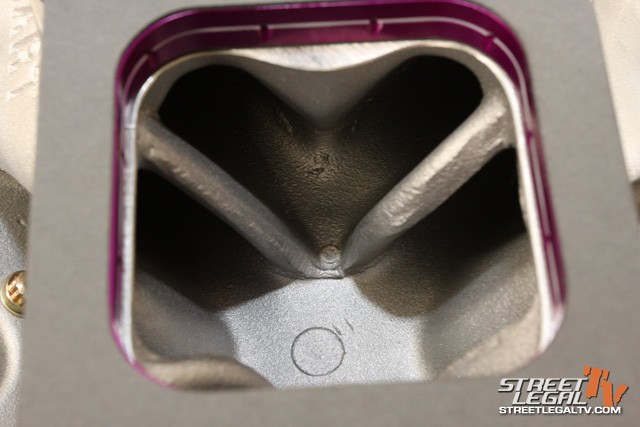
They come assembled with stainless valves, springs, and retainers. The heads are paired with either a single or dual plane, depending on the size of the intake port. Up to 200cc, they recommend going with the dual plane, and for those larger than 215cc (what we have), they recommend the single.
Our final option was chamber size. The 64cc bowl will net a 10.7:1 air fuel ratio, and the 72 cc will come in at 10:1. We went with the lower compression because we were building this for a street car.
When we ordered the heads, we gave Dart the specification on the cam we were using to make sure we had adequate spring pressure on assembled heads.
The rest of the kit consists of all the gaskets and ARP fasteners you will need, as well as stamped steel valve covers.
Top End Kit Specs:
• 215 CC Pro 1 aluminum heads fully assembled with stainless springs, valves, and retainers
• 72 CC bowl for a 10:1 compresion ratio
• Dart single plane intake manifold paired on 215+ CC top end kits
• Dart stamped steel valve covers
• Head, intake, exhaust, and valve cover gaskets
• ARP head bolts, valve cover bolts, NGK spark plugs

Dart’s 215cc Pro 1 aluminum heads feature a 72cc bowl for a 10:1 compression ratio.
Comp Cams Complete Valvetrain
The valvetrain is another potenitally costly component that can empty your wallet in a hurry. Since we planned to keep the engine under 7000 RPM’s, there was no need for a high-end shaft mount system. We used traditional full roller rockers and went with the Comp Cams 1.52 Pro Magnums on the beefier 7/16th stud. We chose steel rockers for the sake of durability. Chris Mays of Comp Cams states: “Magnum rockers are a better addition to any cam upgrade, especially hydraulic cams and lower lift hydraulic rollers. I would strongly recommend an aluminum or Pro Magnum for any cam over .500 lift.” Pro Magnum Roller Rockers are also built entirely from 8650 chrome moly steel, a material three times stronger than aluminum.
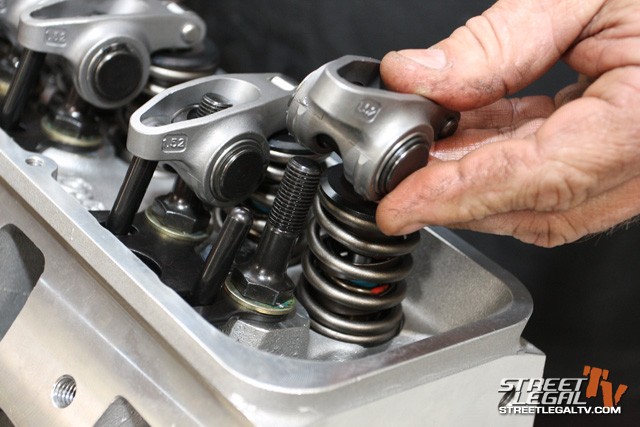
Comp Cams 1.52 Pro Magnum rockers fit perfectly on the Dart heads.
Finishing up the top end are the pushrods and lifters. We chose the Magnum series one-piece chrome moly steel pushrods, as they aren’t that much more expensive than the high energy and they are stronger. For the lifters, we went with the spider-style lifters from Comp Cams. These are OEM style, but don’t be fooled. Comp Cams has gone to great lengths to make these hydraulic rollers last on higher RPM’s. I asked Chris about the capabilities of these lifters and he responded, “I rate the OEM style lifters at 6500 RPM and normally .550 lift before running into any floating or binding issues with the lift. The tolerances of all of our lifters are a little tighter, which ensures more RPM capabilities.”

OEM spider-style Comp Cam hydraulic lifters fit on the SHP integrated stands, and are accompanied by Pro Magnum hardened pushrods.
We took Steve Brule’s advice when it came to selecting a cam. We had a light 5-speed car that was going to see a lot of street driving. We needed a cam that wasn’t going to make traffic a living hell, yet would provide a good balance of power. The cam choice was made a bit easier because we had power brakes. Ultimately, we decided on Comp Cams 12-443-8. Here are the specs on the cam:
Duration: 294 Intake 300 Exhaust
Duration at .050 Lift: 242 Intake 248 Exhaust
Valve Lift: .54 Intake .562 Exhaust
Lobe Lift: .36 Intake .375 Exhaust
Wrapping up the valvetrain, we went with a Comp Cams billet dual timing chain. This setup gives you the ability to adjust cam timing and it’s a fairly inexpensive part. We picked the three piece cover to help speed up the process of cam timing adjustment. For cam changes, Chris says: “The customers who wish to change a cam but don’t want to pull the balancer and drop the front part of the oil pan to do it are able to. Pretty easy now since we can just pull the top piece down and make a cam change.”

Steve Brule of Westech installing our Comp Cam.
A Look at the installation: Part 1
Now that we have discussed some of the parts that went into this engine, let’s see how it goes together. Steve started where most engine builders do: he slid the cam into the journal. From there, the timing sprockets were installed on the crank, followed by the timing chain and cam wheel. Steve then put together the three piece cover and applied gasket sealant to prevent oil leakage.
Next, Steve applied a little assembly lube and the hydraulic roller lifters slid nicely into place. The Dart SHP block is .300 tall on the lifter journals, so make sure that you get the taller application if you use a tie bar lifter.
With the lifters in place, it was time to tackle the heads. Steve lined up the Fel Pro head gaskets, supplied by Dart, and dropped our nice and light aluminum Pro 1’s onto the block. A few taps later, the heads were nicely seated and Steve began installing the supplied ARP head bolts.

The tall style lifters are required for the Dart SHP Chevy block.
With the heads nice and snug, it was time to finish up the top end with the valvetrain. We had accidentally ordered studs for the rockers that were a tad too long. Whoops! It turns out that putting a washer under the stud helped with our pushrod angle, which made for a win/win situation. Guide plates on and pushrods slid down, it was time for the Pro Magnum 1.52’s to go on. Since it is hydraulic, a 1/2 turn past snug is the only adjustment that was needed. The Dart valve covers and gaskets sealed the deal and we were ready to move on to the balancer.

The long block is almost done.
Yep, Even More Parts to Talk About
TCI Rattler Harmonic Balancer
A good balancer is one of those important small parts that people forget. Because the crank flexes and creates vibrations, a good balancer is needed to keep your lower end from dying. The TCI Rattler is not a fluid dampener. Rather, it has small metal pucks inside of holes all around the balancer and these pucks act as the dampening force for the balancer. Due to its unique design, the Rattler is virtually maintenance free. If you shake it, you will know why they named it and it might even freak you out.
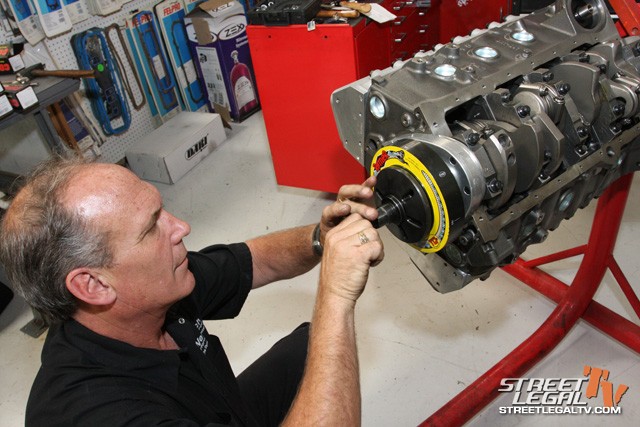
Steve installing the TCI Rattler balancer.
We will discuss the oil pan later.
Zex Perimeter Plate Nitrous Kit
Once the Fel Pro gaskets were on the heads, Steve slid on the Dart single plane intake manifold. It was now time to install our Zex nitrous plate. Zex is known for their self-contained NMU units, which are commonly known as the little purple rectangles that house all the electronics and solenoids into one compact unit. Needing to venture into the higher horsepower and carbureted market, they developed a more traditional kit with a unique perimeter plate design. There is always the hope that holes drilled in traditional spray bars are pointed in the right direction, but they might not be optimal for all manifold designs. Matt Patrick of Zex explains: “By having a perimeter design, you’re really allowing the intake manifold to do its job on pulling what it needs to each individual cylinder.” An added benefit is the heat sink effect – as the entire nitrous plate fills with extremely cold nitrous, it helps cool the components bolted to it.
You can see that the Zex plate fires the nitrous/fuel mixture all the way around the plenum opening.
Holley 830 CFM 4150 HP Carburetor
Believe it or not, this is the same carburetor that Holley builds for NASCAR competition. The HP line is definitely a race line, though tamer than their Ultra HP line, which allows these carbs to be used on the street as well. I asked Jay McFarland of Holley what the HP was designed for. His response? “The main target market is going to be anywhere from the entry level drag racer up to the professional and the Saturday night circle track racer through to NASCAR.”
The one issue that I ran into was the lack of vacuum ports for a brake booster. However, we were able to plumb an intake manifold runner for the needed vacuum. The smoothed venturis, high flow metering, screw in air bleeds, plus high flow main bodies and metering blocks are a few of the HP’s benefits. Additionally, the down leg boosters drop the discharge ring lower in the carburetor’s main venturi, where it operates in air of higher velocity, drawing more fuel than the annular style booster.

The Holley 830 CFM NASCAR inspired carburetor.
Jay further remarked, “The HP was designed as a race version of a standard 4150. Lots of racers were cutting off the choke towers and smoothing the venturis to increase airflow and get every ounce of power they could. Holley decided to design the Holley 4150 HP, which already addressed these things. It has no choke tower and a nice contoured venturi for maximum airflow and reduced turbulence. At the same time, we included high flow HP metering blocks with a race calibration.”
Pertronix Flame-Thrower Plug and Play Distributor
The Pertronix billet distributor was the final modification on our small block. Simplifying the wiring in a vehicle makes everyone sleep better at night, and that is exactly why we chose the Petronix distributor. I rang Jim Hariston at Pertronix and asked him to educate me on an adaptive dwell type distributor. “Most amplifier box type ignitions produce more energy then would ever be needed.”

Adaptive dwell is behind the magic of the Pertronix plug and play distributor.
The Ignitor 2 is a microprocessor based module that has the ability to adapt dwell time. This means that the dwell time will decrease at lower RPM’s, when high spark energy is not needed. When the engine RPM increases and you need more spark energy, the ignitor will open the dwell time. “Capacitive discharge systems have a very powerful spark, but short burn time. The reason the multi-spark is needed in low RPM is because the spark time wasn’t long enough to begin with in those low RPM’s,” Jim says.
Pertronix recently ran their plug and play distributor on a 632 cubic inch big block Chevy and it made over 1100 HP with no issues.
Final Engine Assembly at the End of Day One
Where did we leave off? Oh yeah, the balancer. The TCI Rattler balancer went on as expected, without any problems, and was secured firmly in place with an ARP crank bolt.
However, we ran into an issue when it came to put the pan on. The 240SX needed a custom front sump oil pan. We didn’t notice the problem until the pan was on the motor and the dipstick kick out was on the wrong side. Great. I dug through the local auto parts stores and finally found one fifteen miles away that I went and snatched for an over inflated price.
Pan is on, time to flip the engine back over.
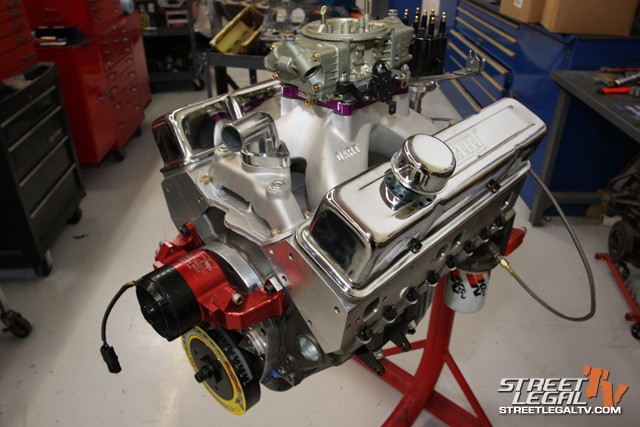
Completed engine assembly, ready for the engine dyno.
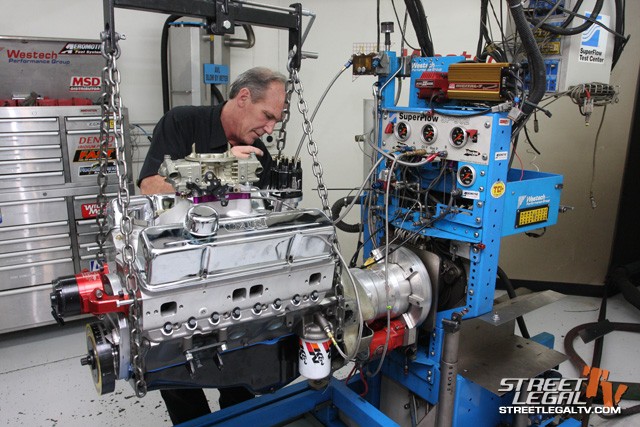
Steve getting our Dart small block on the dyno.
The Zex plate kit with longer studs and the Holley HP carb went on without any issues. Before the distributor went on, Steve primed the engine to get some oil circulating and to make sure that all the lifters pumped up. Everything looked good, so it was time to TDC the motor and drop the distributor in with the cap off, making sure the rotor was clocked to the cylinder one firing position. It was the end of the day one.
Day Two: Time to Prove its Worth on the Engine Dyno
I rolled into Westech at 8 am on day two and saw Steve pushing the engine to the dyno room on a cherry picker. Since Steve has dyno’d about a million different engines, it only takes him about an hour to get the engine situated and ready for some pulls. The time was nearing as he poured the 91 octane into the gas tank outside and began his final checks on the engine like a pilot in a fighter jet. I was getting excited. I couldn’t wait to hear it start.

702 horsepower on nitrous and 523 on motor. Not bad for a budget small block build.
Fuel pump on, fuel pushes on the throttle lever, ignition, and she’s a rumbling. Steve immediately headed to the dyno room to check the timing. Rev it past 2500 RPM and look for 36 degrees and she was set.
Steve made a series of short RPM runs merged with some idle time to correctly break in the engine. After it was all ready, it was time for our first pull.
The engine performed flawlessly out of the gate. It made 523 horsepower and 496 ft/tq, while singing to the tune of 6500 RPM. By 2500 RPM, the engine was already making over 400 ft/tq. There wasn’t a bit of valve float or misfire. It was a success.
The other amazing feat was that the Holley HP carb required zero adjustment, not even for idle to run perfect air/fuels.
Naturally Aspirated Horsepower: 523 horsepower 496 ft/tq
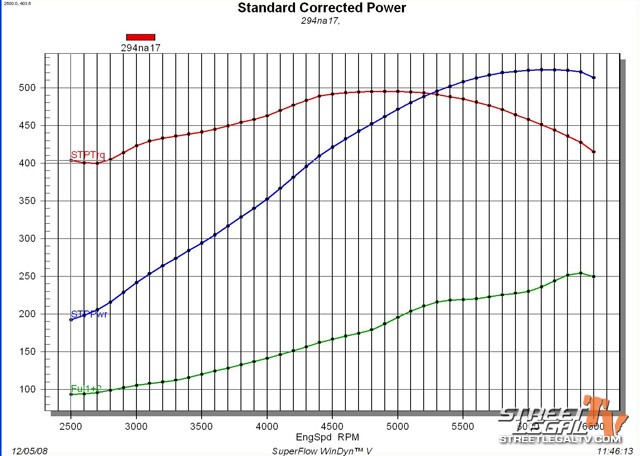
Naturally Aspirated, 523 horsepower and 496 ft/tq to 6500 RPM’s.
With grins on our faces and a few runs in the book, it was time to hook the big purple bottle onto the engine for some 150 shot pulls through our Zex system. With the bottle warmed up in the custom made Westech warmer, we were ready for a 950 PSI blast.
Again, everything worked perfectly and we netted a total gain of 145 horsepower and 143 ft/tq, making 668 horsepower and 639 ft/tq. Not bad for a budget street build, but we were not done yet. Steve felt that the air/fuel ratio was still a little on the conservative side and decided to warm the bottle up another 100 psi, making it 1050 psi.
We were ready for our last pull of the day, which was the most impressive. The difference in the bottle pressure added another 34 horsepower and 45 ft/tq, breaking into 702 horsepower and 684 ft/tq.
Nitrous Assisted Power at 950 PSI: 668 horsepower 639 ft/tq
Nitrous Assisted Power at 1050 PSI: 702 horsepower and 684 ft/tq
Now, who says that good power can’t be made on a budget? Dart uses their Pro Stock technology when it comes to designing their blocks, but the same care is also applied to the short blocks they build. With an assembled short block, top end kit, and Comp/Holley accessories, we were able to get our SHP turned from a short block to a long block in less than a day.
At the end of the day, we were extremely happy with the power numbers we produced. Every single part performed flawlessly and we were able (with the help of Westech) to put together an engine combination that makes amazing power on and off the nitrous, while still being affordable and street worthy.
We can’t wait to get the engine home and put into our Riced Rat Rod 240SX, and are looking forward to tractionless horsepower.

702 horsepower and 684 ft/tq on nitrous. Yikes!


