
It’s a gorgeous, sunny, Sunday afternoon, and you just pulled your pride and joy out of the garage. This is your Sunday afternoon ritual; you pull the car out, you give it a good cleaning, and then you reap the rewards by taking it out for a spin. But, this time you noticed an ominous brown stain on the fender. You try to get it to come off, but unfortunately, a chunk of paint came with it. That’s when you see the rusty hole in your car’s fender. Your car is infected, and now you have to deal with rust repair.
For many, rust repair is considered a black-magic art. Most of the time, enthusiasts fear that if they try to fix the rust on their own, they will make a bad situation worse. With tight finances, many enthusiasts are finally willing to try and fix the problem themselves. That’s where we come in. We traveled to Old Glory Automotive in Largo, Florida, and watched as they eradicated a rusty situation on an Impala fender.
Painting Your Repair
When applying primer and paint over your repaired rust, it is important to remember that thin coats of a high-quality autobody primer should be used. A successful repair usually requires three thin coats of primer and three-to-six light coats of paint. While you can wash the newly painted car with mild car soap, we recommend waiting at least 30 days before applying any wax.While there are a lot of images, our hope is that you can gain a basic understanding of how to properly tackle rust repair on your own car. Sure, you can slather a little body filler or fiberglass matting over the diseased area you found, but we hope that you enjoyed applying it because you will be doing it again when the rust comes back—and it will. There is only one way to completely stop rust, and that is to eliminate it. Many times, eliminating it means that major surgery will be involved, but sometimes a small repair like the one we’re showing you can be easily handled by the do-it-yourselfer at home.
DIY Rust Repair
If you live in an area where seasonal changes mean your car has, at one time or another, seen snow and ice, you will be combating rust. The “salts” used to clear ice and snow from roads will accelerate rust damage on your car. If you have rust that needs eliminating, you will need to determine whether you can treat or remove the rusted area yourself, or if you will need a professional to take care of the problem for you.
Your decision will depend greatly on how extensive the rust damage is, and what kind of results you are expecting. With that said, small repairs can usually be handled at home in your garage or driveway.
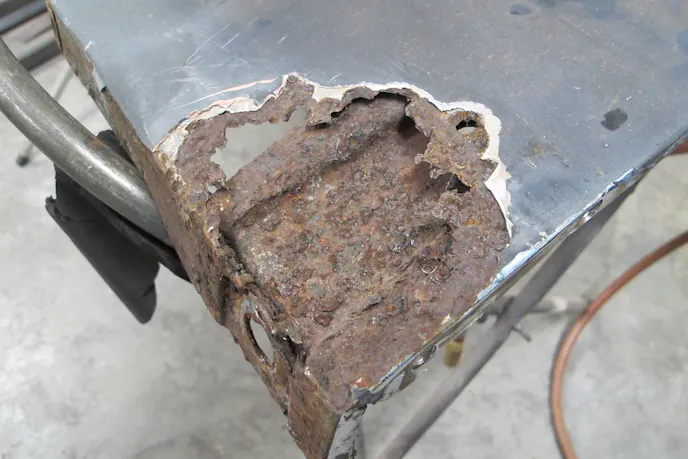
The Afflicted Candidate
Old Glory Automotive had this rusty Impala fender that needed repair, so we thought we would take an afternoon and show you how easy it is to make and install a simple patch panel. This fender is much like many others, the salt and moisture had accumulated behind the sheetmetal over the years, and eventually, the rust poked through.
Working with metal is nothing that should cause much concern. If you happen to shape it in a way that doesn’t work, reshape it. It’s metal, it can be bent and shaped many different ways before it finally cracks or breaks.
We understand that many of you doing rust repair in your home shop probably don’t have a lot of body-repair tools, especially a sheetmetal break, but you can get the same results with a couple of pieces of angle iron, some locking pliers, and a sturdy workbench.
Even though our patch panel did lose its curvature when we bent the fender-to-doorjamb lip, it was not a major issue. Sheetmetal is very malleable, and by shrinking the short, inner-lip of our patch, the curve of the metal came right back.
When cutting sheetmetal, a die grinder with a cut-off wheel works great. If you have access to a set of air-powered shears, you are a step ahead of many home shops. We used a die grinder with a cut-off wheel and a set of tin snips.
Old Glory Automotive’s Lead Fabricator TJ told us, “I like to avoid using square patch pieces. The reason is that excess heat can build up at the corners when you’re welding and cause severe warping. By making my patch piece with a rounded edge, no excessive heat buildup will occur.”
On the bottom edge of our fender is a dimpled area where a fender attachment bolt is installed. If we do not make this recess in the patch panel, attaching the fender to the car with the bolt will cause it to buckle in this area. We took a 7/8-inch socket and used it to start our “dimpled” area. Once we had the dimple as deep as we wanted, we then used a body hammer to complete the dimpled section out to the edge of the patch panel.
When you begin to weld your rust repair patch panel in place, take your time! We can’t express enough how important it is to not overheat the metal where you are welding. You will be burning small spot welds along the entire length of the patch. When you make each spot-weld, alternate from one side of the patch to the other—and even take a few breaks in between. This will keep the metal from overheating and warping. Less warpage now means less filler is required later.
With the fine pits filled in and smoothed, there is no need for any filler in this repair. If you do have a little warpage or even some fine pits, a small skim coat of filler is not a terrible thing.
The most expensive tool you will need to accomplish this rust repair is a welder. If you can’t afford or justify buying one, one option might be to make a patch panel with the simple tools we outlined, and then take the patch and the fender to a local body shop. By doing this, you don’t have as much labor cost involved, since you made the patch and prepared the fender for the patch. All they need to do is weld it in place.

While this is a fairly in-depth task to accomplish, if you decide to do it yourself, take your time and really think about what you’re doing and how to accomplish it, you can save yourself some money and fix those small rust holes at home.
You might also like
Classic Style, Modern Control: Art Morrison’s GT Sport Chassis For Early Chevys
Art Morrison's GT Sport chassis transforms the timeless 1949-54 Chevrolet into a serious restomod performer.

