 [1]
[1]
It doesn’t matter whether you’re walking around a local car show or cruise night, the chances of you seeing a car that has been the recipient of an LS swap is more than probable, it’s almost guaranteed.
But before we get deep into things don’t be fooled or discouraged, we aren’t going to paint this rosy picture about how easy the job is. With help from our friends at Holley [2], the point of this piece is to let you know what you will need to be aware of so that you can ensure a successful swap.
The Subject Of Our Swap
Michael Franz is the proud owner of this gorgeous ’68 Camaro, and has definitely noticed the surging popularity of LS swaps. Michael’s car is the typical hot rod. Under the hood was a small-block Chevy [3] with the usual upgrades like headers and a Holley four-barrel carburetor. Behind that was a Turbo 350 automatic.
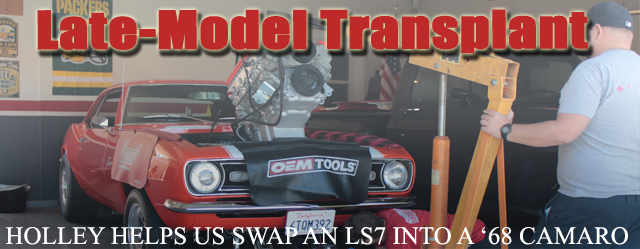
 [4]
[4]Michael already had the classic small-block removed from the car in preparation for the LS install. He also had the coils mounted to the engine crossmember with brackets he made himself.
Like we said, his car was a typical cruiser with a typical drivetrain. But, Mike decided that typical was not a style that he wanted to keep, and that’s one reason why he acquired an LS7. “The LS7 that I am using, is delivering nearly twice the power output of what the iron-headed small-block was putting out, and I also wanted to add an overdrive transmission.”
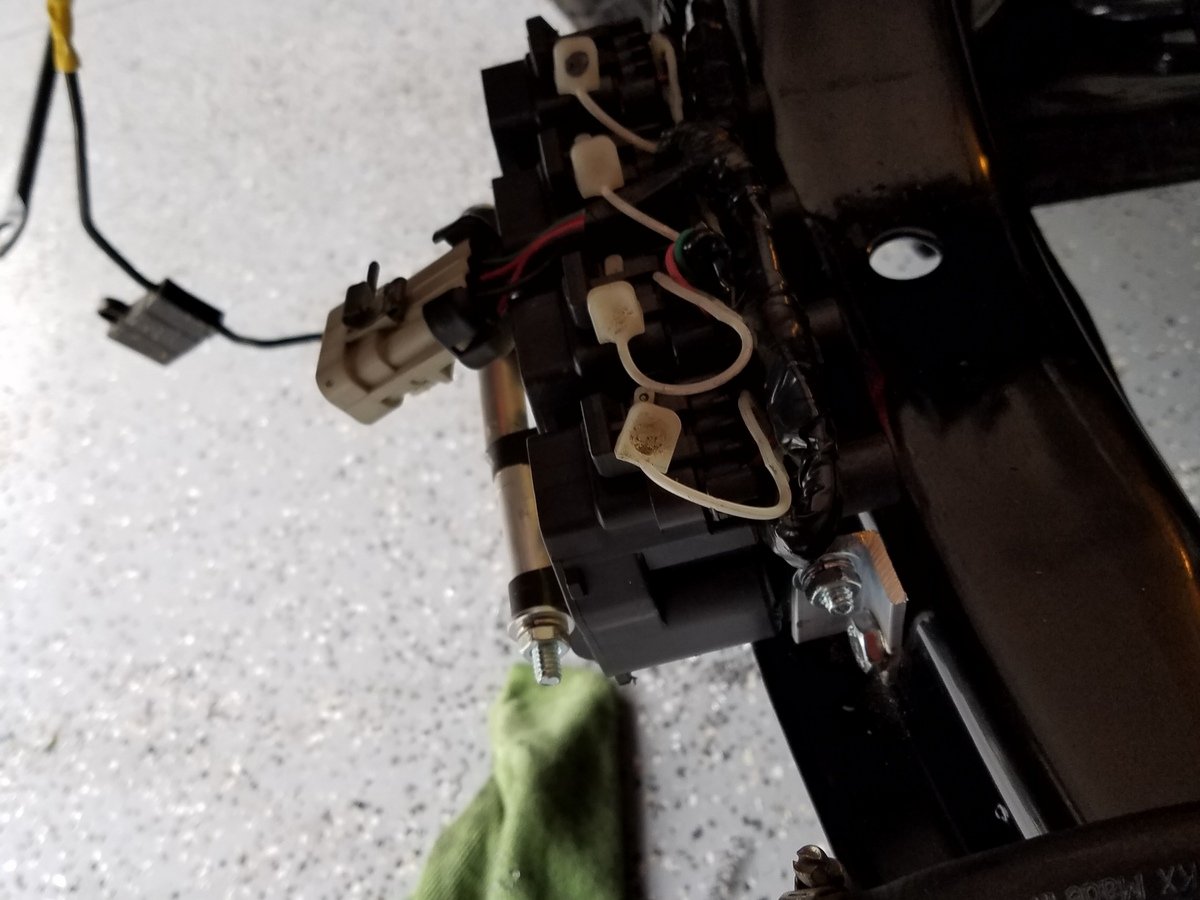 [5]
[5]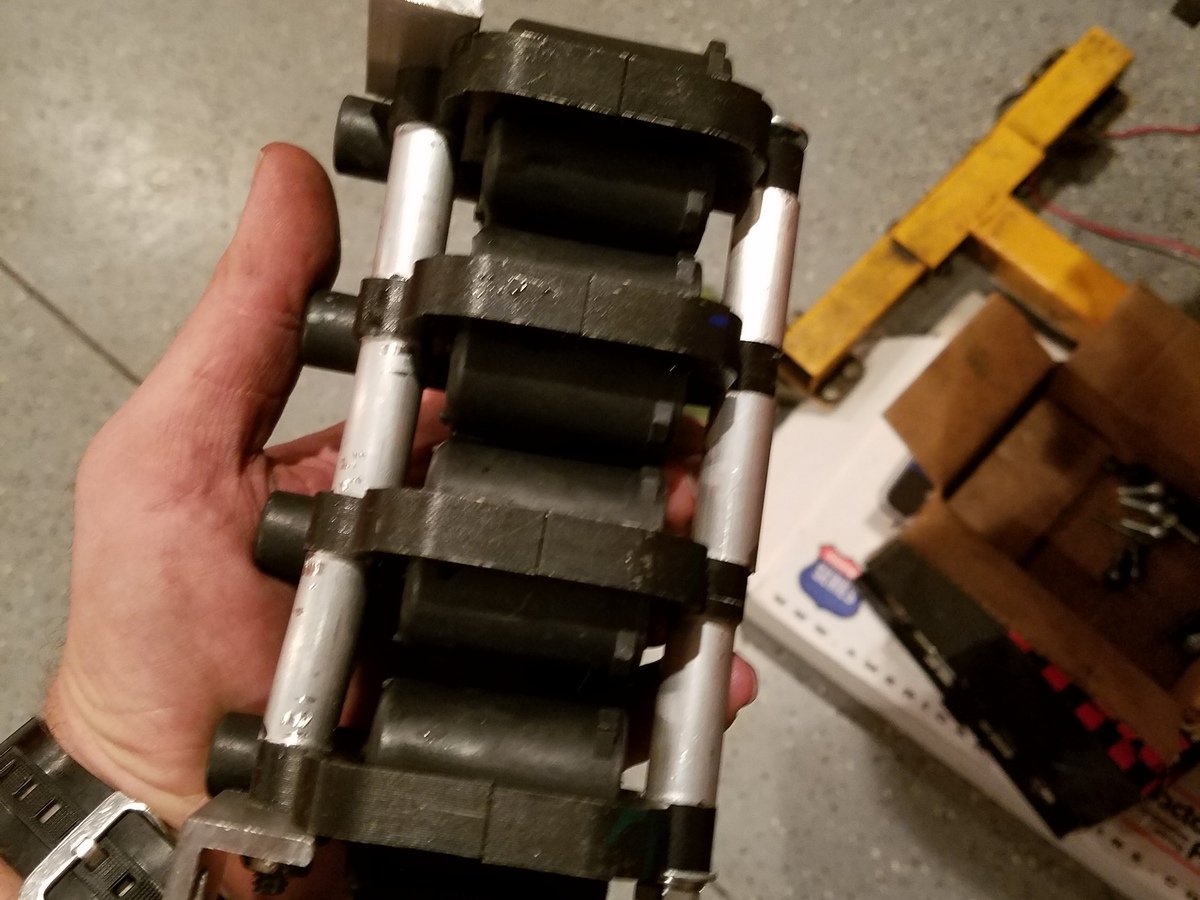 [6]
[6] [7]
[7]
Mike made a simple coil-mounting bracket from aluminum brake line tubing to keep the coils together, and then mounted them to the crossmember. This will actually deliver a clean arrangement of wires not cluttering up the top of the engine.
LS engines can be found in every junkyard and Craigslist page around the country. With displacements ranging from 4.8 to 7.0 liters, there is an engine to fit every budget and application. As an example, we found several junkyard-sourced 5.3-liter LS engines that could be purchased for prices ranging from $1,000 to $1,500. Each of them also came with the controller. All of the LS engines share the same basic architecture, which means that many of the parts will interchange — within reason.
There are a couple of exceptions to the interchangeability rule, and one of them is the LS4 used in the front-wheel-drive Impala SS and Pontiac Grand Prix GXP. This version has a unique, low-profile front accessory-drive system that includes a “short” water pump. This was designed to accommodate the engine’s transverse-mounting position. It also has a bellhousing bolt-pattern unique to the engine. This means it will not work in rear-wheel drive applications. Also, the heads, intake manifold, and camshaft of the LS6 are unique to that engine.
 [8]
[8] [9]
[9] [10]
[10]
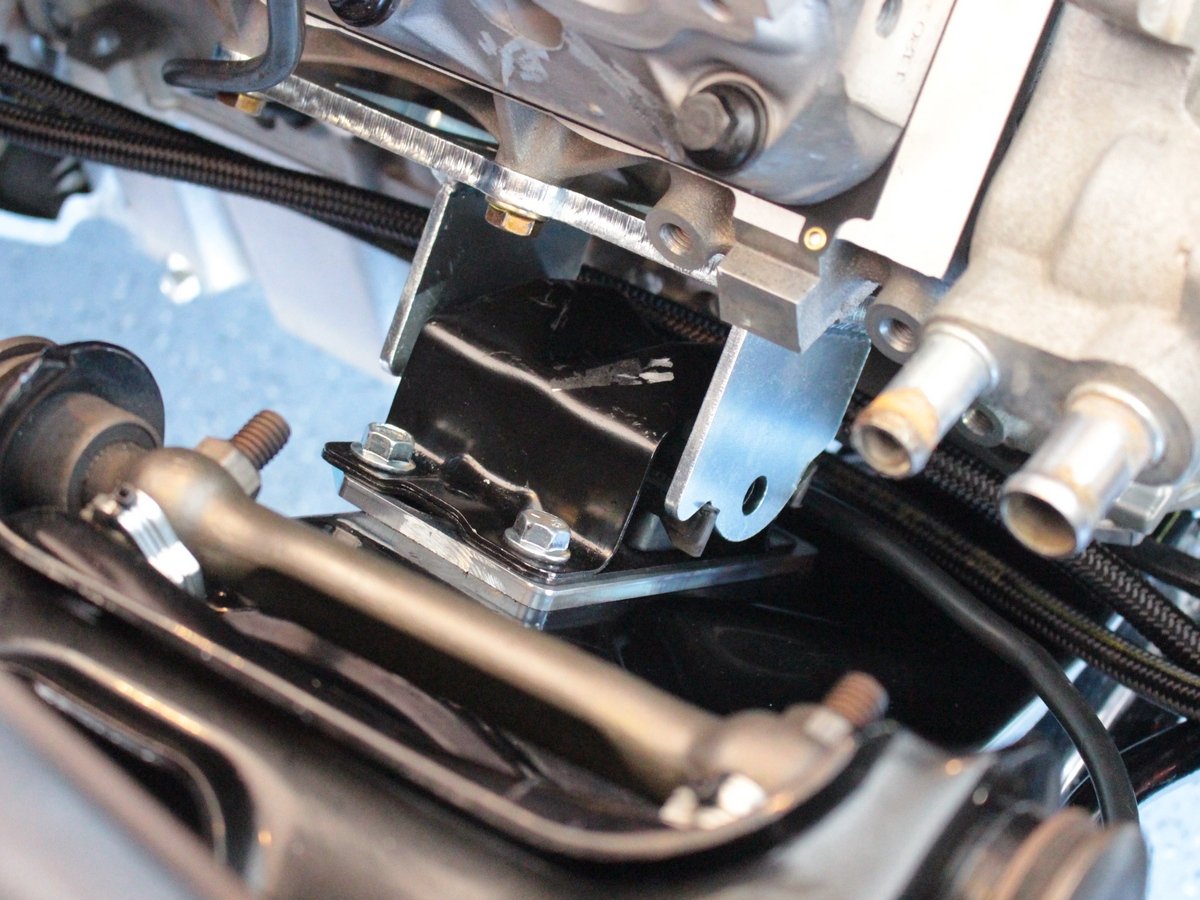
The engine mounting points with this kit move the crossmember-mounted pads slightly rearward, hence the reason for the frame mounted adapter plates. We did learn that the OE mount did need some minor trimming in this application. A small corner of the mount was removed.
Another thing that you need to know is that when it comes to the ignition timing on LS engines, most pre-2005 LS engines use a 24-tooth crankshaft reluctor wheel. The exceptions are the 2005 LS2 that was planted in 2005 Corvettes, 2005 – 2006 GTO, and 2006 Trailblazer SS. These also used the 24-tooth crankshaft reluctor wheels. The later LS2 and LS3, LS7, L76, L92, and L98, all used the 58-tooth crankshaft reluctor wheels. This will influence your ignition-box or EFI choice.
Why This Swap Is Worth The Effort
 [11]
[11]
We asked Keith Jessee, marketing and PR coordinator at Holley, about the cost versus benefit of the swap, and he was happy to tell us, “The LS engine has features that the old school small-blocks never dreamed of having. Six-bolt mains, O-ring style gaskets and seals, advanced casting methods, factory aluminum heads, the list goes on. In this day and age, LS engines are nearly as plentiful and as inexpensive as the older small-block Chevy.”
Like we said, Michael is one such enthusiast who has been interested in the capabilities of the LS engine, and has been contemplating swapping one of these new-fangled engines into his ’68 Camaro for quite some time.
The impetus to begin this swap finally came when the transmission behind his traditional small-block decided it had enough. Michael informed us, “The main reason this project was started, was I blew up the Turbo 350. But ultimately, a big reason for swapping in the LS was because I was looking for an engine with more performance.
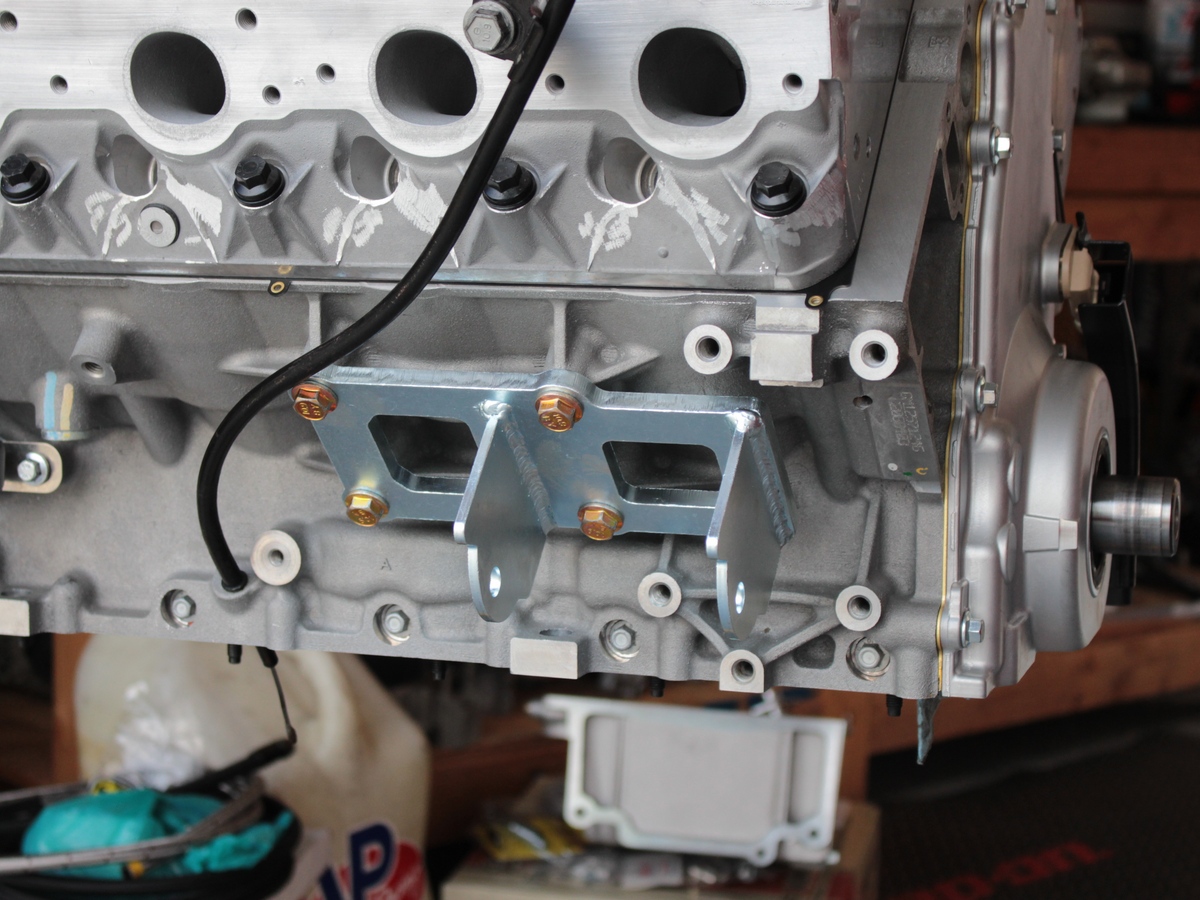 [12]
[12]Motor mounts installed? Check.
We asked Jessee how many times a day the guys at Holley get questions about doing this swap from customers/enthusiasts, “During my time in the Tech Service department, I typically handled 60 to 70 phone calls a day. I would say at least 10 of those were related to someone swapping an LS engine into something. Keep in mind, there were usually about 10 tech representatives on the phones at all times.”
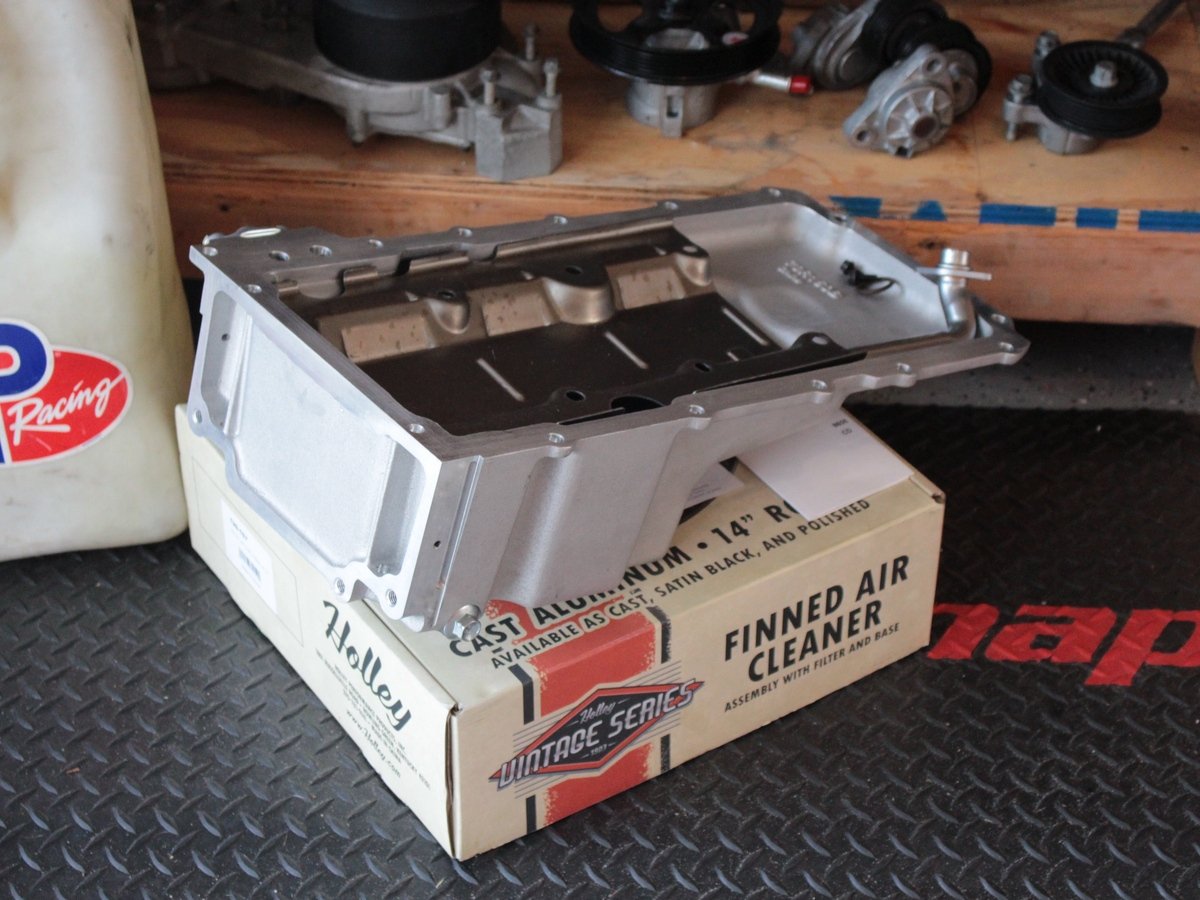
 [13]
[13]If using a traditional wet-sump oiling system, the LS7’s, dry-sump oil system will need swapped. That’s why Mike ordered Holley’s retrofit pan kit and swapped them before installing the engine.
In this day and age, LS engines are nearly as plentiful and as inexpensive as the older small-block Chevy. – Keith Jessee, Holley

Two of the biggest concerns that many have when contemplating this swap, is fuel delivery and wiring. If you plan to run the LS factory EFI, then the easiest way to overcome the wiring issue is to purchase the controller and wiring harness with the engine.
In Michael’s case, he decided that he wanted to use a carburetor to feed his LS7, so that eliminated much of the engine-control wiring. But he did say, “Most of the wiring in my car is still from 1968. This old wiring is not really up to the task of supporting the newer electronics and added fuel pump, so everything was installed and connected with relays. The absence of EFI did limit the fuel system wiring needed, but the ignition still needs a brain to function. There are multiple boxes available to handle this function, but Michael chose MSD [14]’s 6LS box (PN 6012).
 [15]
[15] [16]
[16]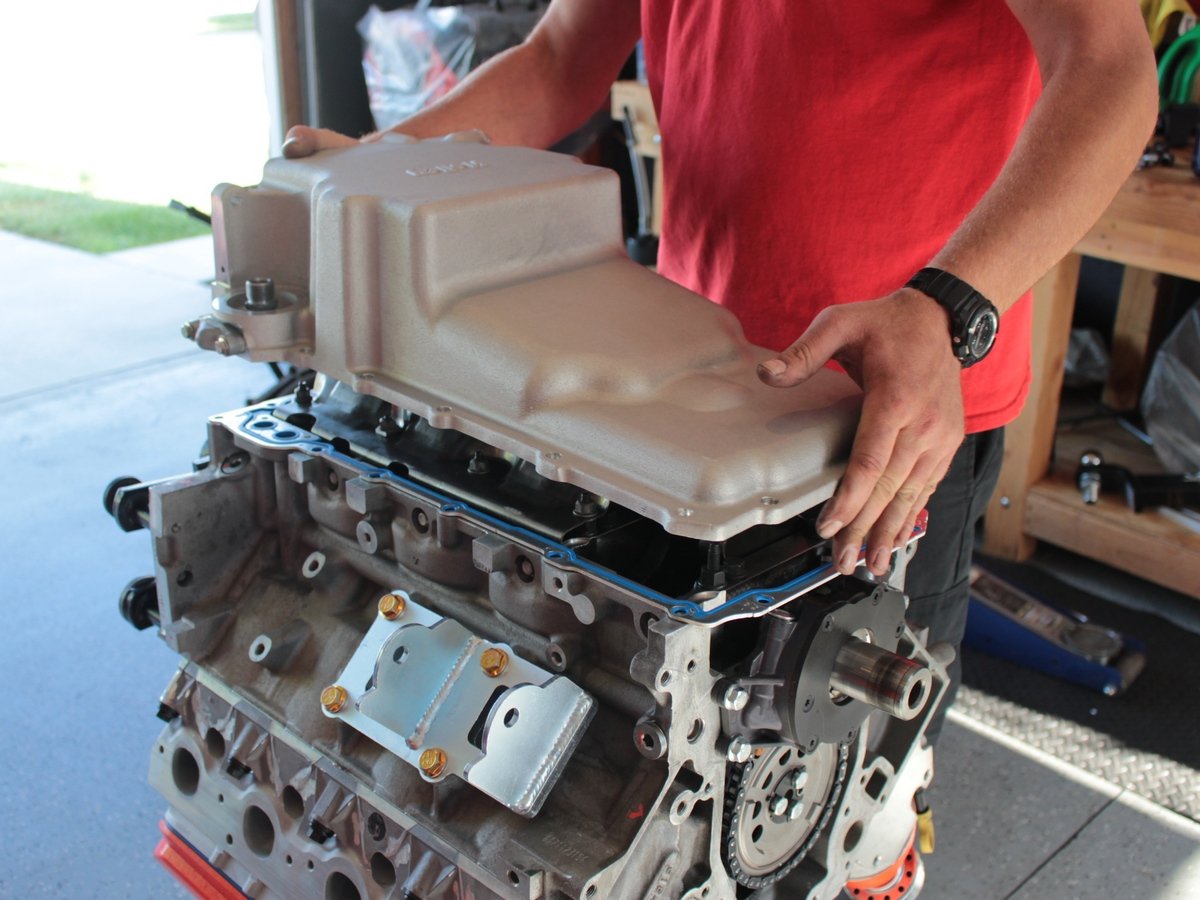 [17]
[17]
Swapping the oil pan is easy, remove the bolts, lift the pan, change the pick up tube, and replace with the new pan and gasket.
The next item you’ll need is a transmission. The LS engine will connect to any older GM transmission, but, since Michael’s Turbo 350 went boom, Michael wanted to add an overdrive to make his Camaro a lot more enjoyable on long drives. That is why he chose GM’s 4L60E. This electronically-controlled transmission was introduced in trucks during the 1993 model years, and then in rear-wheel-drive cars in 1994. What this means is that another control box is needed – or is it?
 [18]
[18]With the Holley pan installed, Mike could put the front cover and OE pulleys in place.
To keep things simple, Michael built his transmission to be manually shifted, so no controller is required. This is a truly viable option, as long as the driver never forgets to downshift to First gear when the car comes to a complete halt. Try to get the car moving without downshifting, and you will quickly burn up the transmission. But, manually shifting does not address the lock up feature of the torque converter. He simply installed a toggle switch mounted on the dash to control that function.
 [19]
[19]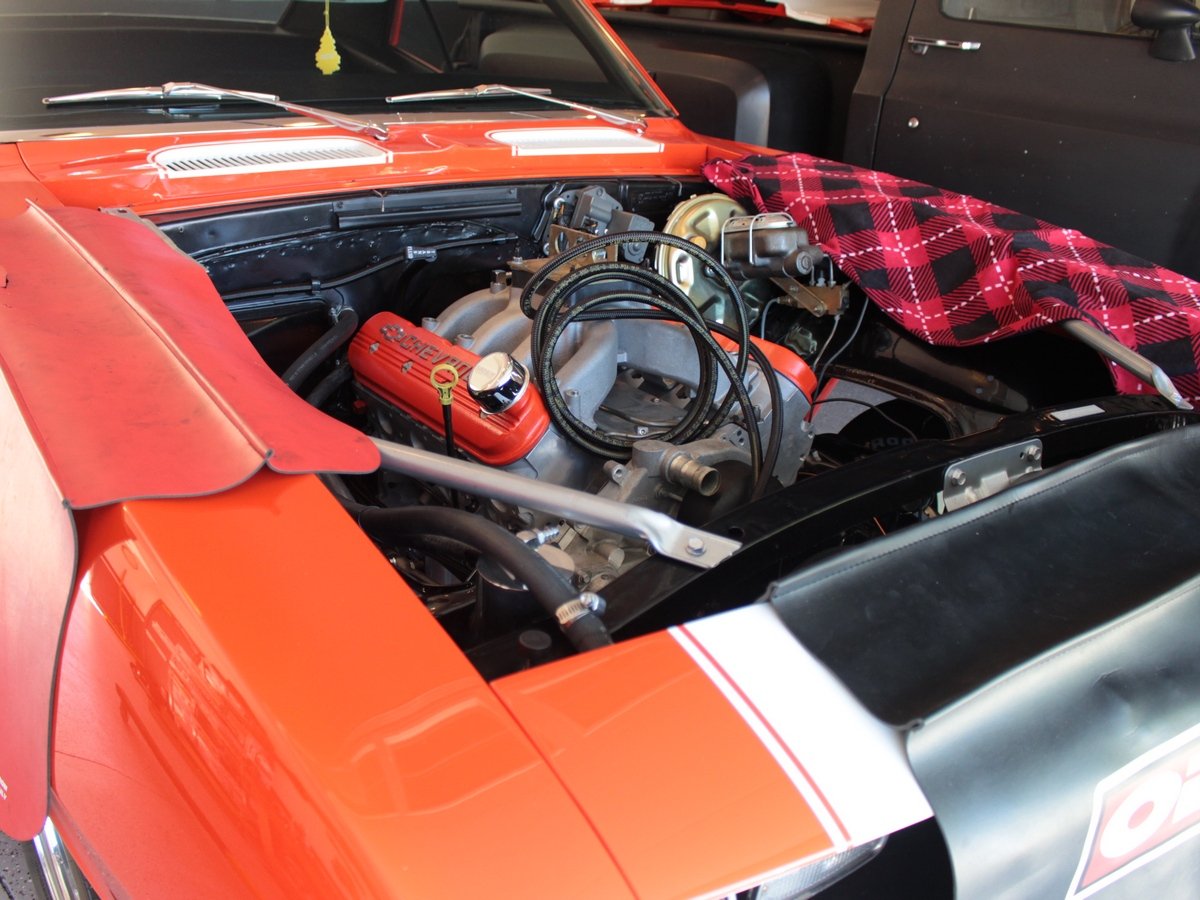 [20]
[20]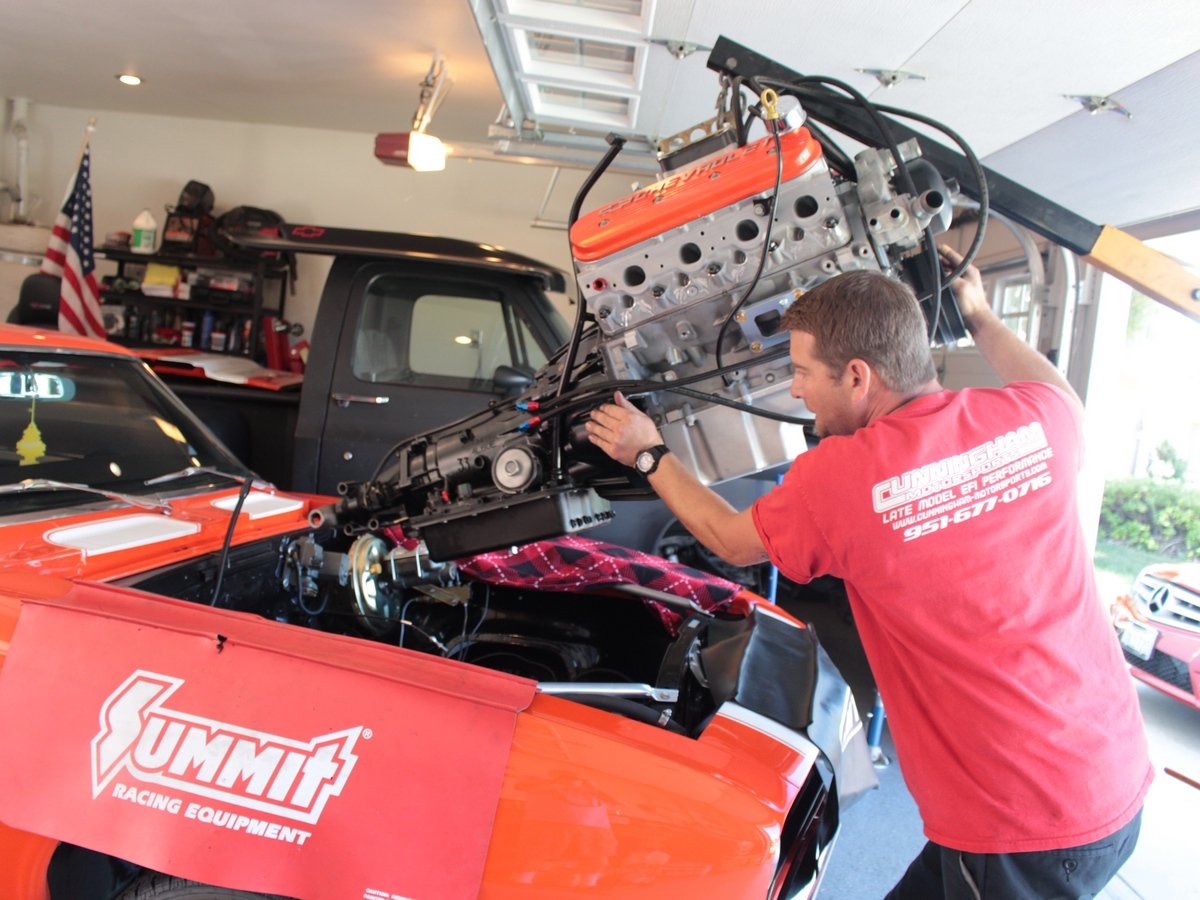 [21]
[21]
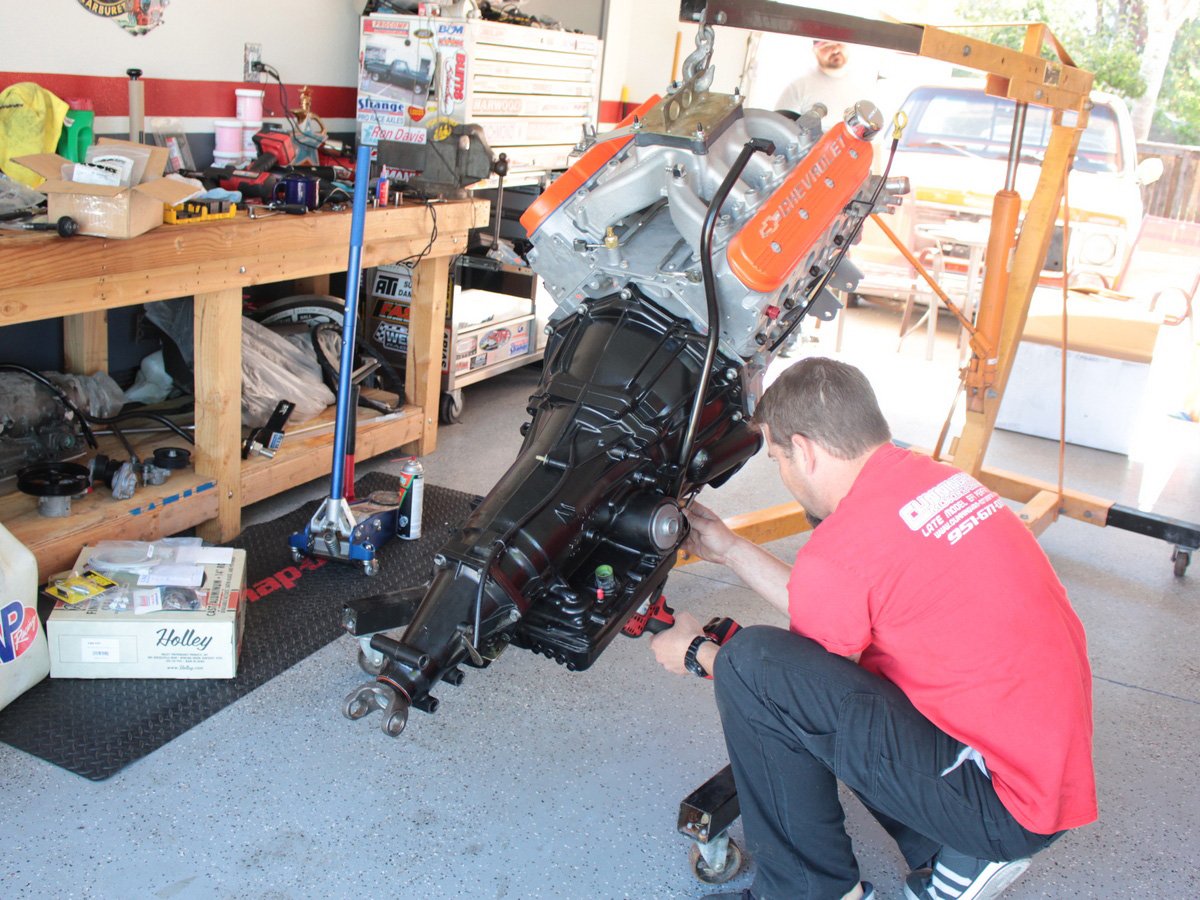
After the transmission was bolted to the engine, the assembly was lowered into the car. According to Mike, it dropped right into place.
Making It Bang, Suck, And Blow
A few of the last things that you need to consider are the fuel system, alternator mounting, and exhaust manifolds/headers. If you are using the factory or an aftermarket EFI, then a fuel system designed for EFI needs to be considered. Since Michael is using a carburetor on his LS, the stock fuel system will suffice – almost.
It is a very well-engineered kit, and I will be using one again in the future – Michael Franz
This means you have one of two choices, utilize the bulky, factory accessories and drive system, or upgrade to an aftermarket unit. Holley makes this task easy by delivering an accessory-bracket kit that handles the mounting of the alternator and power steering pump, with various configurations to fit your chassis.
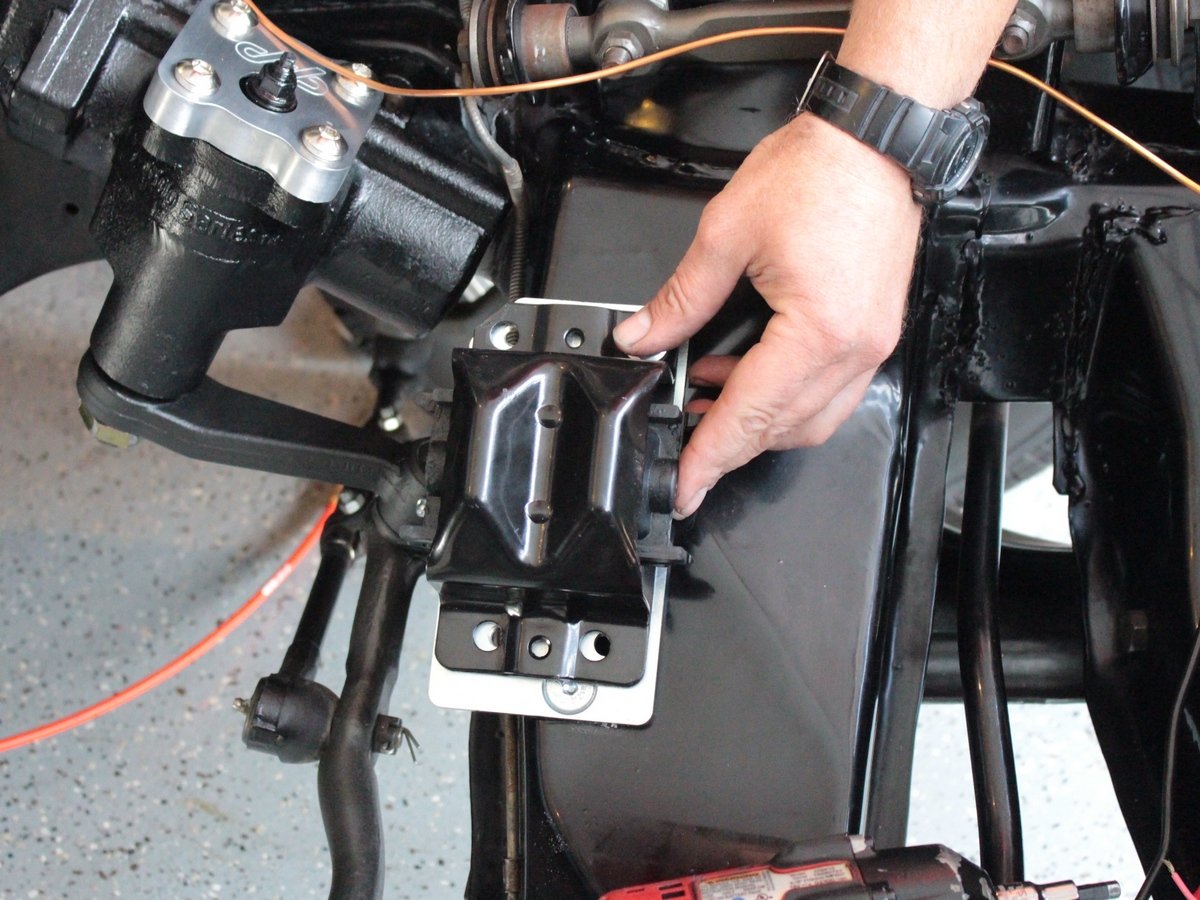
 [22]
[22]Here you can see the pulley interference that is mentioned in the instructions. Mike overcame this issue by using aftermarket, tubular control arms.
The Holley bracket uses a standard late-model alternator that is common on most 1996 through 2005 GM trucks and 1998 through 2006 Camaro, Firebird, and GTO. The recommended power steering pump is from a 1997 and later Corvette (Saginaw TC type). There are other pumps that have the same housing design, but the folks at Holley tell us the bracket is tailored for the Corvette pump. TIP: All non-Corvette pumps do not have a correctly positioned reservoir hose tube, which might cause interference.
 [23]
[23] [24]
[24] [25]
[25]
With the engine lowered onto the frame mounts, the transmission mount and crossmember can be installed.
Holley’s kit gets you the bracket and hardware needed for installation, but you need to supply the accessories. These are, many times, already on the engine when you purchase it. As a side note, if you are installing air conditioning, Holley also sells a passenger’s-side bracket for mounting the A/C compressor. Since there is no air conditioning in Michael’s car, the driver’s side kit was the only kit needed. Nearing the end of the install, the exhaust now needed to be addressed.
While certain OE exhaust manifolds will fit certain applications, many enthusiasts feel that adapting the clunky, cast-iron exhaust manifolds to an upgrade like this is akin to cutting corners. So, for this swap, Mike chose Hooker’s long-tube headers, and their dual exhaust. The headers are designed specifically for this application.
 [26]
[26]The headers should be placed in the engine compartment before the engine is installed. If you’re putting them into position after the engine is installed, the passenger’s side will fit with relative ease, but the driver’s side of the engine will need to be lifted to make room for that header to slide into position. Ask us how we know.
In A Nutshell
We asked Michael what he thought about the Holley parts after he had the chance to install everything, “The entire kit fit extremely well, after dropping the engine in, the motor mount bolts slide right through their holes and the transmission crossmember fit better than the stock one. It is a very well-engineered kit, and I will be using one again in the future.
 [27]
[27]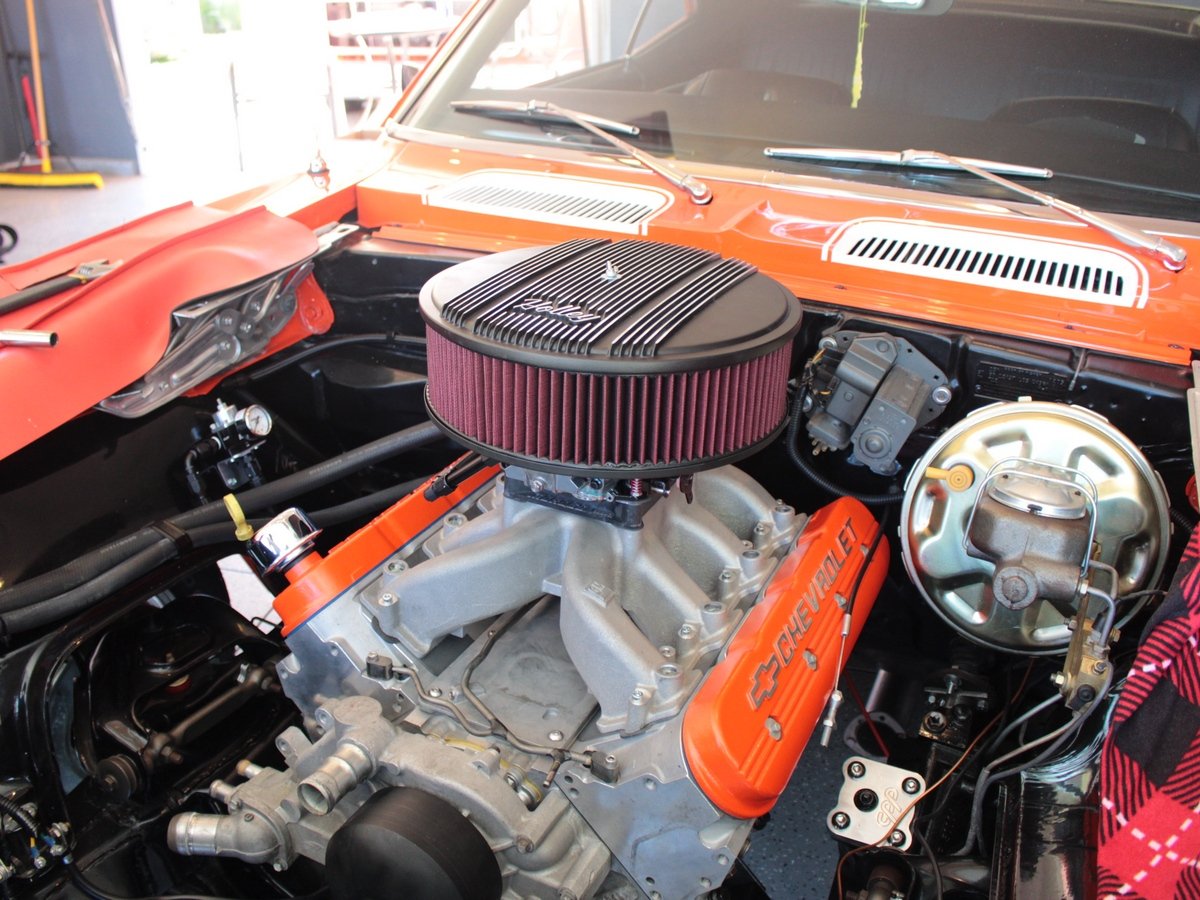 [28]
[28]
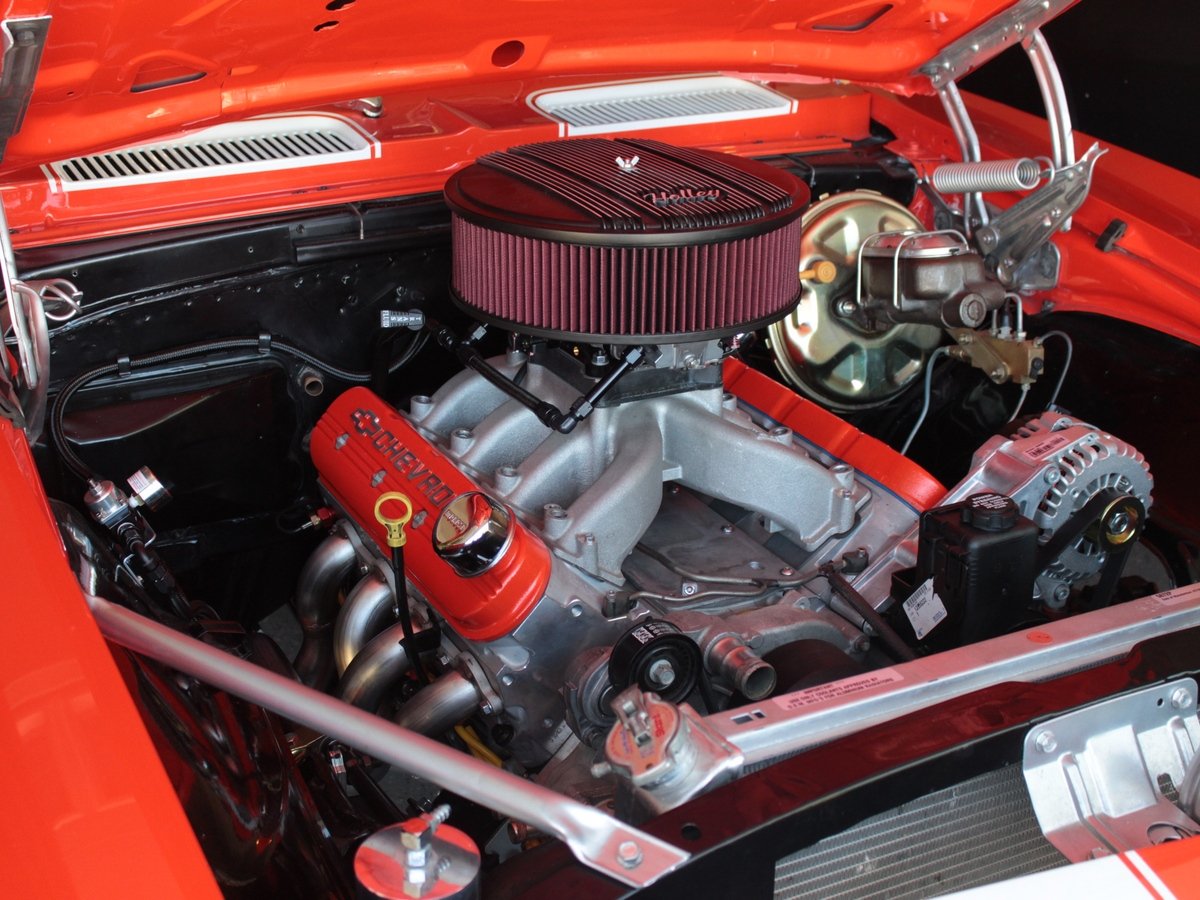
The 750 cfm carburetor is the perfect size for this LS7, and topped with a 14-inch round air cleaner, the engine looks right at home in the classic Camaro.
“It all just bolts together – it’s too easy.” With that being said, he did follow up by letting us know about a potential fitment concern that will need some attention on your part, “The only issue we did run into was the upper control arm interfered with the belt clearance on the power steering pulley.” Some power steering pulleys may interfere with the suspension A-arm in certain swap applications.
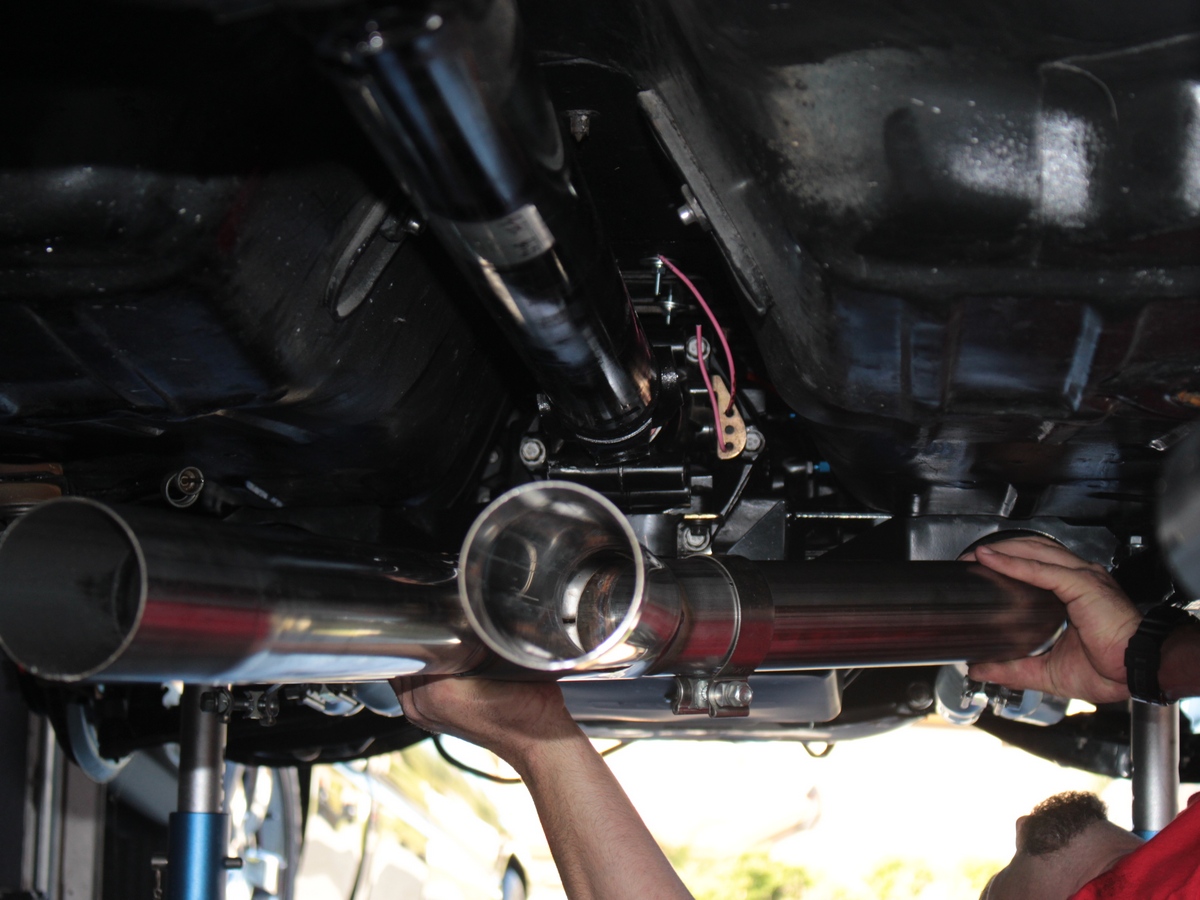 [29]
[29]After finishing the exhaust install, we were all impressed at the ease of which the task was completed.
Choosing a smaller pulley in these situations can give additional clearance, but a smaller power steering pulley, can rotate the pump beyond its recommended RPM limit. To correct this, a 25-percent underdrive balancer should be used when a 6-inch or smaller diameter pump pulley is used. Mike continued, “Holley mentions this in their instructions, and my solution was to use aftermarket upper control arms.”
 [30]
[30]
Overall, this swap can be completed in a weekend if you have a buddy or two to help, and your newly-upgraded classic can be ready to go in no time. Working out of his home garage, Michael was able to complete the swap with no hammer modifications, throwing of tool, or excessive mumbling whatsoever, which makes an undertaking such as this a truly enjoyable DIY-type upgrade.