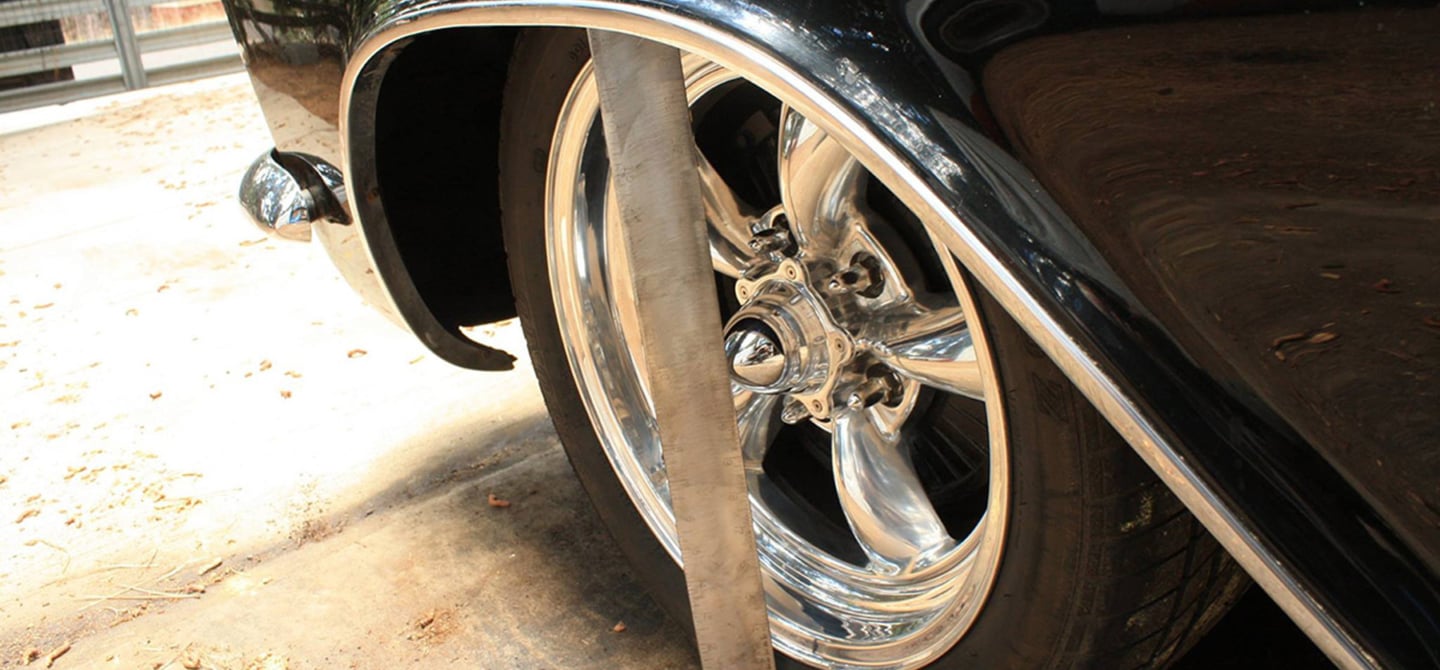

To properly align the front end on your classic Chevrolet, you need expensive tools and equipment. Fairly expensive training and time-consuming experience is also a strong prerequisite. However, should you find yourself needing to replace vital suspension components at home, there are things you can do to get the alignment in the ballpark so you don’t destroy your tires or new suspension components until you get to the alignment shop.
Camber And Toe Problems Do The Most Damage
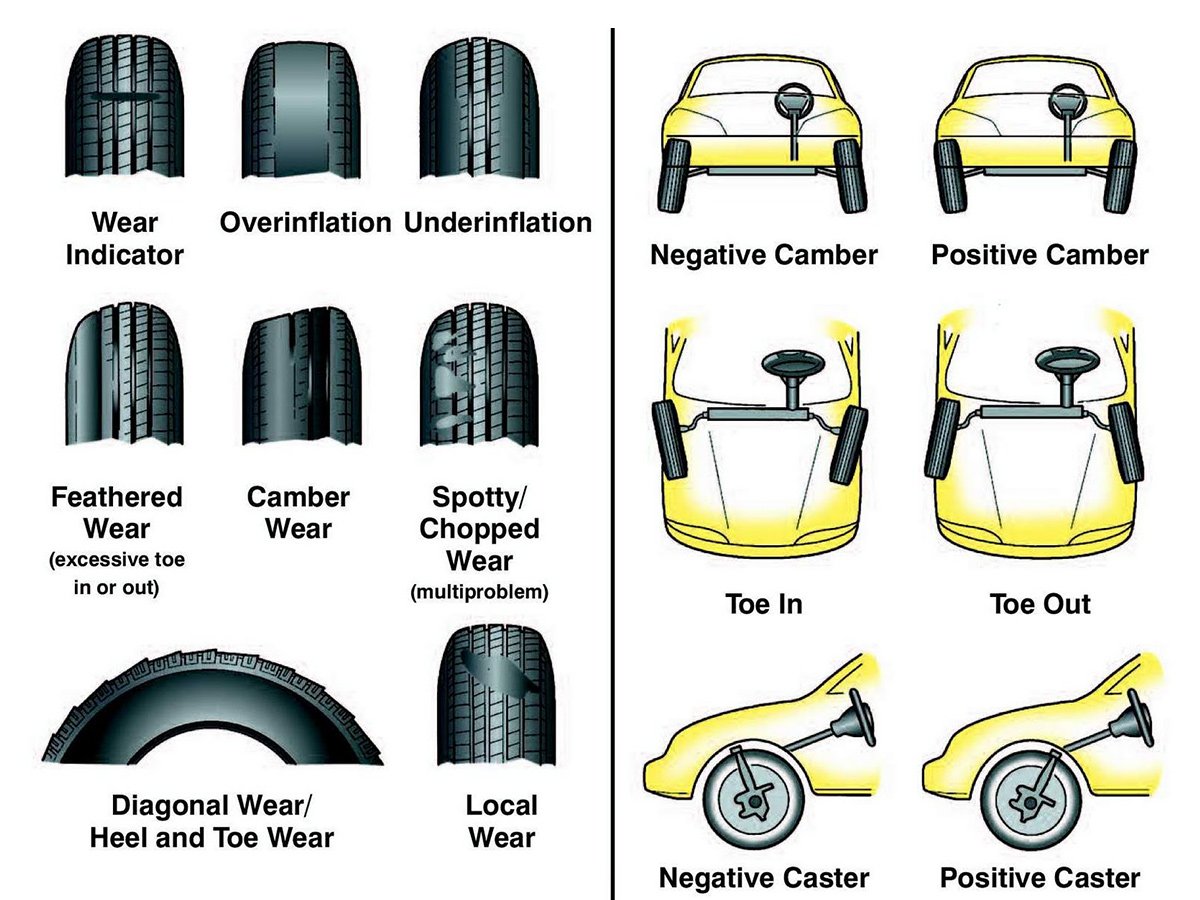
There are three adjustments that can be made to most suspensions: caster, camber, and toe. When camber and/or toe are out of adjustment, they can do the most damage to your tires and suspension components. However, caster should not be overlooked.
Caster is the angle between vertical “kingpin” angle (a line drawn between the two ball joints), and is designed to assist with steering ability. Camber is the inward or outward lean of the tire from vertical, while toe is the inward or outward orientation of the tire in relation to the car’s front-to-rear centerline.
What You Need to “Eyeball” Camber
In order to properly set camber, you’re going to need a few tools. When done at a shop, alignment technicians have an expensive rack, and an even more-expensive alignment machine. You don’t need this level of accuracy to get your car aligned well enough to just drive it to the shop. But, you do need to at least get it at least close to specification. For this, you’ll need:
Types of Alignments
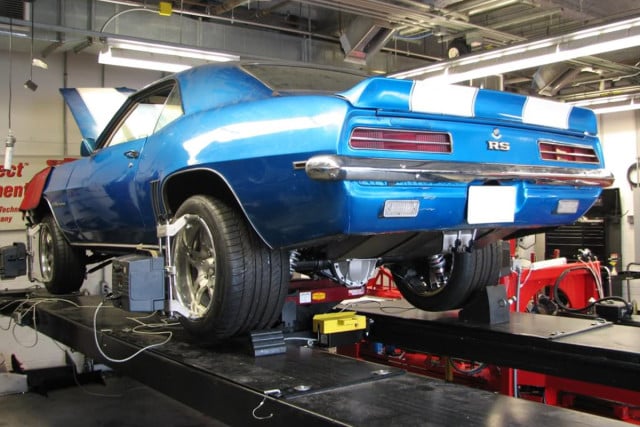
There are three types of alignments that we can perform on modern cars: the thrust alignment, two-wheel alignment, and four-wheel alignment. Most shop alignments will be the thrust type. This requires four alignment heads, and aligns not only the front wheels, but the rear wheels. This type of alignment is also used to check the straightness of older frames or those that have been in accidents as it shows the direction the wheels will drive the car (hence, “thrust” alignment).
- A piece of string long enough to go around the circumference of your tire
- Tools; sockets and wrenches to loosen nuts and bolts
- A torpedo level to measure angles
- Alignment shims
- A tape measure
- Large carpenter’s L-square
Most older Chevrolet cars have double A-arm front suspensions that use shims to adjust caster and camber. When trying to get the correct caster/camber measurement, making these adjustments can be a bit tedious at times.
Some parts stores might rent you a camber-measuring device that uses a magnet to secure it to the front hub. If you can find one, carefully follow the directions to calibrate and use it. The readings you achieve will be much more accurate. Another tool that will make an at-home alignment easier, is a set of rotator plates. Although most guys will not have a set of plates, if you know someone that does and they will let you use them, they are worth getting your hands on. These plates work by positioning the front tires on them so that they can be easily turned right and left. The plates remove the friction created with the tires sitting on the floor of your garage, and allow the wheels and suspension to move around more easily as you make adjustments. However, they can be heavy and cumbersome, and decidedly not cheap. If you can’t find plates to use, two pieces of cardboard with grease slathered between them also works.
As far as alignment shims, you can usually find them at a number of locations. Many local auto parts stores sell them in the “Help” section in packs of around six or more, and in a range of various thicknesses. If you are spending your weekends in salvage yards, you can also grab a handful while you’re grabbing other parts. Where you get them is irrelevant, but they are necessary for aligning the front end of your car.
Get Ready To Check And Set Camber
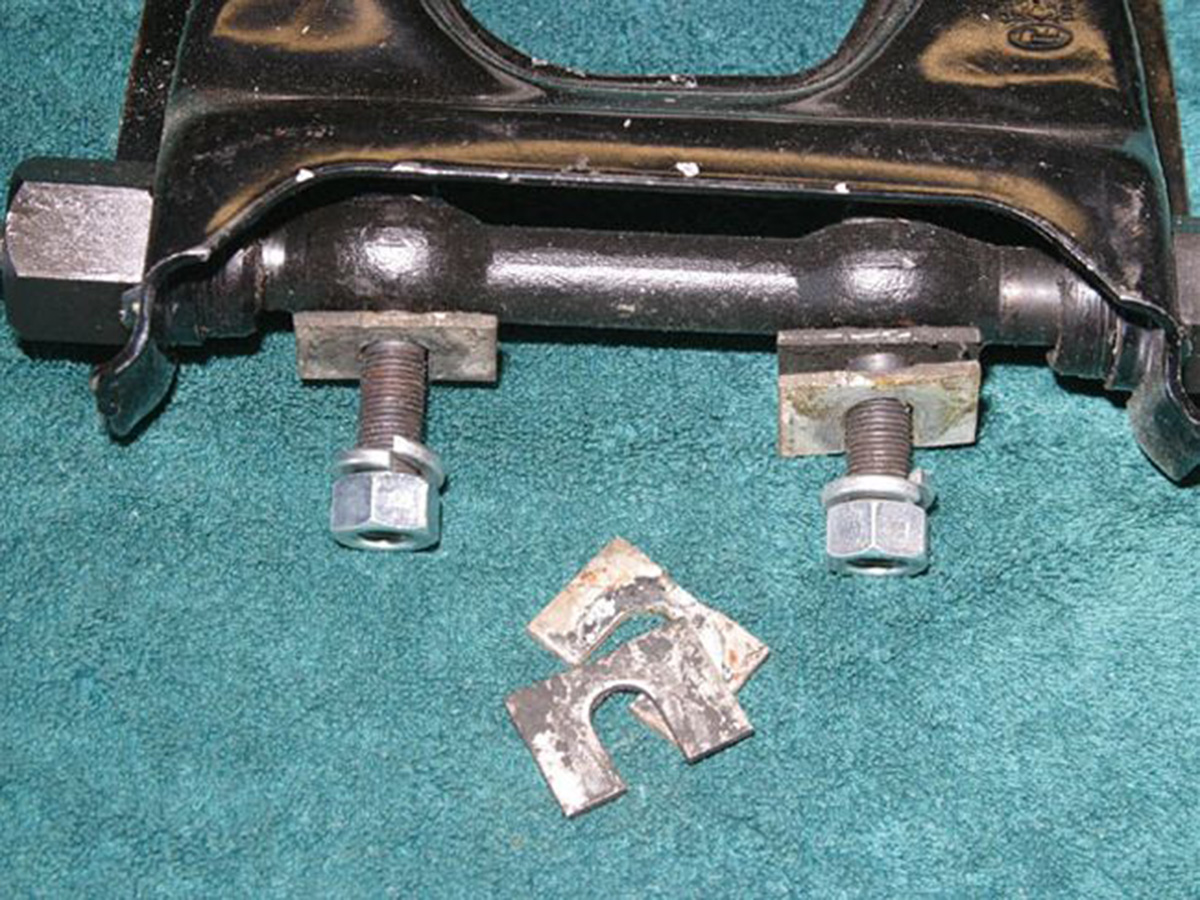
An example of an outboard-mounted upper control arm, showing the shims used to adjust caster and camber. When two shims (one from each bolt) of the same thickness are installed or removed, camber is adjusted. If the shims are of different thicknesses, both caster and camber will be affected.
Checking Camber Method 1: String
Park the car on a surface that is flat and level. Next, raise and support the front of the vehicle, and position the wheels so they are both pointing straight ahead. Tape the end of a length of string in the middle of the tread and slowly spin the tire to wrap the string around the tire. Keep the string centered in the tread. Once the the two ends of the string meet, tape the other end into place. Repeat on the other tire and then lower the vehicle.

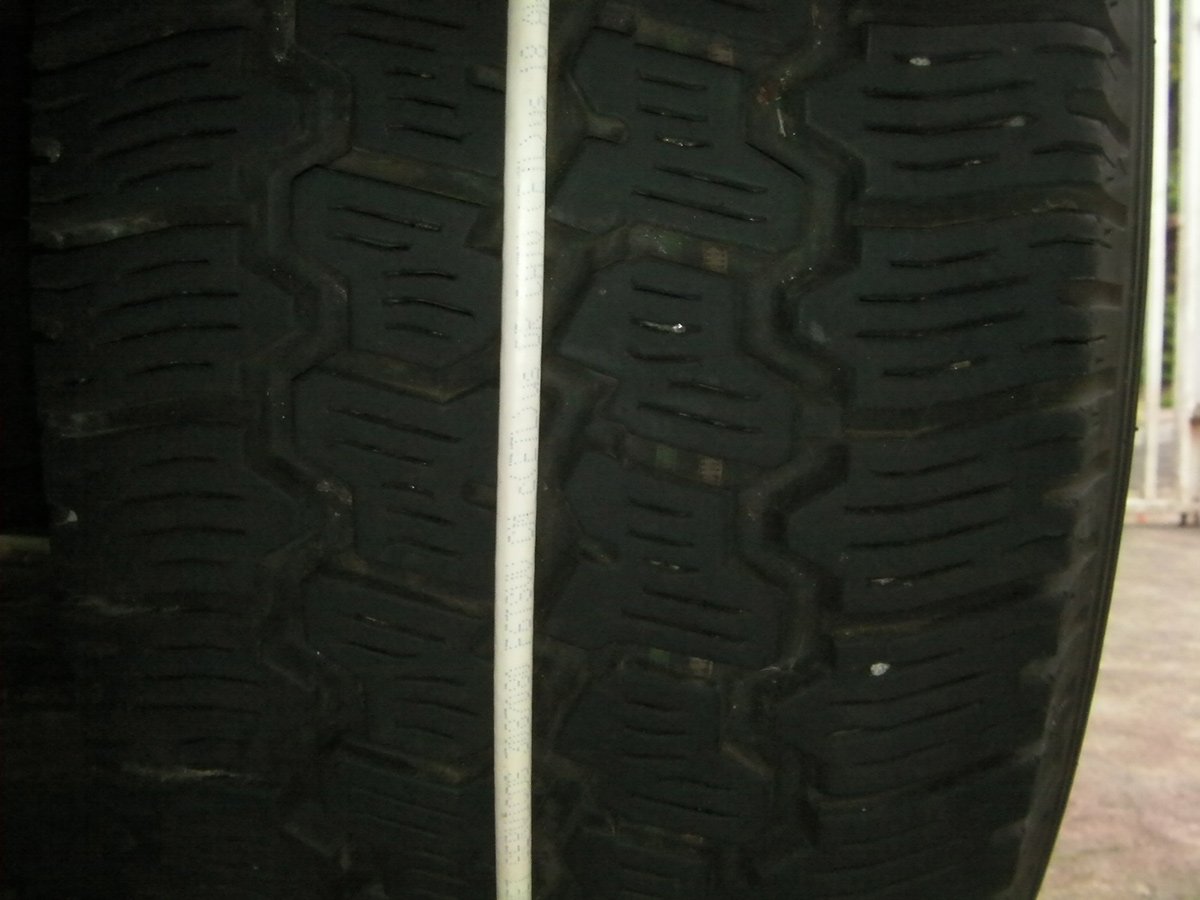

Left: Wrap the tire with a piece of string. Left-Center: Use a tape measure and straight edge to measure the distance from the sidewall to the string. Right-center: Move up the tire and measure again. Adjust as necessary to keep the string perfectly straight around the circumference of the tire. Right: Use a protractor to measure the angle of the tire's lean.
Checking Camber Method 2: Large Carpenter’s Square
A carpenter’s square can also be used if you have one large enough. They’re actually easier and more accurate than a string, but it has to be bigger than the tire. First, place the long leg of the square against the sidewall of the tire (at the top and bottom of the tire), with the shorter leg sticking straight out perpendicular to the tire. Use the protractor to measure the angle of the horizontal gap formed by the small leg and the ground. To accomplish this, the tire must properly inflated to eliminate the “bulge” of the tire as it rests on the ground.
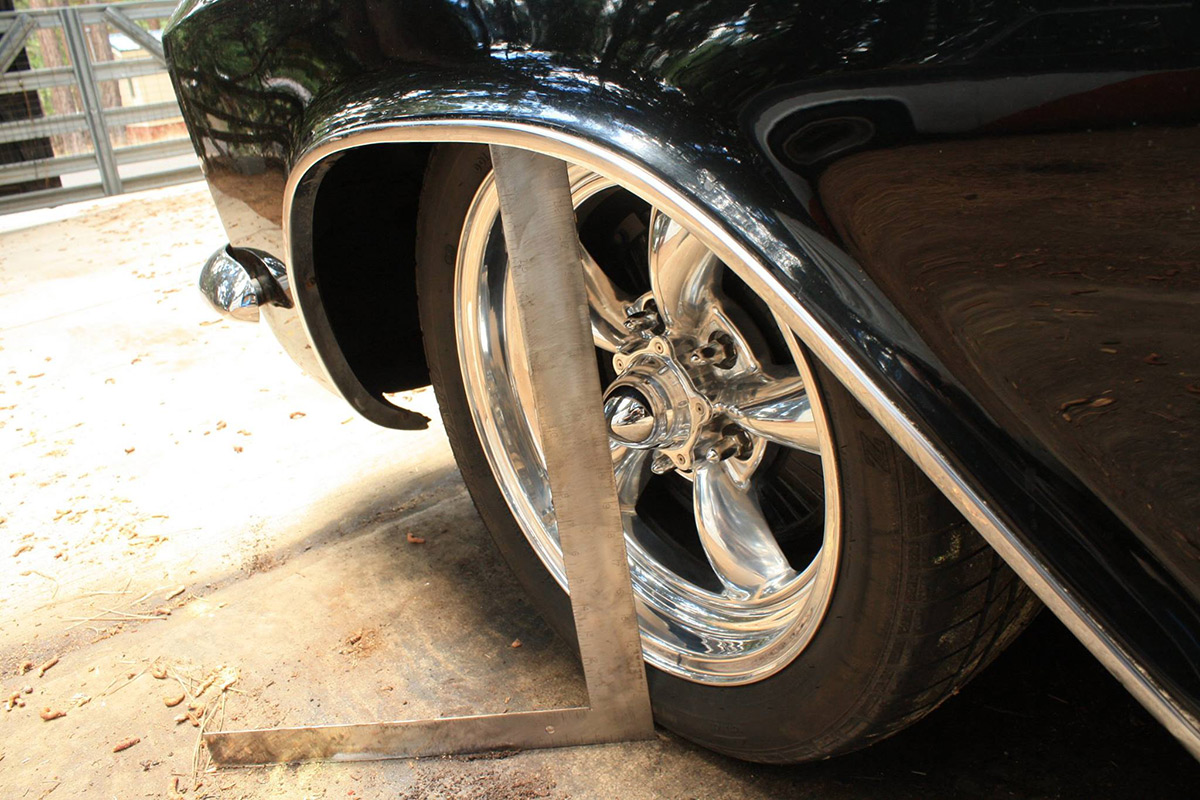
Place the long edge of the square against the sidewall with the leg on the ground. Image by Sam Goodman.
Method 2: Use A Bubble Level
Another way to check camber is to use a bubble level. To do this, you must have a level that is long enough to span the tire. Again, make sure the tire pressure is adequate. Position the level vertically against the sidewall of the tire, and take note how the bubble is positioned. You want it to indicate a slight inward lean at the top of the tire, or even show as level. If you plan on doing any driving where you need to increase the handling capabilities of the car, a slight inward lean (negative camber) of about 1 to 1 1/2 degrees is ideal.

A bubble level with horizontal level capabilities also works. Set it against the tire as such and check the bubble.
Setting Camber With Shims
Use the torpedo level or a protractor as in the images above to determine the inward or outward slant of the tire. If the string is not perfectly vertical, you should adjust the camber to get it as close as possible. Here’s how to adjust control arms that use shims:
- If the pivot shaft is inboard of the frame, adding shims causes the top of the tire to lean inward, increasing negative camber. Removing the shims causes positive camber, or an outward lean.
- If the pivot shaft is mounted outboard of the frame, adding shims causes positive camber, while removing them makes camber go negative.
Once you have the camber set, tighten the shim packs securely. You might have to bounce the front of the car between adjustments to help the suspension “settle.”

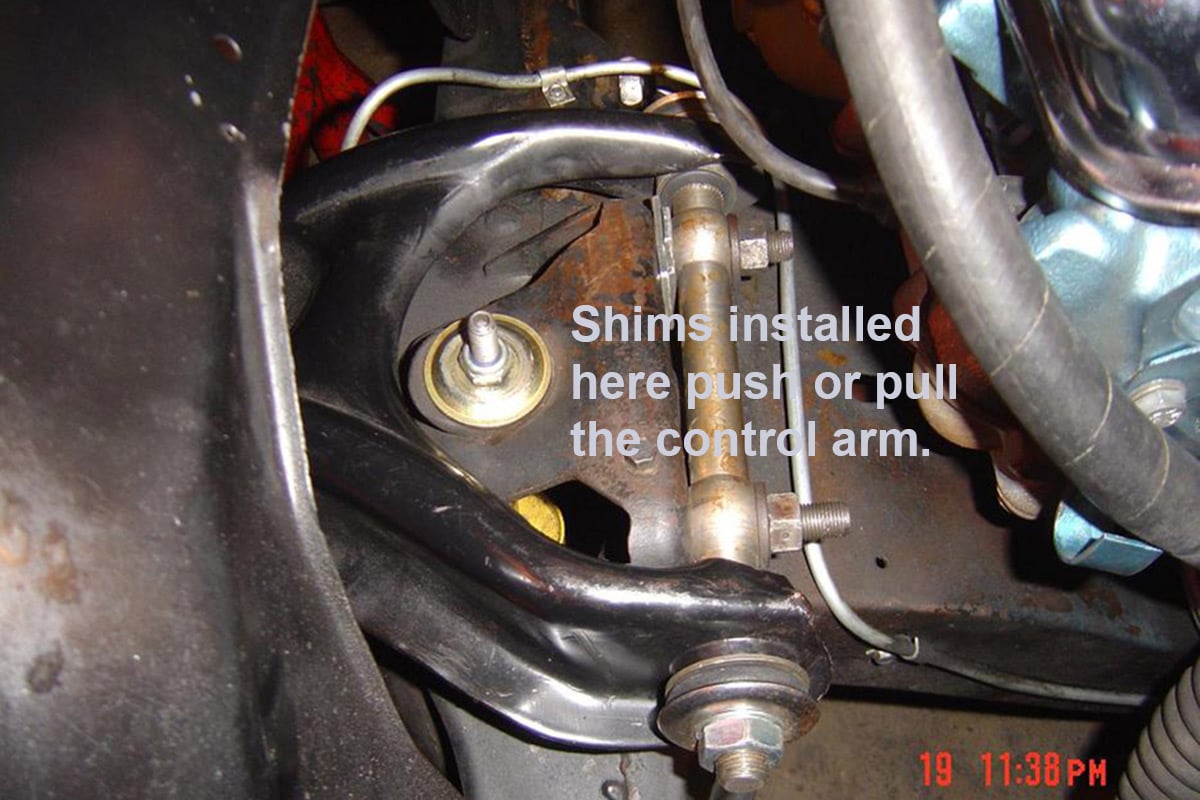
Left: Shims come in different shapes and sizes, but by necessity, all look similar to these. Shims of different thicknesses are used to adjust caster and camber. Center: Watching someone install shims. Right: Control arm with shims installed showing how they cause caster and camber to adjust.
Don’t Make Big Adjustments
When making adjustments, make small, incremental adjustments, and then snug the nuts and bolts. When tightened, bouncing helps the suspension settle. Repeat until you get the adjustment you are looking for.
Measuring Toe Angle

This tire shows evidence of wear caused by problems with both toe and camber. The irregular wear pattern, called feathering, is caused by an excessive toe in condition.
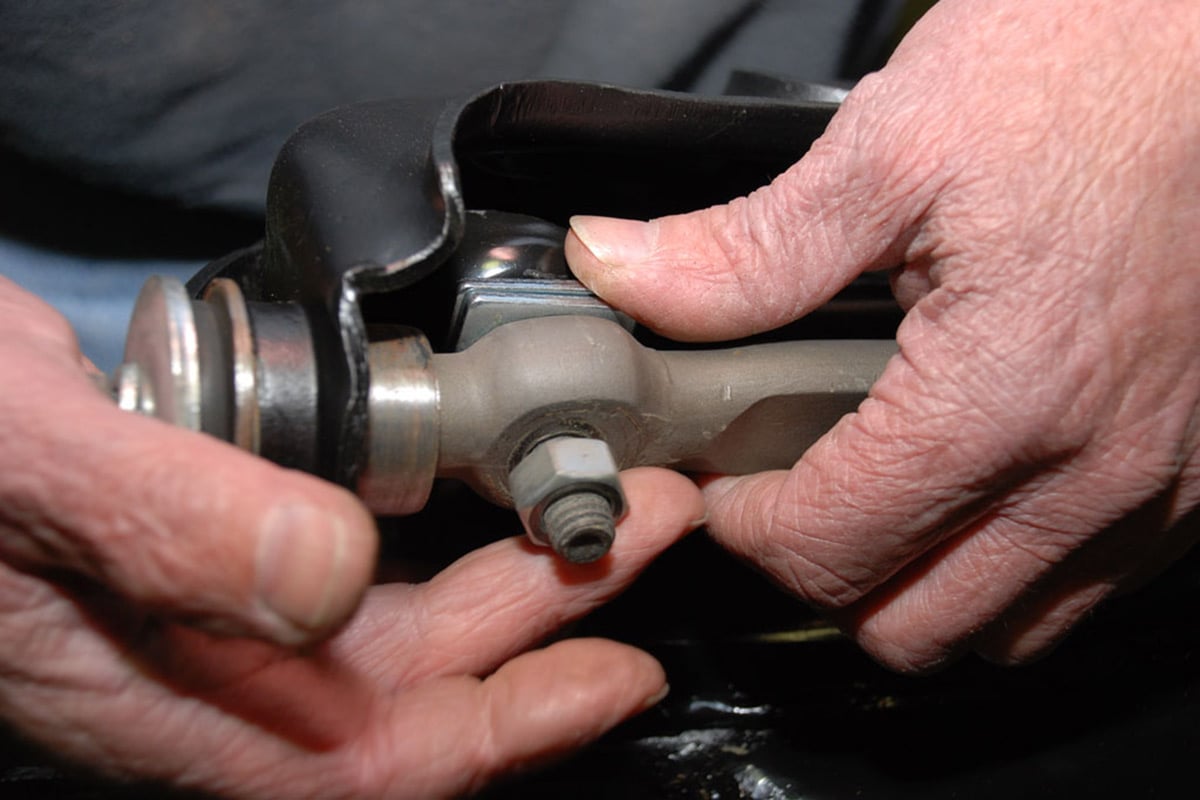
Whether you car has a rack-and-pinion steering system installed, or it is still using an older steering gearbox setup, adjusting toe is basically the same. Just loosen a lock nut and rotate an adjuster. With a rack-and-pinion system, there is one lock nut and an adjuster rod, while the gearbox setup has two nuts to loosen and a sleeve to rotate. When making these adjustments, have someone hold the steering wheel centered, or use a rope that is tied around the steering wheel and through the door frame to keep it from moving while measuring and adjusting toe.
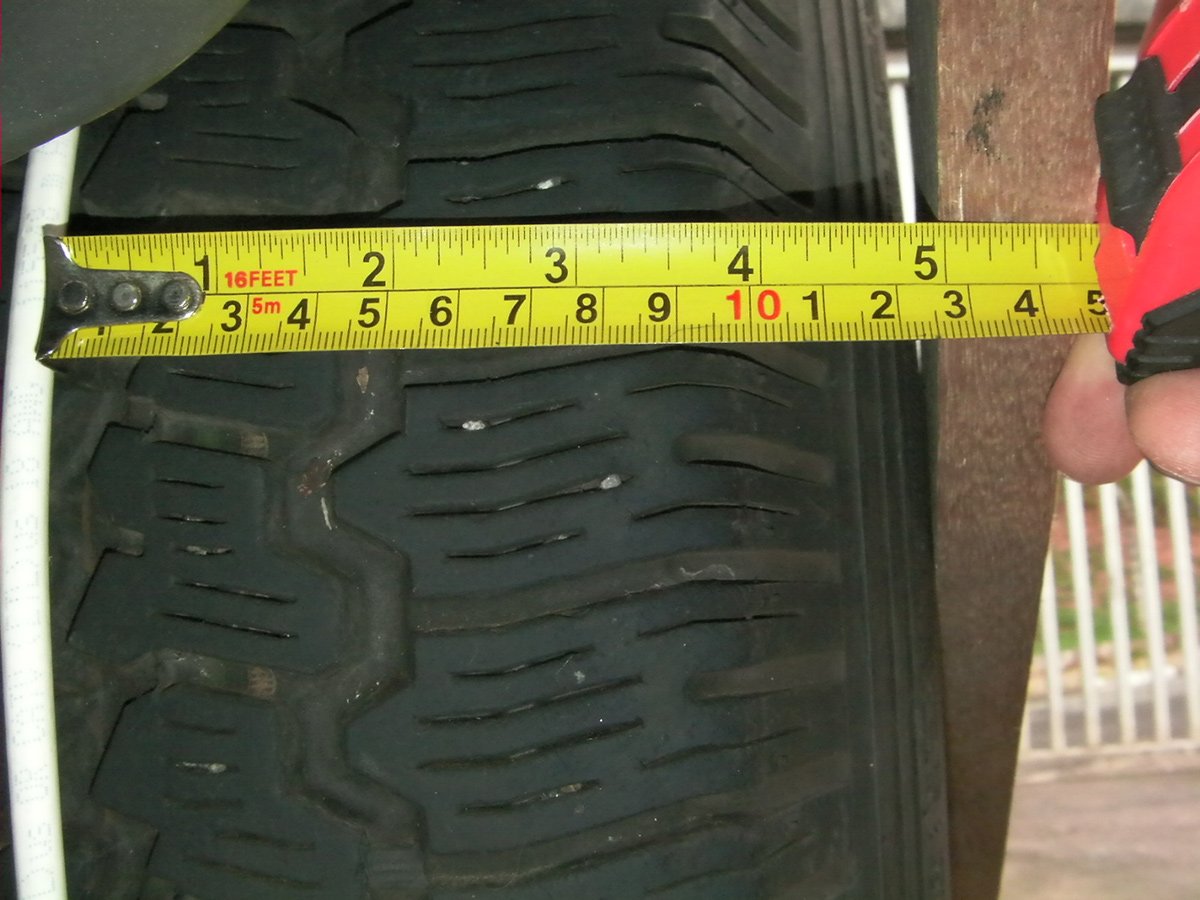
Before adjusting the toe angle, we need to know if an adjustment is actually required. Place the end of a tape measure in the tread just to the outside of the string at the front of the tire and stretch it to the opposite tire and read the distance, let’s say it measures 65 3/16 inches. Next, move to the rear of the tire, and measure to the same spot at the rear of the tire, let’s say we get 65 5/16 inches. You can also measure sidewall to sidewall if that would be easier.

If you’ve got the money, look into buying or possibly renting one of these bubble alignment gauges.
Now, subtract the smaller measurement from the bigger one, which in our example yields a difference of 1/8-inch. Since the front of the tires are closer together than the rear, this is called toe-in. A little toe-in, of up to about 3/16-inch is okay for our purposes. However, let’s presume our measurement was off by 7/16-inch toe-in. You will want to back that off by roughly 1/4-inch.
Adjusting The Toe Angle
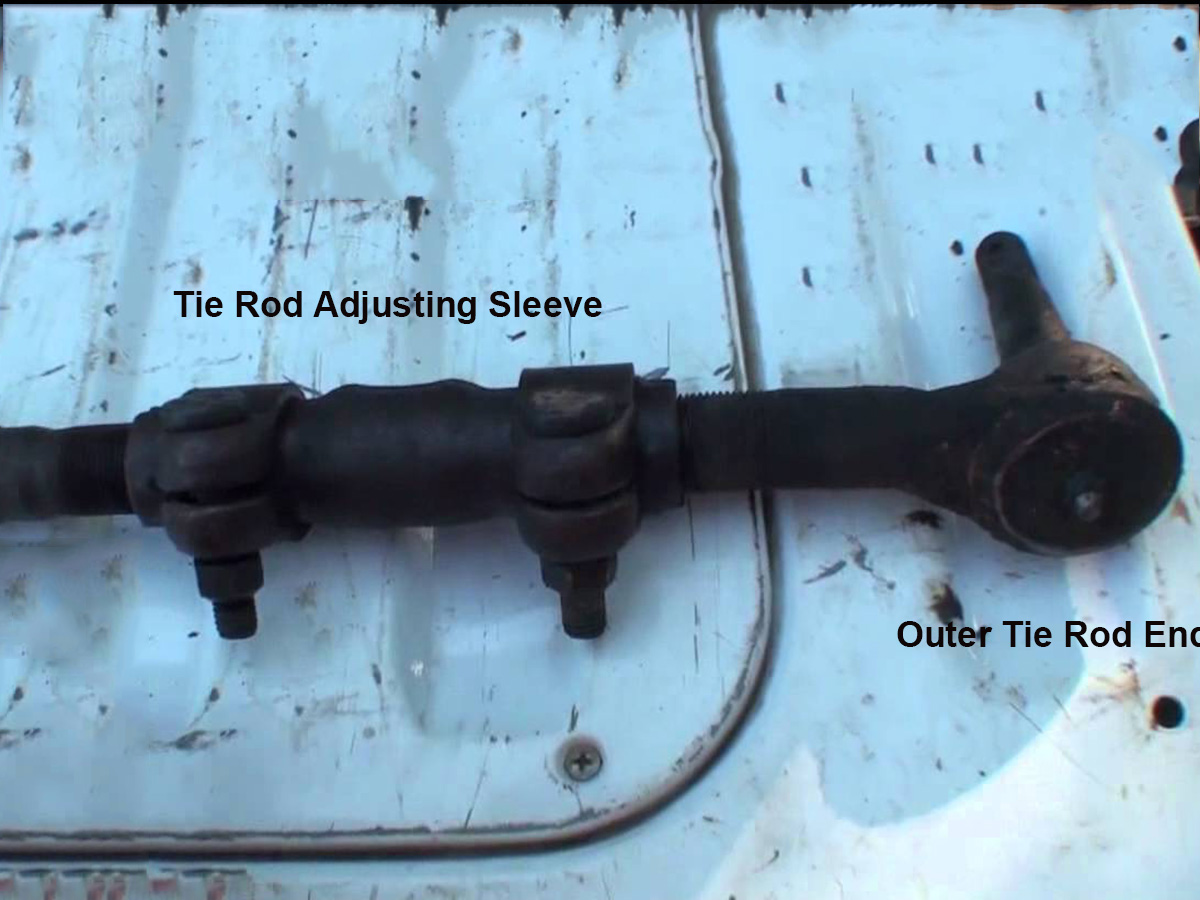
Toe adjustment with a steering gearbox steering is accomplished by loosening these two lock nuts and rotating the sleeve.
If working on a car with rack-and-pinion steering, loosen the lock nut on both outer tie rods. If a gearbox steering is used, loosen both nuts on both adjuster sleeves (right and left). Measure or count the amount of exposed threads and make note. We want to bring the backs of each tire in by about 1/8-inch to bring toe close to spec.

Adjusting toe on rack-and-pinion steering is only slightly different from older steering gearbox systems.
As you rotate the adjuster, keep an eye on how many threads are exposed. Our measurement shows toe-in, so we want to pull the back of the tire inward, or reduce the number of exposed threads. Rotate each adjuster one full turn and then bounce on the suspension. Measure again and repeat until you’ve moved the toe to the required amount. Remember, there is an adjusting collar on both sides of the car, so both collars need to be adjusted equally. This is done by splitting the measurement distance in half, and moving each adjuster just enough to move half of the required distance.
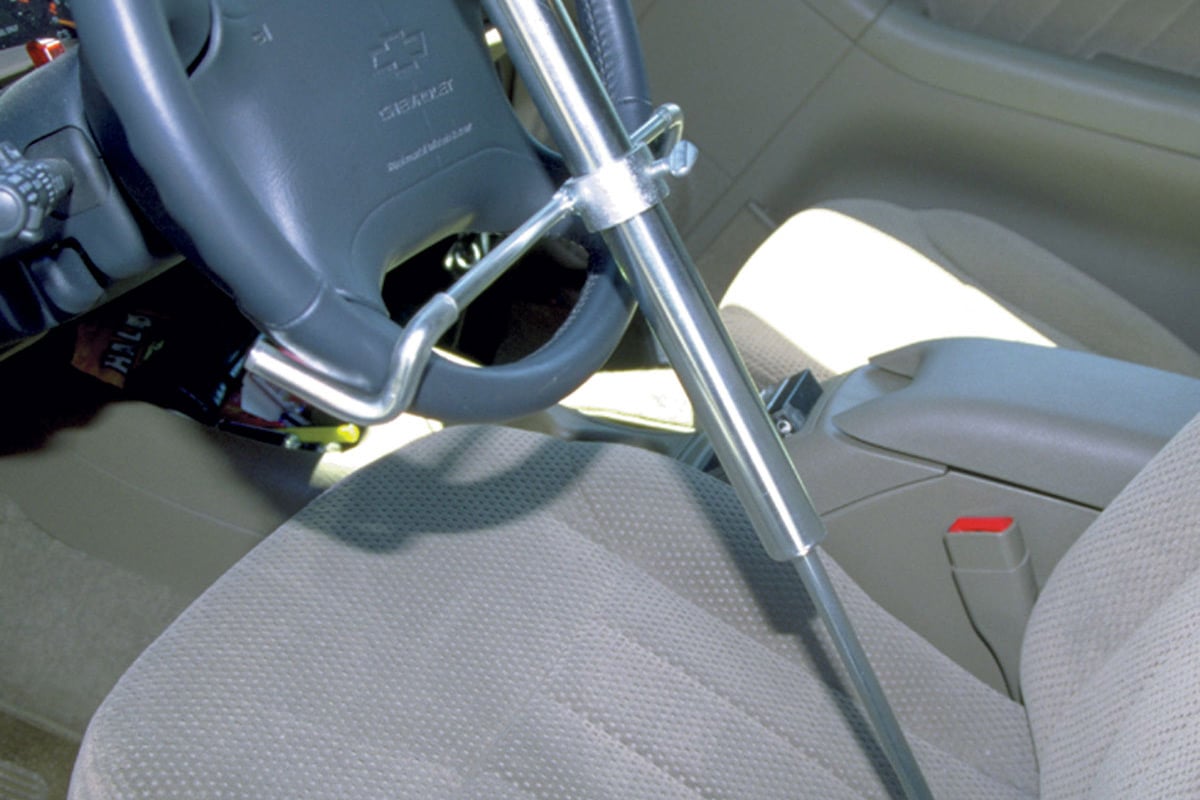
This is a steering wheel lock. It keeps the steering wheel from turning while adjusting toe. If you don’t have one of these, a bungee cord or rope can be used to secure the steering wheel.
In all honesty, if you follow these directions and get your toe measurement to within a few degrees, camber to within a degree of spec, and tighten everything properly, you shouldn’t have to worry about ruining your tires or new suspension components while driving to the local alignment shop. Alignment issues start to show up after a couple of hundred miles. Tread wear patterns become irreversible after about 500 miles. Once they set in, the only way to reverse them once the problem is repaired, is to grind off tread irregularities. This, of course, reduces the tread life significantly.


