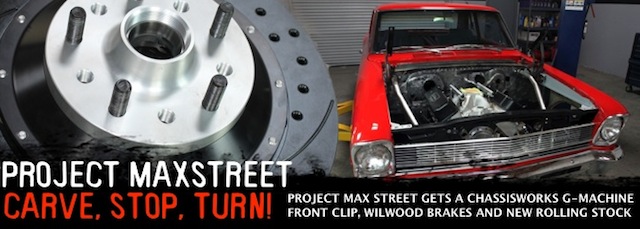
In our first installment of our project ’66 Chevrolet Chevy II Nova, we went all out and sprung for the Chris Alston Chassisworks Bolt-On A-Arm Clip. This complete and comprehensive system allows Chevy II owners the luxury of completely replacing their factory front clip with this lightweight, structurally-superior, technologically-advanced sub frame system. While we touched on several aspects of the comprehensive g-Machine package previously, we wanted to revisit a handful of key components in greater detail just to emphasize how stellar this bolt-on application truly is. When we’re done with this ’66 Chevy Duece, she’s gonna haul the mail and carve corners like a car 45 years younger.
Christened “Max Street,” the potential of this project Nova II is edging towards limitless street domination. With a blow-through-carbureted 555ci big block Chevy backed with a TCI 6X six-gear overdrive transmission, and a ridiculously cool four-link and rear end, this little ol’ shoebox will be putting down close to 900 horsepower to the asphalt. The purpose of this build is edging more toward Sir Edmond Hillary’s reasoning for climbing Mount Everest, “Because it’s there.” Why build a Nova to do what this one will? Because we think we can…
Our g-Machine front set up consisted of the following:
• Chassisworks g-Machine Subframe (PN: 7700)
• Chassisworks g-Machine A-Arms (PN: 6152 & 6153)
• Chassisworks g-Machine Swap Bar (PN: 6154)
• Chassisworks g-Machine Power Rack and Pinion w/Billet Rack Mounts (PN: 6140-215-1)
• Chassisworks g-Machine Spindles (PN:6186)
• Chassisworks Brake Hubs (PN: 8320)
• Wilwood SRP Drilled and slotted Performance Brake rotors (PN: 160-7172-BK & 160-7173-BK)
• Wilwood Billet Narrow Superlite 6 radial mount calipers (PN: 160-8000-RS & 120-8001-RS)
• Wilwood BP-20 Street Performance brake pads for Superlite calipers (PN: 150-9415K)
[/LIST]
A-ARM WRESTLING
As the underlying theme of this portion of our car build is get this little red shoebox to handle like its riding on rails, and thereby reducing as much body roll and exerted energy as possible, the geometry of our suspension was tantamount to our project’s success. In reducing our Nova’s body roll or “load transfer” during cornering, acceleration and braking, we had a couple factors working in our favor:
• The Nova’s short wheelbase and track width provides a nimble platform to start from.
• Second, its light body mass would only be lighter after we were finished modifying it, improving its already stellar power-to-weight ratio.
• Our Forgeline wheels, Chassisworks suspension and low profile tires would drop our Nova’s center of gravity substantially.
• The gobs of acceleration that our 555ci ProCharger-supercharged plant would pull the lightweight Nova “out of the hole.”

Installation of our upper and lower control arms was a cinch. The Chris Alston front end kit allow for easy access.
Chassisworks’ front suspension strives to reduce as many of the factors that exaggerate weight transfer in handling by improving:
• “Vehicle roll center” or the point at which cornering forces in the suspension are reacted to the vehicle body.
• “Anti-roll bar stiffness” or how much transferred force is applied to the opposite track.
• “Kinematic design” or quantity of contact points of the suspension linkage[/LIST]
Chassisworks designed the g-Machine sub frame (part number 917700) to accept their new g-Machine Control Arms with these mathematical matters forefront in mind. Specifically-designed to withstand the increased forces imposed by hard cornering and severe braking, Chassisworks’ upper and lower control arms (part numbers 916152 and 916153, respectively) were drafted with maximum rigidity and durability in mind by using the best materials and components available including high-grade mild steel tubing and stainless steel mounting hardware.
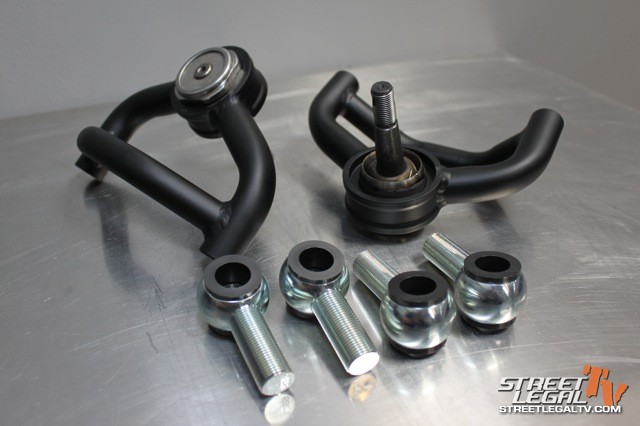
Chassisworks' tubular upper A-arms (part number 916153) are deceptively advanced. Gone are the old "press-in" ball joints; rather, these ball joints are similar to Chrysler's thread in-style, which are significantly stronger to duress and less likely to slip or misalign. Two CNC'ed eyebolts are fabricated for each kit.
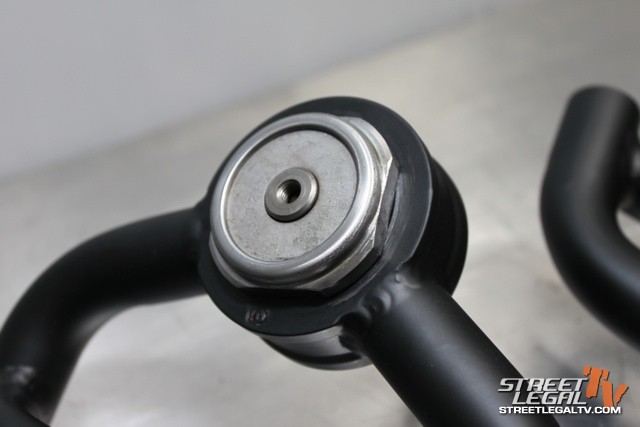
Each A-arm is also marked with a “D” or “P” for Driver or Passenger side, embossed on the balljoint housing. “The g-Machine arms were specifically designed to handle the increased cornering and braking forces that modern Pro-Touring and open-track cars are capable of generating,” says Chassisworks.
Key characteristics of the Chassisworks lower A-arms are their sizing; the wide lower control arm size increases its load capacity and stability during hard braking and cornering while their longer length reduces track-width change and roll-center movement during suspension travel for “smoother transitions entering and exiting turns.”

Additionally, their lower shock mount is located right next to the balljoint for a better shock-motion ratio. This allows the use of lighter, lower-rate springs for improved suspension control without degrading ride quality. The upper arms’ are equally as advanced, including the same optimal geometry-centric attributes.
Before mounting our A-arms, they needed to be fully assembled first. While the lower A-arms come from Chassisworks with the bushings already installed, we needed to install the balljoints on both the upper and lower control arms. Chassisworks suggests installing the rubber balljoint boot before the balljoint itself, due to the boot’s tight fit and likelihood of tearing if trying to install afterward. The boot’s outer lip needs to fit snuggly all the way around the edge of the balljoint housing. Once completed, apply a thin layer of anti-seize on the balljoint’s threads before hand-threading it in to the A-arm housing. With our balljoints snug on the control arms, we used our supplied balljoint tool to tighten them down. Chassisworks recommends tightening the balljoint down to over 150 lbs. ft. of torque, until it is fully seated.
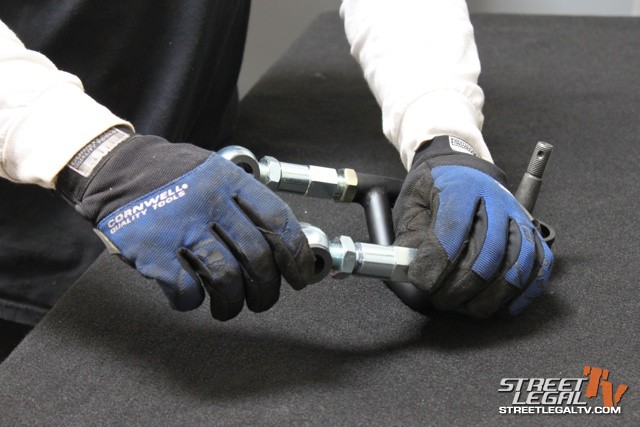
Before finally installing the rod ends, we threaded on the jam nut until there was roughly 1 1/16-inches of thread left, just to provide us a baseline for alignment. Next, we applied some anti-seize to the threads and tightened the rod ends down, as well as the ball joint (making sure to install by hand first, then with the wrench).
Chassisworks’ upper A-arms feature billet rod ends. Incorporating rubber-inserted eyebolts, the rod ends connect to the A-arm via a adjustable coupler. This provides even further alignment tuning. Chassisworks’ instructions instruct chasing all of the A-arms’ threads with a 5/8-18 tap just to clear out any debris in the threads that might have collected during the manufacturing process. This is a safety step, of course, but when dealing with high performance suspension, it’s the little things that count.

When completed, the Chassisworks front suspension kit provided substantially-improved front end geometry. Larger mounts with improved axis angles working with coil over springs (see previous article, here) removed the guesswork and structural flaws of the stock unibody front clip.
With our Chassisworks A-arms ready to roll, we carefully chased the threads on the upper and lower control mounts on the new frame. You read that right, the Chassisworks A-arms mate to a threaded pivot stud; this ensures the maximum in durability and security. An Allen T-wrench tightens everything down with ease. The A-arms are doubly secured with a set screw that locks down the pivot studs. Using a dab of Loctite, the screw is set in place. Now, we’ve already showed how the spindles and rotors went on without a hiccup (making sure to include cotter pins through all of our castle nuts to secure our wheels to the Nova – you’d be surprised how many forget this step!), so now we need to take a closer look at our brakes.
PUTTING ON THE BRAKES
No doubt, since we’re powerTV after all, this Chevy II Nova will be packing plenty of power. With a ProCharger blowing gobs of boost down the throat of our big block Chevy 555, we’re sure to see this Nova vanish in a streak of cherry red down the street. But, since breaking the sound barrier down a straight line is only a small portion of this build’s ultimate goal, we knew we needed to get this ’66 deuce to come to a halt just as quick. Besides running a parachute, there’s really no better way to bring a car to stop than multi-piston caliper disc brakes. Since caliper brakes employ dual-sided friction to convert the vehicle’s kinetic energy into heat on a wheel-mounted rotor, it’s imperative to shed that heat as fluidly as possible.
Heat, nearly more than any other factor, is the greatest detractor to brake function. As your vehicle’s kinetic energy (read: energy of motion) increases, so does the distance required to bring that vehicle to a complete stop, multiplying upwards to 100-times! Factor in a high or low wind drag and poorly operating brakes, and you could have the makings of a small disaster. While upgrading your brakes won’t help your vehicle’s aerodynamics, they will greatly affect your stopping prowess.
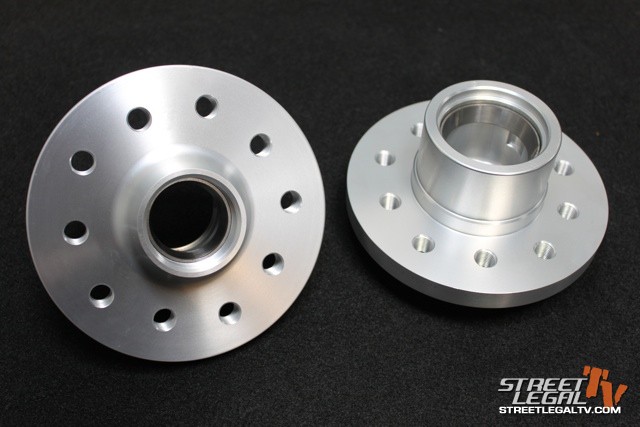
Chassisworks fabricates these gorgeous billet aluminum wheel hubs (part number 8320) work with Wilwood's Superlite and SRP Drilled Performance disc brake kits and are sturdy and lightweight.
Chassisworks’ Chris Alston recommends Wilwood rotors and calipers for his g-Machine Chevy II front clip kit to the point of selling them as optional equipment. The Chassisworks kit includes billet aluminum hubs that come with threaded stud-mounting holes for both 4 1/2 and 4 3/4-inch bolt patterns. Again, chasing the threads with a tap (1/2-20) is recommended, as these are CNC-machined. The Chassisworks hubs (part number 8320) mate beautifully to the Wilwood SRP Drilled Performance Rotor suggested for the g-Machine package. The SRPs are ideal for this application as each rotor is directionally cross drilled and slotted. These features shed heat faster than solid rotors which have a tendency to “soak” or retain heat, causing “brake fade” or a loss of surface tactility, hindering pad contact.
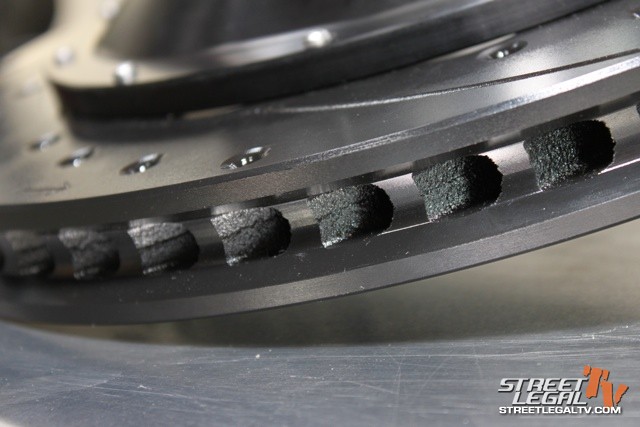
Wilwood's SRP drilled and slotted rotors feature these convex blades which shed brake pad dust and dissipate heat faster than solid or single-blade rotors.
“The rotors used in the Alston system where specifically matched to [the g-Machine] system,” explained Michael Hamrick from Wilwood. It’s only recently that aftermarket and some higher performance factory vehicles have featured hub-mounted, removable rotors. This is another example of racing influencing everyday life. Without having to removed the complete hub from the spindle, pit crews could interchange rotors during stops if so needed, especially if rotors were warped or distorted from excessive heating and cooling. Bringing out our trusty Loctite, we whetted the stud threads and tightened down the 2 1/4-inch 12-point bolts; obviously a longer wheel stud is needed for thicker wheels or to satisfy certain racing regulations, so 3-inch-long studs are available from Chassisworks. With the hubs married to the rotors, it was time to press in our inner wheel bearings and seals.
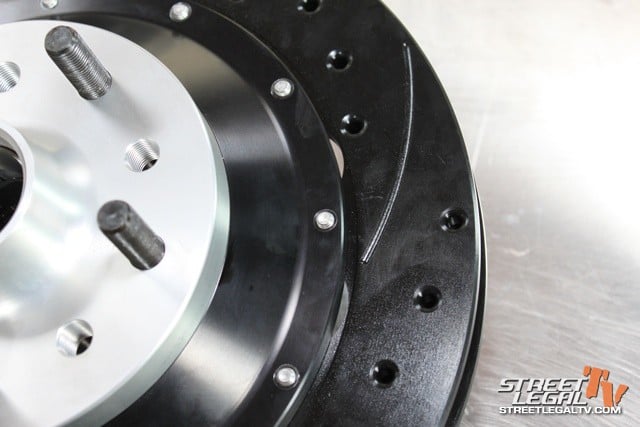
With the hub mated to the rotor, we can see how the two piece composite system makes for an easier setup, especially when it comes to quick brake changes and/or repairs (although, we're not expecting any).
Thankfully, the bearing races are pressed into the billet hub from Chassisworks. The wheel bearing, though, needs to be packed with grease before installation. Properly hand-packing bearings is messy (grab a handful and start pressing! – Ed.), but needs to be done. With the bearing packed, set it in the bearing race. Next, place the hub on a soft, flat surface (i.e. a wood work bench). Using a hammer and a seal installer, pound the seal into the hub, fully seating it. This step is imperative. Not seating the bearing can cause excessive unnecessary wear and eventual damage to the hub and spindle or worse.
Remember, before installing the hubs to the spindles (part number 916186), Wilwood’s rotors are directional, designed to evacuate heat away from the disc and rotor as quickly as possible. Since we didn’t want to wash our hands twice, we packed the outer bearings the same time as the inner bearings.

With our hub on the spindle, we inserted the bearing, hand-tightened the castle nut down (approximately 25 lbs. of torque) and backed it off to snug. Next went in the cotter pin and dust cap. With our rotors spinning freely on their spindles, we knew it was time for the calipers.
Providing the clamping power for the front brakes is Wilwood’s Billet Narrow Superlite 6R Radial Mount 6-piston Caliper. Each caliper features six Termlock pistons, a multi-part collaborative piston design that aids in creating a “thermal barrier” between the caliper body and the pads, which equals extended service life of the pad and less “brake fade” associated with the duress of performance braking.
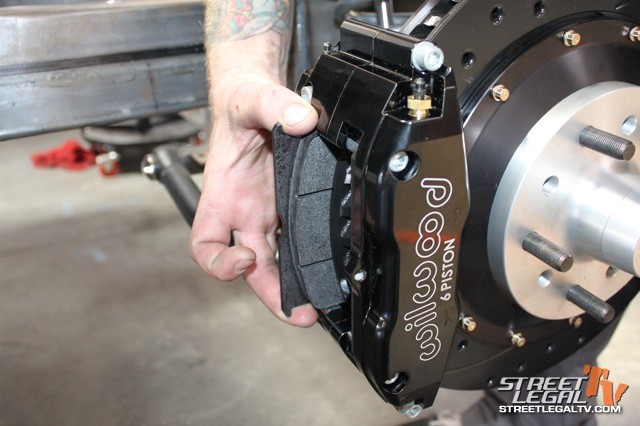
Servicing the SuperLite 6R calipers is made easy by its five bridge bolts, allowing for quick brake pads exchanges. Without removing the calipers from their mount, the Wilwood BP-20 Street Performance brake pads for Superlite calipers (PN: 150-9415K) are effortlessly extracted from between the caliper and rotor. And since the five bridge bolts allow for extensive brake adjustment, our “Max Street” Nova can be all the more tuned.
ROLLING STOCK
Using the provided 3/8-16 x1 3/8 socket head allen screws, lock washers and flat washers, we mounted the caliper to the spindle. A good rule of thumb is to roll the rotor back and forth to check for any clearance issues. Investigating further, we mounted our Nova’s big 17-inch Billet Specialties wheels. With more than the suggested minimum 1/4-inch of clearance, we were satisfied. “The size of this caliper lends it to be used in tight fit applications normally associated with big brake conversions,” says Wilwood’s Hamrick. We wholeheartedly agree.
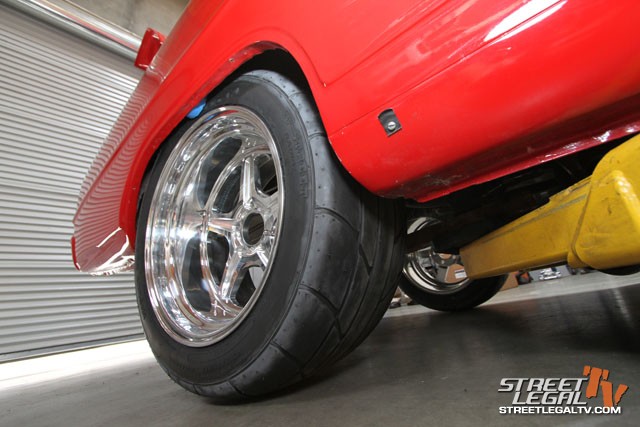
Our Billet Specialties Street Lites tucked up nicely into our recently-installed mini-tubs. If you didn't get to read up on their easy installation, make sure you hope over here to check it out!
The Billet Specialties Street Lite wheels were specifically designed for our Nova with a unique design specific to our ride. “We made sure the wheel works with both mag shank lug nuts (common for street type use) and 5/8-inch studs (race type). The benefit of this is if you do upgrade to a set of say, Strange or Mark Williams axles with 5/8-inch studs, you do not have to drill or buy new wheels,” explained Scott Sandoval from Billet Specialties. “We use 6061-T6 rotary forged aluminum center for strength and weight savings, plus, 6061 polishes to a higher shine and is easier to maintain. Light weight equals faster acceleration. This is a lightweight race wheel strong enough for everyday street use.”
While 15-inch rims are the gold standard for classic muscle cars, we opted to go a little taller at 17-inches. And since the Chevy II was destined for maintaining apt road manners with hard acceleration greatness, we went with 8-inch wide wheels in front and a cement roller-wide 11-inches in the rear, which eventually required us to install a set of prefabricated mini-tubs. The Street Lites were wrapped in Hancook 225/45/ZR17 94Y XL Ventus V12 EVOs (that’s a mouthful!) and broad 315/35/R17 Mickey Thompson ET street radials in the tail.

With our new Chris Alston's Chassisworks front end complete and our Nova II fitted with some serious rolling stock, we plopped our wicked 555ci big block Chevy between the frame rails. Make sure to stay tuned to progress on Project Max Street here!
CONCLUSION
We’re still a ways away from getting out on the tarmac and seeing how this fiery red Chevy II will do in the slalom and on the skidpad, but we’re certain that we’re properly equipped for whatever come our way. Preparing for the worst and expecting the best, our Nova has the right suspension, hardware, brakes and wheels and tires to ensure sharp, precision cornering, secure, hard braking, and glued to the floor traction. Completely replacing our 44-year-old factory front clip with Chris Alston’s Chevy II g-Machine Subframe System saved us some weight while drastically improving front end rigidity, suspension geometry and durability. In other words, our Chassisworks front end kit literally transformed our stock unibody into a true street/strip machine and that’s exactly the point.


